

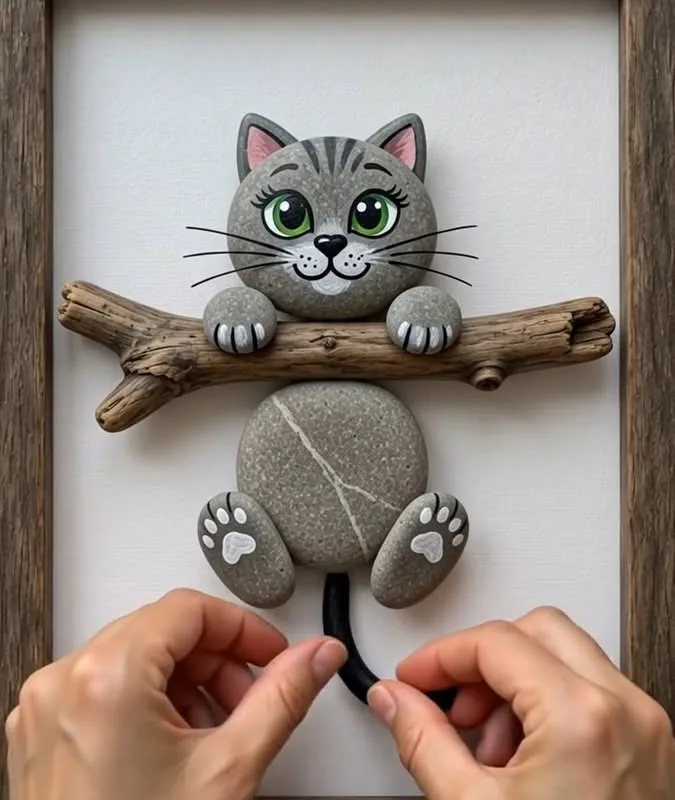
That 588K-view pebble cat video makes it look effortless — three stones, a flick of paint, done. Here's the honest version: which stones to pick, how to glue them so the ears don't slide off, and the small tricks that turn a wonky pile of rocks into a cat you'd actually display.
Advertisements1
- Use a 3:2:1 collecting ratio — three body stones, two heads, one ear pair — so you have real options when you sit down.
- Glue in two stages: body to head first, full cure, then ears. Simultaneous assembly is why ears slide off.
- Tilt ears about 20 degrees outward and place them slightly forward for an unmistakable cat silhouette.
- Paint fewer marks than you think — two dot eyes and a nose read better than a full face on a 3 cm stone.
- Seal with two thin coats of matte varnish; one thick coat dries cloudy in the stone's texture.
- Matte, water-worn pebbles hold paint and glue far better than glassy or polished stones.
Why Pebble Cats Are the Perfect First Stone Art Project
A pebble cat is basically a puzzle with four pieces: one oval body, one round head, two tiny triangles for ears. That's it. You don't need drawing skills, you don't need a kiln, and you don't need to spend £40 on supplies before you know if you even like the hobby. The whole thing fits in the palm of your hand, which means mistakes cost you about ninety seconds, not an entire afternoon.
The reason this format works so well for beginners is that the stones do the hard work. Nature has already drawn the cat's back curve, the cheek roundness, the pointy ear. Your job is mostly selection and assembly — you're casting a play, not writing the script. That's a much gentler entry point than freehand painting, where a shaky line is instantly visible. Here, a slightly crooked ear just reads as personality.
I've watched dozens of beginners try this on a kitchen table, and the ones who succeed all share one habit: they lay out all the stones loose before touching any glue. Do that first. It sounds obvious, and it's the single biggest difference between a charming cat and a frustrating mess.
Choosing Your Stones: The 3:2:1 Rule That Saves Hours
Here's the ratio I use and recommend to anyone starting out: for every three body-sized stones you collect, gather two head-sized ones and one ear-sized pair. That 3:2:1 approach means you'll have real options when you sit down to assemble, instead of one sad pebble that almost works. A typical finished cat uses a body stone around 4–6 cm long, a head around 2.5–3.5 cm, and ears under 1.5 cm.
Flatter is better than rounder. A body stone with one relatively flat face gives the cat a stable base and lets you glue the head flush against it. Beach pebbles worn smooth by water are ideal; chunky gravel from a garden path tends to be too irregular and the joins fail. If you're collecting, look for stones that feel slightly matte rather than glassy — paint and glue grip matte surfaces far better than polished ones.
Colour matters less than you'd think, because most pebble cat designs paint over the stone anyway. But if you want the natural-stone look, aim for two or three tones in the same family — greys, warm tans, or slate blues — so the finished piece reads as one object rather than a random handful. Wash everything in warm soapy water and let it dry fully for at least an hour before you start. Glue will not bond to damp stone, and that's the number one reason ears fall off overnight.
The Assembly Order That Stops Ears Sliding Off
Most failed pebble cats fail at the ears. The instinct is to glue body, head, and ears all at once and hold the whole thing together like a rock sandwich. Don't. Work in two stages with a real gap between them: body to head first, let it cure fully, then attach the ears to the head.
For the body-to-head join, use a strong craft adhesive — a clear-drying PVA works for display pieces, but a two-part epoxy or a dedicated stone adhesive is what you want if the cat will live outdoors or get handled. Apply a small blob, press for 30 seconds, then prop it upright against something (a mug works) and leave it alone for the full cure time on the packet. Usually that's 24 hours, not the two minutes you feel like waiting.
When you attach the ears, angle them slightly outward rather than straight up. Vertical ears look like a rabbit; ears tilted about 20 degrees from vertical read instantly as a cat. And place them slightly forward on the head, not dead centre — that small offset is what gives the face its expression. Glue one ear, let it set for ten minutes, then do the other, so you're never balancing both at once.
Painting the Face: Fewer Marks, More Cat
The temptation with a blank stone head is to paint a full face — eyes, nose, mouth, whiskers, the lot. Resist it for your first three cats. The most appealing pebble cats in the videos that go viral use a remarkably small number of marks: two dots for eyes, one tiny triangle for the nose, and nothing else. The viewer's brain fills in the rest, and the result looks confident instead of cluttered.
Use a fine brush (size 0 or 00) and acrylic paint, which dries fast and covers stone well. Load the brush lightly — a heavy blob on a 3 cm stone will spread into a puddle and ruin the eye. For the eyes, touch the brush down and lift straight up rather than dragging, which gives you a clean round dot. If you want whiskers, use a fine liner pen or a near-dry brush and draw outward from the nose in a curve, not a straight line.
Here's the part people skip: seal it. Two thin coats of matte acrylic varnish, fully dry between coats, protects the face from chipping and stops the paint looking chalky. Thin coats matter — one thick coat will pool in the stone's texture and dry cloudy.
Display and Mounting Ideas That Look Intentional
A finished pebble cat with no home ends up in a drawer. Decide its purpose before you start, because that changes how you build it. A fridge magnet needs a flat back and a strong magnet glued on before the cat is assembled (so you can press it flat). A framed piece needs the stones glued directly onto a painted board or thick card, not onto glass — glass gives the glue nothing to grip.
My favourite low-effort option is a small shadow box or a plain wooden coaster. Glue the cat down, add a couple of tiny dried flowers or a scattering of sand around the base, and you've got a gift that looks like it came from a shop. For garden display, use exterior-grade adhesive and seal the painted face with an outdoor varnish, then mount the cat on a flat slate or a piece of driftwood rather than leaving it loose on soil where it'll sink.
One practical note: if you're making these with children, skip the epoxy entirely and use tacky glue with a longer setting time, plus a heavy book as a weight. The results are slightly less permanent but the process is far safer and much less stressful for everyone involved.
Common Mistakes and How to Fix Them Fast
The most common failure is glue squeeze-out — a visible ring of adhesive around the join. Fix it by applying less glue than feels right and wiping the seam with a damp cotton bud within the first minute, before it skins over. Once it's dry, you can usually pick it off with a fingernail, but it may lift paint with it.
Second: mismatched stone thickness. If the head is much thicker than the body, the cat looks like it's wearing a helmet. Lay your stones side by side before gluing and check the profile from the side, not just from above. Third: painting before the glue is fully cured. Paint seeps into the seam and dries as a visible line. Wait the full 24 hours.
Finally, don't sand stones unless you have to. Sanding smooths the very texture that makes pebble art charming, and the dust is unpleasant to breathe. If a stone has a sharp edge, a quick rub with a wet emery board on that one spot is plenty.
How to Do It, Step by Step
- 1Wash and fully dry your stones
Scrub in warm soapy water and air-dry for at least an hour. Glue won't bond to damp or dusty stone, which is the top cause of pieces falling apart. - 2Lay out the cat loose before gluing
Arrange body, head, and ears on a flat surface and adjust until the silhouette reads as a cat from above. Commit only once you're happy. - 3Glue body to head and cure fully
Use a small blob of stone or craft adhesive, press 30 seconds, prop upright against a mug, and leave for the full 24-hour cure. - 4Attach ears one at a time, tilted outward
Glue one ear about 20 degrees off vertical and slightly forward on the head. Wait ten minutes, then attach the second. - 5Paint a minimal face with a size 0 brush
Two dot eyes and a small triangle nose. Touch the brush down and lift straight up for clean dots instead of dragging. - 6Seal with two thin coats of matte varnish
Let each coat dry completely. Thin coats prevent cloudiness and protect the face from chipping. - 7Mount with a purpose in mind
Glue to a coaster, board, or magnet backing before assembly if you want a flat finish. Use exterior adhesive and varnish for garden pieces.
The stones have already drawn the cat — your job is selection and assembly, not drawing skill.
Frequently Asked Questions
What kind of glue is best for pebble art?
A dedicated stone or two-part epoxy adhesive gives the strongest, most permanent bond, especially for outdoor pieces. For indoor display or kid-friendly projects, clear-drying PVA or tacky glue works well as long as you allow the full cure time.
How long should I wait before painting a pebble cat?
Wait a full 24 hours after the final glue-up before painting. Painting too soon lets paint seep into the wet seam and dry as a visible line, and it can also weaken the bond.
Where can I find good stones for pebble art?
Beaches, riverbanks, and garden gravel beds are the best sources for smooth, water-worn pebbles. Look for matte rather than glassy surfaces, and always check local rules before removing stones from protected areas.
Can pebble art be displayed outdoors?
Yes, if you use exterior-grade adhesive and an outdoor varnish over the painted face. Mount the piece on flat slate or driftwood rather than leaving it loose on soil, where it will sink and discolour.
How do I stop paint from chipping off stones?
Apply two thin coats of matte acrylic varnish, letting each coat dry fully. Sealing also stops the paint looking chalky, which is common on unsealed porous stone.

Priya explores creative writing prompts and storytelling techniques for aspiring authors. She shares exercises to spark imagination and build narrative confidence, drawn from her own writing practice.


