

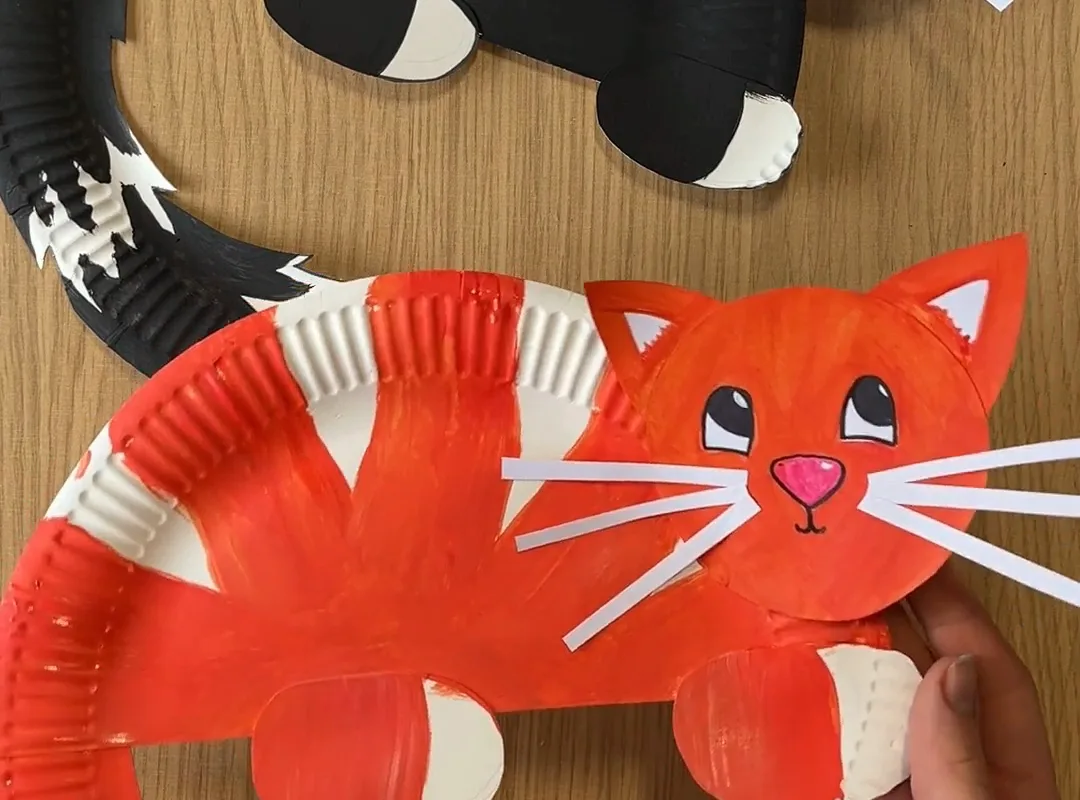
A paper plate cat is one of those rare crafts that looks impressive on a Pinterest board and still works at the kitchen table on a rainy Tuesday. I've made dozens of them with kids aged three to nine, and the difference between a lopsided blob and a cat with real personality comes down to a handful of small choices. Here's what I've learned.
Advertisements1
- A rigid 9-inch coated plate holds shape far better than thin 6-inch plates.
- Triangle ears with folded glue tabs are the single biggest visual upgrade.
- Two colors with one accent look intentional; five colors look chaotic.
- Pipe-cleaner whiskers threaded through the plate outlast glued-on yarn or paper.
- Backing the cat with a second plate keeps it intact through handling and display.
- Pausing to admire the finished work teaches children to value the process.
Start with the right plate (it matters more than you think)
Not all paper plates are created equal. The thin, floppy 6-inch plates from the dollar store buckle the moment you glue on ears, and the rim crushes inward when a small hand grips it. Reach for a 9-inch coated plate with a rigid rim — the kind sold in 100-count packs at warehouse stores — and your cat will hold its shape through glue, paint, and a week on the fridge door.
If you're making a cat face rather than a full-body cat, flip the plate so the rim faces away from you. The smooth center becomes the face, and the rim gives you a natural border to paint or wrap yarn around. I learned this the hard way after a batch of cats with glue pooling in the rim's grooves.
One small mindfulness prompt before you begin: hold the plate in both hands and notice its weight and texture. It sounds silly, but slowing down for ten seconds helps you model patience for the child beside you — and that patience is what keeps the craft from turning into a race.
Ears: triangles, not semicircles
The single biggest upgrade to any paper plate cat is the ear shape. A semicircle glued to the top of the plate reads as a bear or a mouse. A triangle — roughly 2 inches at the base and 2.5 inches tall — reads unmistakably as a cat. Cut two identical triangles from a second plate so the color and thickness match, then fold the bottom quarter-inch of each triangle under to create a glue tab. That tab gives you a flat surface to attach to the plate, and the ear stays upright instead of drooping.
Position the ears about 1.5 inches apart at the top center. Closer than that and the cat looks angry; farther apart and it looks surprised. Both are charming, honestly — but decide which expression you want before the glue sets.
Have you ever noticed how a real cat's ears swivel independently? If you're making this with an older child, use a brass fastener through the ear tab instead of glue so the ears can actually turn. It's a five-minute change that turns a flat craft into a toy.
Eyes and nose: restraint wins
The temptation is to add huge googly eyes, a pink pom-pom nose, and drawn whiskers all at once. Resist for a moment. The cats I've seen children love longest are the ones with simple, well-placed features: two almond-shaped eyes cut from black cardstock, positioned about one-third of the way down the plate, and a small triangle nose centered below them.
Almond eyes — pointed at the outer corners — read as feline. Circles read as owl. If you're using googly eyes, choose the 10mm size and glue them with a dab of tacky glue rather than school glue; school glue slides on the coated surface and your cat ends up cross-eyed by morning.
For the nose, a 1-inch triangle of pink felt is softer than paper and gives a nice tactile contrast. Place it so the top edge sits about a half-inch below the eyes. Then — and this is the part people skip — add a thin line from the nose down to the mouth with a fine-tip marker. That single line is what makes the face feel finished.
Whiskers that survive the car ride home
Pipe cleaners are the gold standard for whiskers because they hold a curve and don't snap. Cut each 12-inch pipe cleaner into three 4-inch pieces, and you'll get six whiskers from two pipe cleaners. Poke each one through the plate with a pencil tip first, then bend a tiny hook on the back and tape it down. Gluing whiskers flat to the front looks fine for a photo but peels off within a day.
If you don't have pipe cleaners, cut thin strips of cardstock about 1/8 inch wide and 3 inches long. They're stiffer than yarn and won't tangle, which matters if several children are crafting at once.
Here's a question worth asking yourself: does the cat need whiskers at all? Some of the most striking versions I've seen use a single line of stitching or a row of small dots instead. Fewer pieces mean fewer things to fall off — and a calmer craft session.
Color and texture: one bold choice, not five
A paper plate cat painted in five colors looks busy; one painted in a single bold color with one accent looks intentional. My favorite combination is a solid charcoal or ginger body with a cream muzzle — two colors, maximum impact. Acrylic craft paint covers the coated plate surface far better than tempera, which beads up and dries chalky. Two thin coats with a five-minute dry between them beat one thick coat every time.
Texture is where you can add real delight. A few short strokes of a stiff brush in a slightly darker shade suggest fur without any drawing skill. A small heart-shaped patch of felt on one ear adds a detail that children notice and adults compliment.
Before you add anything else, pause and look at your cat from arm's length. Ask: what is the one thing my eye goes to first? If the answer isn't the face, something else is competing. That's your cue to simplify, not add.
Finishing and display: the details that make it last
A finished paper plate cat needs a backing if it's going to be handled. Cut a second plate in half and glue it to the back with a glue stick along the rim — this doubles the stiffness and keeps the front from denting. For a hanging cat, punch two holes 3 inches apart near the top rim and thread a 12-inch length of ribbon through, knotting on the back side.
If the cat will live on a shelf rather than a wall, glue a small cardboard triangle to the back as a stand. A 3-inch right triangle works for a 9-inch plate.
And when the craft is done, take one slow breath together and admire the finished cat in silence for a few seconds. It's a small ritual, but it teaches children that making something is worth a moment of quiet appreciation — not just a rush to the next thing.
How to Do It, Step by Step
- 1Choose a rigid 9-inch coated plate
Use a plate with a firm rim so ears and glue don't crush it; thin plates buckle within a day. - 2Cut two triangle ears with glue tabs
Make 2-inch-base triangles from a matching plate and fold a quarter-inch tab at the bottom so ears stand upright. - 3Place ears 1.5 inches apart at the top center
This spacing keeps the face balanced; closer looks angry, wider looks surprised. - 4Add almond eyes one-third down the plate
Pointed outer corners read as feline; use 10mm googly eyes with tacky glue if going that route. - 5Center a 1-inch triangle nose below the eyes
Felt gives a soft texture; add a fine marker line from nose to mouth to finish the face. - 6Thread six pipe-cleaner whiskers through the plate
Cut two pipe cleaners into thirds, poke with a pencil, and tape hooks on the back so they don't peel off. - 7Paint two thin coats of acrylic
Thin coats dry evenly on coated plates; tempera beads up and looks chalky. - 8Back with a second plate and add a hanger or stand
A half-plate backing doubles stiffness; ribbon loops or a cardboard triangle make it display-ready.
The difference between a paper plate blob and a cat with real personality is almost always the ear shape and the spacing of the eyes.
Frequently Asked Questions
What age is a paper plate cat craft suitable for?
It works well for ages three and up with adult help on the cutting, and independently for ages six to nine. Younger children can paint and place features while an adult handles scissors and pipe cleaners.
What can I use instead of pipe cleaners for whiskers?
Thin strips of cardstock about 1/8 inch wide work best as a substitute. They're stiffer than yarn, won't tangle, and hold a straight line better than thread.
How do I make the ears stay up on a paper plate cat?
Fold a quarter-inch tab at the base of each triangle ear and glue that tab to the plate. The flat tab gives the glue a real surface to grip, so the ear stands upright instead of flopping.
What paint works best on paper plates?
Acrylic craft paint covers coated plates best. Apply two thin coats with a few minutes of drying time between them; tempera tends to bead up and dry chalky on the coated surface.
Can I make a paper plate cat without paint?
Yes — colored cardstock, felt, and markers all work. Cut features from colored paper and glue them on, or color the plate with markers and add a felt nose for texture.

Sofia writes about mindful living and personal wellness, exploring habits that nurture mental and physical health. She shares gentle, realistic suggestions for creating calm in a busy world.


