

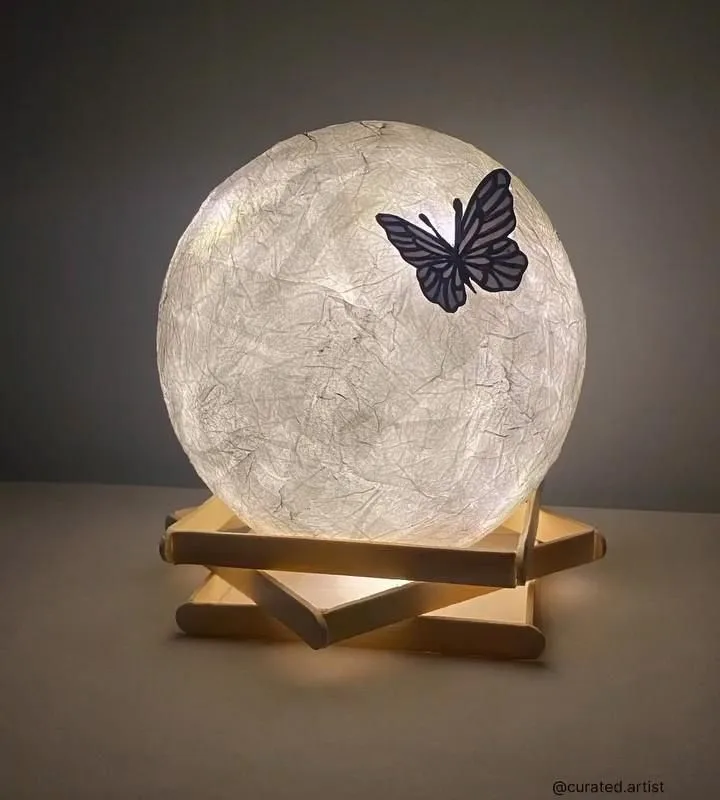
A DIY moon light is one of the few crafts that looks expensive on a shelf but costs under $15 and takes a single evening. These seven hacks are the ones I actually use in my own craft room, each with the exact reason it works and the mistake that ruins it.
Advertisements1
- A 12-inch paper lantern is the fastest and most durable moon base — skip balloons entirely.
- Craters come from texture and shadow, not gray paint; toilet paper and glue do the job for pennies.
- 2700K warm white LEDs make or break the glow — cool white ruins the effect.
- Hang moons at least 12 inches from the wall so the light spreads into a soft halo.
- Matte acrylic sealer makes moons outdoor-safe for a season without dulling the glow.
- Every scrap becomes a moon garland — a 6-foot glowing garland takes 30 minutes.
Start With the Right Sphere: Paper Lanterns Beat Balloons Every Time
A 12-inch white paper lantern ($4-6 at craft stores) is the fastest moon base you can buy. It already holds a round shape, weighs almost nothing, and diffuses light beautifully. Balloons work, but they deflate within a week and the papier-mâché shell cracks as they shrink.
If you want real crater texture, layer torn strips of tissue paper over the lantern with a 50/50 mix of white glue and water. Two thin layers, dried 45 minutes between coats, give you a surface that catches light like a real lunar landscape. Thicker layers turn gummy and sag.
Substitution: no paper lantern? A $2 plastic globe lamp shade from a hardware store works and is sturdier for outdoor use.
Build Craters With Toilet Paper and Glue, Not Paint
Real moon craters are shadows, not color. Roll small balls of toilet paper, dip them in your glue mix, and press them onto the dry lantern surface. Let them set for 20 minutes, then brush a thin coat over the top. Once lit, each bump throws a soft shadow that reads as a crater from across the room.
Aim for 15-25 craters in mixed sizes — roughly 60% small (dime-sized), 30% medium (nickel), 10% large (quarter). Random placement looks more realistic than a pattern. I keep a photo of the full moon on my phone as a reference while placing them.
Substitution: cotton balls work and dry faster, but they absorb more glue, so budget an extra 30 minutes of drying time.
Pick Warm White LEDs at 2700K for That Golden Glow
The single biggest upgrade to any DIY moon light is the bulb, not the craft. A 2700K warm white LED fairy light strand gives you the creamy, slightly golden glow people expect from a moon lamp. Cool white (5000K+) looks clinical and washes out your crater shadows.
Use a battery-operated strand (2×AA or 3×AA) so there are no cords to hide. A 20-light strand at low brightness is plenty for a 12-inch moon — more lights create hot spots where the paper glows unevenly.
Substitution: a remote-controlled color LED puck light lets you switch between warm white and soft blue, which looks great as a nursery night light.
Suspend It With Fishing Line for a Floating Effect
A moon hanging mid-air beats a moon sitting on a shelf. Thread 20-pound clear fishing line through the lantern's top wire loop, tie it off, and hang from a ceiling hook rated for at least 5 pounds. The line disappears against most walls.
For a cluster, hang three moons at 10-inch, 8-inch, and 6-inch diameters at staggered heights — 8 inches apart vertically reads best. Keep them at least 12 inches from the wall so the glow spreads instead of flattening.
Substitution: command hooks work for moons under 1 pound; anything heavier needs a real ceiling anchor.
Seal Outdoor Moons With Matte Acrylic Spray
If your moon is going on a porch or in a garden, one coat of matte acrylic sealer (Krylon Matte Finish, about $8) makes it weather-resistant for a season. Spray in light passes from 10 inches away, 15 minutes between coats, two coats total.
Skip the sealer indoors — it slightly dulls the glow and isn't needed. For outdoor use, also swap to an IP65-rated battery puck light so rain doesn't kill it.
Substitution: Mod Podge Outdoor works and brushes on, though it adds a faint sheen.
Turn Scraps Into a Moon Garland in 30 Minutes
Cut 3-inch circles from white cardstock, punch a hole near the top, and string them on baker's twine with a mini LED fairy light woven through. Space circles 4 inches apart and alternate with small star cutouts. A 6-foot garland takes about 30 minutes and uses up every leftover scrap from your moon project.
Hang it across a headboard or window frame for instant ambiance. Battery pack clips to the end of the twine so you can hide it behind a curtain.
Substitution: coffee filters make lovely translucent moons that glow when backlit by a window.
Photograph Your Moon With One Simple Trick
Turn off the room lights, place the moon on a dark surface, and shoot with your phone's night mode on a tripod or propped against a book. Expose for the moon itself by tapping the screen on its brightest point and dragging the exposure slider down slightly. You'll capture the glow instead of a blown-out white blob.
A single tea light behind the moon (out of frame) adds a subtle rim light. Shoot at dusk with a window in the background for that dreamy indoor look that performs well on Pinterest.
Substitution: no tripod? A stack of books and the 3-second timer works fine.
The Hacks, Step by Step
- 1Gather your supplies
12-inch white paper lantern, white glue, water, tissue paper, toilet paper, 20-light warm white battery fairy lights, fishing line, and matte sealer if going outdoors. Total cost under $15. - 2Mix your glue coat
Stir equal parts white glue and water in a disposable cup. Dip torn tissue strips, squeeze off excess, and lay two thin layers over the lantern, drying 45 minutes between coats. - 3Add craters
Roll 15-25 toilet paper balls in mixed sizes, dip in glue mix, and press onto the dry surface in a random pattern. Reference a moon photo as you go. - 4Seal the surface
Brush one thin coat of glue mix over the craters and let dry fully, about 2 hours, until the surface feels firm and matte. - 5Install the lights
Coil the fairy light strand loosely inside the lantern, spreading lights evenly. Test the glow before closing the top. - 6Hang or display
Thread fishing line through the top loop and hang from a ceiling hook at least 12 inches from the wall. Adjust height until the halo looks even. - 7Photograph and share
Turn off room lights, use night mode, lock exposure on the moon's brightest point, and shoot at dusk for the best glow.
The difference between a craft-store moon and a magical one is almost never the base — it's the bulb temperature and the shadows your texture throws.
Frequently Asked Questions
What is the best material to make a DIY moon light?
A white paper lantern is the best base because it holds its shape permanently and diffuses LED light evenly. Layer tissue paper and glue over it for a textured, cratered surface that looks realistic when lit.
How do I make my moon lamp glow warm instead of white?
Use a 2700K warm white LED fairy light strand or puck light. Cool white bulbs above 5000K wash out the texture and make the moon look clinical rather than cozy.
Can I hang a DIY moon light from the ceiling?
Yes — thread 20-pound clear fishing line through the lantern's top loop and hang from a ceiling hook rated for at least 5 pounds. Keep it 12 inches from the wall so the glow spreads properly.
How long does a DIY moon light take to make?
About 3 hours total including drying time, or 30 minutes for a simple garland version. Most of that is waiting for glue layers to dry between coats.
Can I use a DIY moon light outdoors?
Yes, if you seal it with two light coats of matte acrylic spray and use an IP65-rated battery puck light. Unsealed paper lanterns will sag and warp in humidity within days.


