

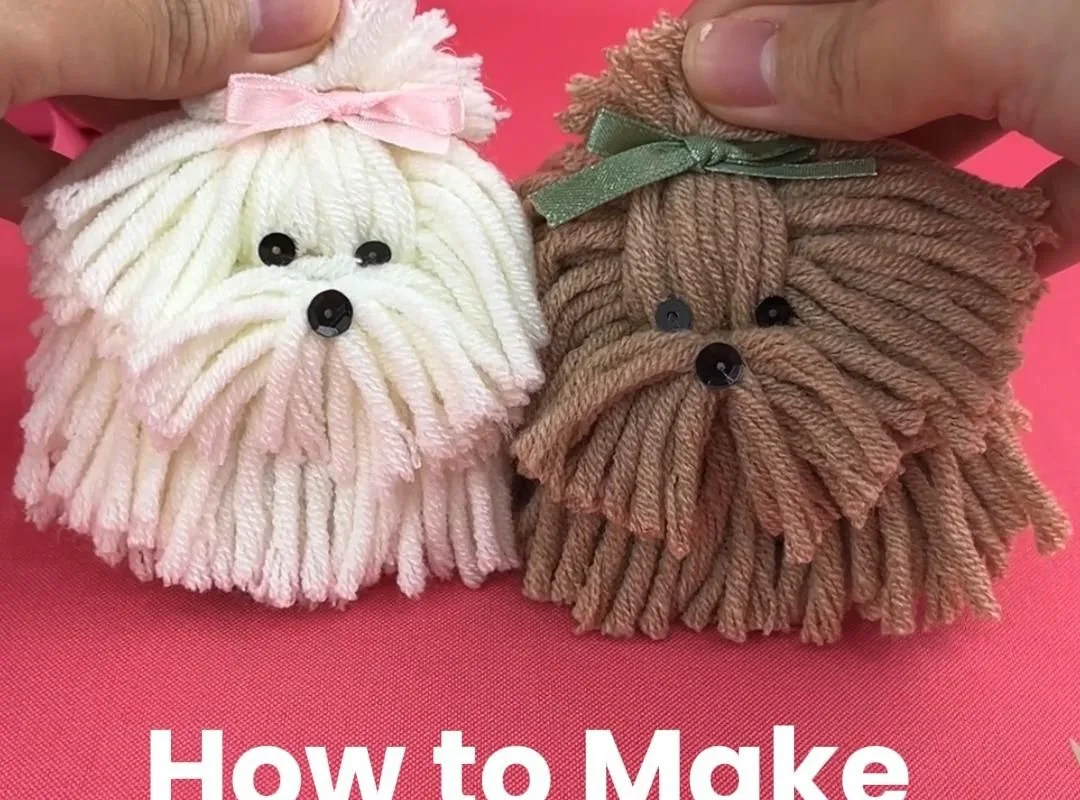
Ever wished you could bottle the joy of a puppy into a craft? With just a skein of yarn, a few simple tools, and 30 minutes, you can create an adorable yarn dog that melts hearts. Let's dive into the fluffy fun!
Advertisements1
- Choose worsted-weight acrylic yarn for durability and vibrant colors.
- Wrap yarn 50 times for the body and 30 times for the head to achieve a fluffy look.
- Trim and fluff your yarn dog to transform it from a fuzzy blob to a realistic pup.
- Use felt for ears, nose, and eyes—it's easy to cut and glue.
- Experiment with different breeds and colors to create a unique yarn dog every time.
Why a Yarn Dog? The Charm of Crafting Canines
There's something irresistible about a handmade puppy—it doesn't shed, doesn't chew shoes, and stays eternally loyal. I remember my first yarn dog, a wobbly little terrier I named Scraps. He sat on my desk, and every time I glanced at him, I smiled. That's the magic you're about to create.
Yarn dogs are perfect for beginners because they require only basic supplies: yarn, scissors, a fork or pom-pom maker, and a bit of felt for ears and nose. Unlike complex amigurumi, which demands crochet skills, this craft uses simple wrapping and tying techniques. You'll have a finished pup in under an hour—no prior experience needed.
Plus, yarn dogs make heartfelt gifts. Imagine a child's face lighting up when they receive a mini puppy that matches their favorite breed. Or a friend going through a tough time, comforted by a soft, squishy companion. The possibilities are as endless as a ball of yarn.
Gather Your Supplies: The Yarn Dog Starter Kit
Before you begin, let's talk supplies. Not all yarn is created equal. For a fluffy, realistic pup, choose a medium-weight (worsted) yarn in the color of your desired breed. Acrylic yarn works well because it's durable and comes in every shade imaginable. If you want a softer touch, try a cotton blend.
You'll also need a pair of sharp scissors, a fork (yes, a regular dining fork!), and a pom-pom maker if you have one. Don't have a pom-pom maker? No problem—a fork or even your fingers will do. For the face, grab some felt sheets in black and pink, and fabric glue. A tapestry needle helps attach the ears securely.
Optional but nice: a small brush or pet slicker brush to fluff the yarn. This gives your dog a furry, realistic texture. And if you want to add a collar, a thin ribbon or a scrap of leather works beautifully.
Step-by-Step: Crafting Your Yarn Dog from Start to Finish
Now, the fun part! We'll break it down into simple steps. First, decide on the size. A small dog (like a Chihuahua) uses about 20 yards of yarn; a larger one (like a Lab) might need 40 yards. Wrap the yarn around a fork (for small) or a book (for larger) about 50 times. The more wraps, the fluffier the body.
Slide the wraps off carefully and tie a separate piece of yarn tightly around the middle to secure. This creates the body. For the head, make a smaller pom-pom using the same technique—about 30 wraps. Tie it off and trim the loops to shape. Don't worry if it looks messy; trimming is where the magic happens.
Attach the head to the body with a few stitches using your tapestry needle and matching thread. Then, cut two small triangles from felt for ears and glue them on. Add a tiny black felt circle for the nose and two small beads or felt dots for eyes. Finally, fluff the yarn with your fingers or a brush to blend the head and body. Voilà—a puppy!
Pro Tips: Making Your Yarn Dog Look Professional
Want your yarn dog to look like it stepped out of a boutique? Here are my hard-earned secrets. First, trim, trim, trim. After assembling, use sharp scissors to even out the fur. Hold the dog against a light to spot uneven areas. A well-trimmed dog looks intentional; an untrimmed one looks like a dust bunny.
Second, use a felting needle to blend colors if you're making a multi-colored breed like a Husky. You can add small amounts of different colored yarn and felt them into the body. This technique, called needle felting, creates smooth transitions. If you don't have a felting needle, you can stitch on patches instead.
Third, pose your dog. Bend the legs (if you added pipe cleaners inside) to sit or stand. A sitting dog looks more lifelike. And don't forget the tail—a small yarn pom-pom attached at the back adds character. Finally, give your dog a name. It sounds silly, but naming it makes you more attached and encourages you to refine the details.
Common Mistakes and How to Avoid Them
Even the most experienced crafters make mistakes. One common issue is using too little yarn, resulting in a scrawny dog. Remember: it's easier to trim excess than to add more. So, err on the side of more wraps. Another mistake is tying the center too loosely. If the yarn isn't secured tightly, the pom-pom will fall apart. Pull that tie as tight as you can without breaking the yarn.
Another pitfall is gluing the face before trimming. Always trim the body first, then attach the features. This way, you can adjust the shape without disturbing the face. Also, avoid using too much glue; it can seep through the yarn and create a crusty mess. A little dab will do.
Lastly, don't rush the fluffing. Take your time to separate the yarn strands and create a soft, even texture. If your dog looks a bit wonky at first, step away for a few minutes and come back with fresh eyes. You'll be surprised how a small adjustment can make a big difference.
Creative Variations: From Classic Pups to Fantasy Dogs
Once you've mastered the basic yarn dog, why not let your imagination run wild? Try making a rainbow dog by using variegated yarn. Or create a fantasy creature like a unicorn dog by adding a tiny horn and a colorful mane. You can also make a mommy dog with a litter of puppies by scaling down the pattern.
For a seasonal twist, craft a Santa Paws with a red hat and a tiny beard. Or a Halloween pup with glow-in-the-dark yarn. The techniques remain the same; only the colors and accessories change. You can even add a small loop to the top to turn your dog into a keychain or ornament.
If you're feeling adventurous, try different breeds. A poodle needs a fluffy, curly texture—use a loop yarn or brush the yarn vigorously. A dachshund requires a longer body, so wrap more yarn around a longer object. The key is to experiment and have fun. There's no wrong way to make a yarn dog, only unique ones.
How to Do It, Step by Step
- 1Choose Your Yarn
Select a worsted-weight acrylic yarn in your desired color. Acrylic is durable and easy to work with. For a fluffy dog, consider a yarn with a halo, like mohair blend. - 2Wrap the Body
Wrap yarn around a fork (for small dogs) or a book (for larger) about 50 times. More wraps equal a fluffier dog. Slide off and tie tightly in the center with a separate piece of yarn. - 3Create the Head
Make a smaller pom-pom using about 30 wraps. Tie off and trim the loops to shape a round head. Leave the center tie long for attaching to the body. - 4Assemble the Dog
Use a tapestry needle and matching thread to stitch the head to the body. Make sure it's secure. Then, fluff the yarn to blend the two parts. - 5Add Facial Features
Cut small triangles from black felt for ears and glue them on. Add a tiny black felt circle for the nose and two small beads for eyes. Use fabric glue sparingly. - 6Trim and Fluff
Use sharp scissors to trim any uneven yarn, shaping the dog's silhouette. Then, use your fingers or a brush to fluff the yarn, giving it a soft, furry appearance. - 7Add Finishing Touches
Attach a small yarn pom-pom for a tail. If desired, add a collar with ribbon. For extra stability, insert pipe cleaners into the legs before attaching.
The best yarn dogs aren't perfect; they're personal. Each wonky ear and uneven fluff tells a story of playful creation.
Frequently Asked Questions
What type of yarn is best for making a yarn dog?
Worsted-weight acrylic yarn is ideal because it's durable, affordable, and comes in many colors. For a softer, fluffier dog, try a mohair or wool blend.
How do I make the yarn dog's ears stand up?
Cut ears from stiff felt and glue them to the head, or insert a small piece of pipe cleaner inside the felt for extra support.
Can I wash my yarn dog if it gets dirty?
Yes, but gently hand wash with mild soap and cold water, then air dry. Avoid machine washing to prevent felting and damage.
How long does it take to make a yarn dog?
For a small dog, about 20-30 minutes. Larger dogs may take an hour. It's a quick and satisfying craft!
What can I use instead of a pom-pom maker?
A fork, a piece of cardboard, or even your fingers work perfectly. Just wrap the yarn around the object and tie off as usual.

Amara explores creative writing and storytelling, with a focus on finding your unique voice and building compelling narratives. She shares prompts and exercises to spark imagination, drawing on her love of folklore and modern fiction.


