

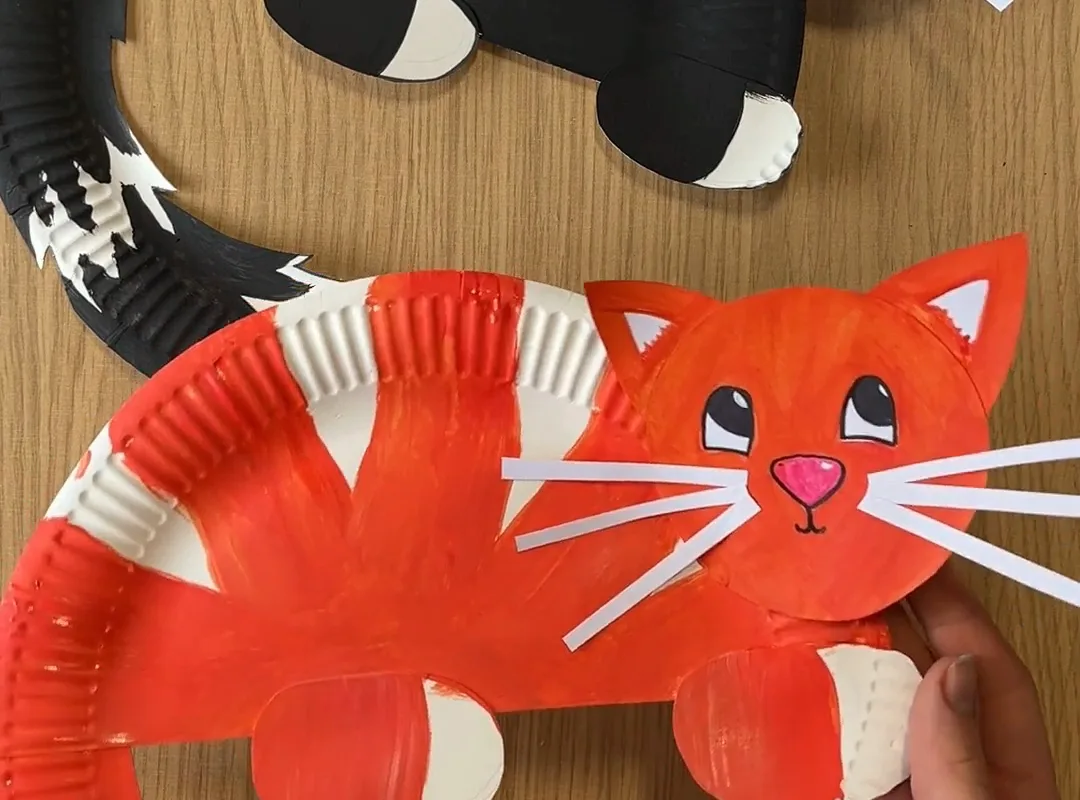
Last week, my niece asked me to make a 'paper plate cat' after seeing one on Pinterest. I thought, how hard could it be? Turns out, with a few tweaks, it's a breeze. Here's my step-by-step guide to creating a cute, durable paper plate cat that kids will love.
Advertisements1
- Use sturdy paper plates like Chinet to prevent bending.
- Tacky glue or glue dots work better than school glue for attaching eyes and ears.
- Let paint dry completely before adding embellishments to avoid smudging.
- Simplify for toddlers by pre-cutting shapes; add complexity for older kids with movable parts.
- Seal with acrylic spray for durability if the cat will be handled often.
Why Paper Plate Cats Are the Purr-fect Craft
Paper plate crafts are a staple in early childhood education for good reason: they're inexpensive, versatile, and encourage creativity. A paper plate cat specifically taps into kids' love for animals and gives them a sense of accomplishment. Unlike complex origami or sewing projects, this craft requires only basic materials and can be completed in under 30 minutes.
But not all paper plate crafts are created equal. I've seen many that look adorable online but fall apart in tiny hands. The key is to reinforce weak points and use the right adhesives. For example, regular school glue often doesn't hold googly eyes well; I recommend tacky glue or glue dots for instant stick. Also, consider the plate's rigidity: cheap plates bend easily, so opt for sturdy ones like Chinet or Hefty.
Another advantage: this craft scales. You can simplify it for toddlers (just glue on pre-cut shapes) or add complexity for older kids (drawing whiskers with markers, adding patterns). It's also a great way to teach shapes: circles for the head, triangles for ears. So before you dismiss it as just another Pinterest fad, give it a shot—it's a classic for a reason.
Materials You'll Need (and What to Avoid)
Gather these supplies: one paper plate (9-inch is ideal), acrylic paint or markers, construction paper (for ears and nose), googly eyes, tacky glue, scissors, and a black marker. Optional: pipe cleaners for whiskers, pom-poms for a nose, and yarn for fur texture.
What to avoid: washable markers (they smear when gluing), cheap glue sticks (they don't adhere to painted surfaces), and flimsy plates (they warp). I once used a generic store-brand plate and the cat's head flopped over—lesson learned. Also, skip the glitter; it gets everywhere and doesn't add much.
If you're crafting with a group, pre-cut the ears and noses to save time. For a no-mess option, use stickers instead of glue. And always have wet wipes handy for quick cleanups.
Step-by-Step: From Plate to Cat
Start by painting the back of the paper plate. This will be the cat's face. Let it dry completely—acrylic paint dries in about 10 minutes. While waiting, cut out two triangles from construction paper for ears. If you want a folded-ear look, cut smaller triangles and fold the tips down.
Once the plate is dry, glue the ears to the top edge. Use tacky glue and hold for 20 seconds. Next, glue on googly eyes. Position them about one-third from the top. For the nose, cut a small triangle from pink construction paper and glue it below the eyes. Draw a mouth with a black marker: a small 'w' shape under the nose. Add whiskers using pipe cleaners or drawn lines.
Finally, add any embellishments: a bow, a collar, or spots. Let everything dry for at least an hour before play. If you want to hang it, punch a hole at the top and thread a string. Voilà—a paper plate cat!
Common Mistakes and How to Fix Them
Mistake #1: Using too much glue. This causes paper to wrinkle and takes forever to dry. Solution: use glue dots or a thin line of tacky glue. Mistake #2: Painting both sides. It's unnecessary and can warp the plate. Paint only the front. Mistake #3: Not letting paint dry fully. If you glue on ears too soon, they'll slide off. Wait until the paint is touch-dry.
Another issue: googly eyes falling off. I've had success with E6000 craft glue, but it's not kid-friendly. For kids, use glue dots or tacky glue and press firmly. If whiskers droop, use pipe cleaners instead of yarn. And if the cat looks more like a bear, adjust the ears: cats have pointier, more triangular ears than bears.
Lastly, don't stress about perfection. The charm of a paper plate cat is its handmade look. Embrace the wobbly eyes and crooked smile—it's part of the fun.
Creative Variations to Try
Once you've mastered the basic cat, try these twists: a black cat for Halloween, a calico with painted spots, or a Siamese with a darker face. You can also turn the plate into a mask by cutting out eye holes and attaching a stick. For a 3D effect, glue on a second plate behind the first, stuffed with newspaper, to make a plump body.
Another idea: use the cat as a photo frame. Cut out the center of the plate, leaving a rim, and glue a photo behind it. Or make a mobile by hanging several cats from a hanger. The possibilities are endless.
For older kids, challenge them to create a cat with moveable parts using brads. This adds an engineering element. And if you're feeling ambitious, combine with a literacy activity: read a cat-themed book and then craft the main character.
Displaying and Preserving Your Paper Plate Cat
To keep your cat looking its best, avoid direct sunlight, which can fade colors. If you want to preserve it, spray with a clear acrylic sealer. This also makes it more durable for play. For hanging, use a Command strip or a pushpin. If it's a gift, attach a magnet to the back for the fridge.
For long-term storage, place in a zip-top bag or a box with tissue paper. Avoid stacking heavy items on top. If the plate bends, you can gently reshape it by dampening the back with a little water and pressing it flat under a book.
Remember, paper plate crafts are ephemeral by nature. Enjoy them while they last, and don't be afraid to make new ones. The process is the real reward.
How to Do It, Step by Step
- 1Paint the Plate
Use acrylic paint or markers to color the back of a sturdy paper plate. Let it dry completely before moving on. This forms the cat's face. - 2Cut and Attach Ears
Cut two triangles from construction paper. Glue them to the top edge of the plate using tacky glue. Hold for 20 seconds to ensure they stick. - 3Add Eyes and Nose
Glue googly eyes about one-third from the top. Cut a small pink triangle for the nose and glue it below the eyes. Draw a mouth with a black marker. - 4Create Whiskers
Use pipe cleaners or draw lines with a marker for whiskers. Pipe cleaners add a 3D effect and are more durable. - 5Embellish
Add a collar, bow, or spots using construction paper or markers. Let your creativity shine. - 6Dry and Display
Let the cat dry for at least an hour. Then display it on a shelf, hang it, or attach a magnet for the fridge.
The secret to a paper plate cat that survives toddler play is simple: sturdy plate, tacky glue, and patience while the paint dries.
Frequently Asked Questions
What materials do I need to make a paper plate cat?
You need a paper plate, paint or markers, construction paper, googly eyes, glue, and scissors. Optional: pipe cleaners, pom-poms, and yarn.
How long does it take to make a paper plate cat?
It takes about 20-30 minutes plus drying time. Painting and gluing are quick, but waiting for paint to dry adds 10-15 minutes.
Can I make a paper plate cat without paint?
Yes, you can use markers, crayons, or even colored paper to cover the plate. Markers are a quick no-mess option.
How do I make the paper plate cat stand up?
Glue a second paper plate behind it as a support, or attach a cardboard stand. You can also cut a slit in a toilet paper tube and slide the plate in.
What age is this craft suitable for?
It's suitable for ages 3 and up with adult supervision. Toddlers can help with gluing pre-cut pieces, while older kids can do the entire craft independently.

Liam covers technology and digital privacy, with a focus on helping everyday people protect their data online. He breaks down complex tech concepts into easy-to-understand advice and reviews privacy tools from a user’s perspective.


