

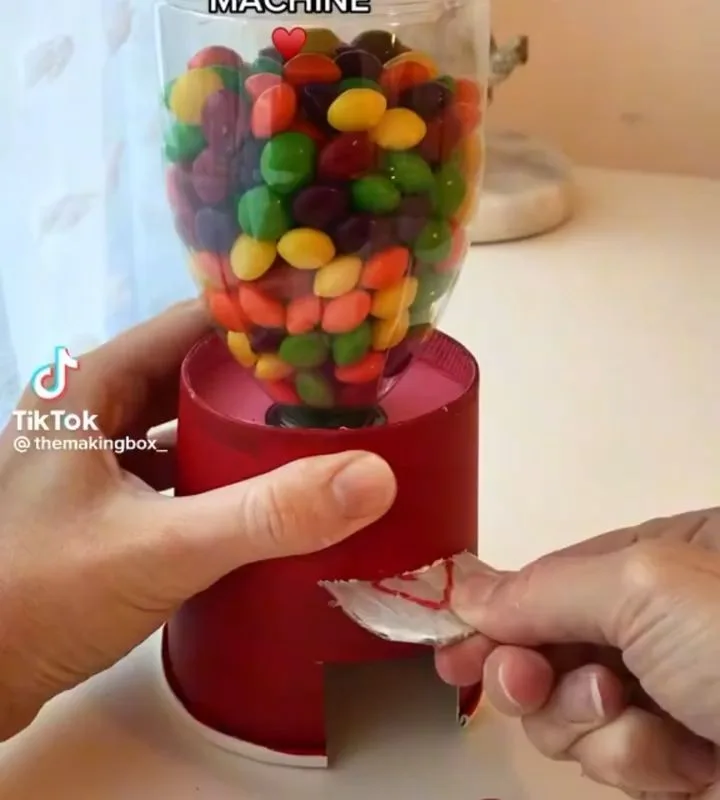
Ever wanted to make a Valentine's gift that's both playful and personal? This DIY Skittle gum ball machine is easier than you think—and I'll share my seven best hacks to get it right the first time. Let's create something sweet together.
Advertisements1
- Use a straight-sided mason jar with a 2.5-inch opening to prevent clogs.
- A plastic bottle cap and dowel make a simple, effective dispensing valve.
- Sort Skittles by color for a Valentine's-themed look—red, pink, and purple work best.
- Test the dispenser at least 10 times before giving it as a gift.
- Personalize with paint, stickers, and a handwritten note for a thoughtful touch.
- Secure the lid during transport to avoid spills.
Why a DIY Skittle Gum Ball Machine Makes the Perfect Valentine
A few years ago, I made my first DIY candy dispenser for my nephew's birthday. It was a hit, but I learned a lot from my mistakes. For Valentine's Day, a Skittle gum ball machine is ideal because it's colorful, interactive, and shows you put thought into every detail. Plus, it's a fun project that doesn't require advanced skills. Have you ever received a gift that made you smile every time you looked at it? That's what this can be.
Beyond the cute factor, this project is budget-friendly and customizable. You can choose the candy colors to match your Valentine's personality—maybe all red and pink Skittles for a classic romantic vibe. It's also a great way to upcycle materials like a mason jar or an old gum ball machine. The process itself can be a mindful activity, a chance to slow down and focus on creating something with love.
Hack 1: Choose the Right Container for a Smooth Dispensing Mechanism
The container is the heart of your gum ball machine. I've tried everything from plastic cups to glass jars, and I've found that a clear mason jar with a 2.5-inch opening works best. Why? Because Skittles are about 0.5 inches in diameter, so a 2.5-inch opening allows them to flow without clogging. A too-narrow opening will jam, and a too-wide one will dump all the candy at once.
A common mistake is using a jar with a curved neck, like a soda bottle. The curve creates a bottleneck where Skittles get stuck. Instead, opt for a straight-sided jar. If you're using a traditional gum ball machine, make sure the globe is at least 6 inches in diameter to hold enough candy. I once used a small fishbowl and had to refill it constantly—lesson learned.
Hack 2: Master the Dispensing Valve with a Simple DIY Mechanism
The dispensing valve is where most DIYers struggle. You need a mechanism that releases one candy at a time. My favorite hack is to use a plastic bottle cap as a slide valve. Cut a slit in the cap just wide enough for a Skittle to pass through, then attach it to a dowel or skewer that acts as a handle. When you pull, one candy drops; when you push, it stops the flow.
Why does this work? It's based on a simple gate system. The cap acts as a barrier, and the slit aligns with the opening only when pulled. A common mistake is making the slit too large—then multiple candies escape. Test with a few Skittles before gluing anything permanently. Also, make sure the dowel moves smoothly; if it's too tight, the mechanism will stick. A little sanding or a drop of olive oil can help.
Hack 3: Personalize with Paint and Decor for a Valentine's Touch
This is where you can really let your creativity shine. I like to paint the base of the machine with acrylic paint in soft pinks and reds. Add heart stickers or use a stencil to paint small hearts. For a more elegant look, wrap the jar with twine and attach a tiny tag that says 'You're a sweetheart.'
But here's a warning: don't paint the inside of the jar or any part that touches the candy. Acrylic paint can chip and mix with the Skittles. Also, if you're using a glass jar, make sure the paint is completely dry before assembling. I once rushed this step and ended up with smudged hearts—not the romantic effect I wanted. Let each coat dry for at least an hour.
Hack 4: Fill with Skittles (Not Gum Balls) for a Colorful Twist
Skittles are the star here, but not all Skittles are created equal. The original fruity mix gives a rainbow effect, but for Valentine's, I recommend sorting out the red, pink, and purple ones. It takes a few minutes, but it's worth it for the visual impact. You'll need about 1 cup of Skittles to fill a standard mason jar (that's roughly 200 pieces).
A common mistake is using stale or melted Skittles. Check the bag for freshness—fresh Skittles have a shiny shell and don't stick together. If they're sticky, they'll clog the dispenser. Also, avoid mixing in other candies like M&Ms, as their size varies and can jam the mechanism. Stick to Skittles for consistent flow.
Hack 5: Test and Troubleshoot Like a Pro
Before you present your gift, test the machine at least 10 times. I keep a small bowl nearby to catch the dispensed candies. If it jams, check the alignment of the valve. Often, the issue is that the slit isn't lined up perfectly with the opening. Adjust by rotating the cap slightly.
Another common problem is that the candies flow too fast. If that happens, reduce the size of the slit or add a small piece of foam to create friction. Remember, patience is key. If you're feeling frustrated, take a deep breath and walk away for a few minutes. Sometimes a fresh perspective solves the problem instantly.
Hack 6: Add a Handwritten Note for a Personal Touch
A handwritten note elevates any gift. Write a short message on a small card and attach it to the machine with ribbon. For example, 'You make my heart skip a beat—just like this candy dispenser!' It's cheesy, but that's the point. Personal touches show you care.
I like to use a fine-tip pen and write neatly. If your handwriting isn't perfect, that's okay—it's the thought that counts. Avoid long paragraphs; a sentence or two is enough. This small addition transforms a craft into a heartfelt keepsake.
Hack 7: Package It Thoughtfully for Presentation
Presentation matters. Place the machine in a small box with tissue paper, or wrap it in cellophane and tie with a bow. If you're giving it in person, hold it gently and present it with a smile. If you're shipping it, secure the dispenser with bubble wrap and include a note that says 'Handle with care—sweet things inside.'
A mistake I've made is not securing the lid during transport. The candies spilled everywhere. So, use a rubber band or tape to keep the lid on until your Valentine is ready to use it. Also, consider including a small bag of extra Skittles so they can refill it later.
The Hacks, Step by Step
- 1Gather Your Materials
You'll need a clean mason jar with a 2.5-inch opening, a plastic bottle cap, a wooden dowel (1/4 inch diameter), acrylic paint, a paintbrush, heart stickers, ribbon, and a bag of Skittles. Make sure the jar is dry and free of any residue. - 2Create the Dispensing Valve
Cut a slit in the bottle cap just wide enough for a Skittle to pass through (about 1/2 inch). Attach the cap to one end of the dowel using hot glue. This will act as your slide valve. Test the fit by inserting a Skittle through the slit—it should pass easily but not fall out on its own. - 3Assemble the Machine
Drill a hole in the jar lid slightly larger than the dowel. Insert the dowel through the hole so the cap sits inside the jar. Secure the dowel with a small rubber grommet or tape to allow movement. The cap should be positioned at the bottom of the jar, where the candies collect. - 4Paint and Decorate
Paint the outside of the jar with acrylic paint in Valentine's colors. Let it dry completely. Add heart stickers or paint small hearts. Wrap twine around the neck for a rustic look. Avoid painting the inside or the lid's rim. - 5Fill with Skittles
Sort out red, pink, and purple Skittles. Pour about 1 cup into the jar. Leave some space at the top so the candies can move freely. Secure the lid tightly. - 6Test the Dispenser
Pull the dowel to release a candy. It should drop one at a time. If it jams, adjust the slit size or alignment. Test at least 10 times to ensure consistency. - 7Add a Personal Note
Write a short, sweet message on a small card. Attach it to the jar with ribbon. This makes the gift extra special. - 8Package for Giving
Place the machine in a gift box with tissue paper, or wrap in cellophane. Secure the lid with a rubber band for transport. Include extra Skittles if desired.
The best DIY gifts are made with patience and a willingness to learn from mistakes—just like any act of love.
Frequently Asked Questions
What kind of container works best for a DIY gum ball machine?
A clear mason jar with a straight-sided design and a 2.5-inch opening works best. It allows Skittles to flow smoothly without jamming.
How do I prevent Skittles from clogging the dispenser?
Ensure the slit in the bottle cap is exactly 1/2 inch wide and aligned with the jar's opening. Also, use fresh Skittles that aren't sticky.
Can I use other candies instead of Skittles?
Yes, but Skittles are ideal because of their uniform size and colorful appearance. Other candies like M&Ms may vary in size and cause jams.
How many Skittles do I need to fill the machine?
About 1 cup (roughly 200 Skittles) will fill a standard mason jar. You can adjust based on the jar size.
Is this project suitable for kids?
Yes, with adult supervision for cutting and gluing. Kids can help with painting and filling the jar.


