

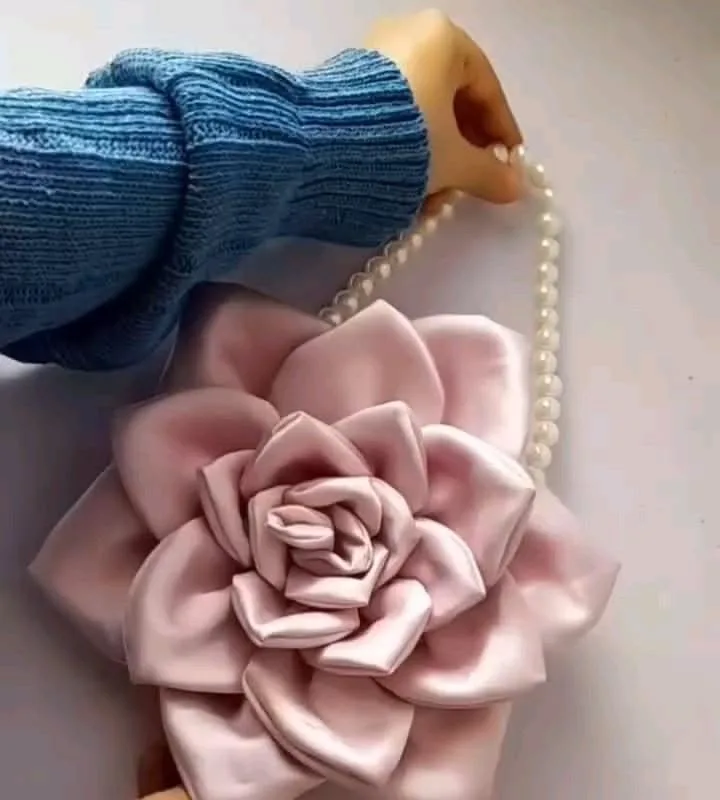
You can make a satin flower clutch with a pearl handle in one afternoon, and it will look like you spent $180 on it. These seven hacks are the ones that save you from puckered petals, a sagging bag, and a handle that snaps off mid-photo.
Advertisements1
- Fusible interfacing is the difference between droopy petals and a crisp, professional flower.
- Bias-cut petals curl naturally and look far more realistic than straight-cut ones.
- Singeing edges over a tealight seals satin permanently and takes two seconds per petal.
- A rigid mat board core keeps your clutch from collapsing at dinner.
- Hidden stitches plus a dab of glue hold the flower far better than glue alone.
- A homemade pearl handle costs about $4 versus $15 to $25 for a pre-made one.
Hack 1: Back Your Satin with Fusible Interfacing Before You Cut a Single Petal
Satin is beautiful and completely uncooperative. It frays the second you look at it and it will not hold a petal shape on its own. Iron a lightweight fusible interfacing (Pellon 911FF is my go-to) onto the back of your satin before cutting anything. Use a medium-hot iron with no steam, press for 10 seconds, and let it cool flat.
Why it works: the interfacing gives the fabric just enough body to keep a curled petal from collapsing, and it locks the weave so your edges stop unraveling. I made my first clutch without it and the petals drooped like wilted tulips by the end of the night.
One mistake to avoid: don't use heavy craft interfacing. It makes the satin stiff as cardboard and your flowers will look like paper crafts, not fabric.
Hack 2: Cut Petals on the Bias for Rounder, More Realistic Flowers
Here's the trick that changes everything: cut your petal shapes at a 45-degree angle to the satin's grain line, not straight along it. You'll get a softer, rounder curve that mimics how real petals drape.
Why it works: satin has almost no stretch along the grain but plenty on the bias. Bias-cut petals curl naturally when you heat-set them with a low iron or a quick pass over a candle (carefully, from a safe distance). For a 6-inch clutch I cut 12 petals — five large at 2.5 inches, four medium at 2 inches, and three small at 1.5 inches.
Common mistake: cutting petals all the same size. Real flowers have layers. Varying your sizes by half an inch is what makes the cluster read as a flower instead of a fabric blob.
Hack 3: Singe Petal Edges for a Clean Finish and Zero Fraying
Hold each petal edge about an inch above a tealight flame and move it steadily. The edge will curl and seal in about two seconds. Do this in a ventilated room and keep a damp cloth nearby.
Why it works: satin is a synthetic blend, so the heat melts the raw edge slightly and stops fraying permanently. It also gives you that soft, organic curl you'd otherwise only get from hours of hand-shaping. Test on a scrap first — some satins scorch faster than others.
Common mistake: holding the fabric too close or too long. You want a gentle curl, not a blackened crisp. If you see smoke, you're already too close.
Hack 4: Build the Clutch Around a Cardboard or Plastic Template
Before you sew anything, cut a template from heavyweight cardstock or a thin plastic cutting board to your finished clutch size — mine was 9 by 5 inches. Wrap and glue your satin around it, then build your flower on top.
Why it works: a rigid core keeps the clutch from collapsing when you set it down at dinner, and it gives you crisp, straight edges without perfect sewing skills. Glue the satin down with fabric glue (Fabri-Tac works well) and fold the corners like a gift wrap.
Common mistake: using flimsy cardboard from a shipping box. It warps with glue and humidity. Use mat board or a plastic sheet instead.
Hack 5: Make the Pearl Handle from a Wire Hanger and Faux Pearls
Thread 8mm faux pearls onto a 12-gauge aluminum wire, leaving 2 inches bare at each end. Bend the bare ends into small loops, then glue them inside the clutch's top edge with E6000. Let it cure for 24 hours.
Why it works: the wire gives the handle structure so it holds its arch, while the pearls hide the wire and give you that evening-bag look. I used about 28 pearls per handle for a comfortable hand span. Pre-made pearl handles exist, but they cost $15 to $25 — this version runs about $4.
Common mistake: using craft wire that's too thin. It bends under the weight of the bag. Go with 12-gauge or double up 16-gauge.
Hack 6: Attach the Flower Cluster with Hidden Stitches, Not Just Glue
Glue alone will fail on a bag you actually carry. Stitch through the center of each petal with a few hidden stitches using matching thread, then add a small dab of glue for security.
Why it works: thread flexes with the bag, while glue cracks. I anchor the largest petals first, working from the outside in, then layer the smaller ones on top with a single stitch each. Finish with a pearl or crystal in the center to hide your stitches.
Common mistake: gluing the whole flower flat. Lift the outer petals slightly as you stitch so the flower has dimension and casts a soft shadow.
Hack 7: Line the Inside with a Pocket So It's Actually Useful
Cut a lining from the same satin (or a contrast color) and add a small slip pocket for your phone and lipstick before you close the bag. A 4-by-3-inch pocket is plenty.
Why it works: an unlined clutch turns into a black hole. A pocket keeps your essentials from sliding around, and the lining hides all your glue and stitching sins. Sew the pocket to the lining first, then glue the lining in with a 1/4-inch seam allowance folded under.
Common mistake: skipping the lining to save time. You'll regret it the first time a bobby pin snags the inside of your bag.
The Hacks, Step by Step
- 1Fuse interfacing to your satin
Iron lightweight fusible interfacing to the back of your satin with a dry, medium-hot iron. This stops fraying and gives petals body. - 2Cut petals on the bias
Cut 12 petals at a 45-degree angle to the grain in three sizes (2.5, 2, and 1.5 inches). Varying sizes creates a realistic layered flower. - 3Singe the petal edges
Hold each edge an inch above a tealight for about two seconds to seal and curl it. Test on a scrap first. - 4Build the clutch core
Cut a 9-by-5-inch template from mat board or plastic, wrap it in satin, and glue the edges down with Fabri-Tac. - 5Make the pearl handle
Thread 28 faux pearls onto 12-gauge wire, bend loops at each end, and glue them inside the top edge with E6000. Cure 24 hours. - 6Stitch on the flower cluster
Anchor the large petals first with hidden stitches, layer smaller petals on top, and finish with a pearl center. - 7Add a lined pocket
Sew a 4-by-3-inch slip pocket to your lining, then glue the lining inside the clutch with folded edges.
The secret to a satin flower that looks real isn't the pattern — it's the interfacing, the bias cut, and two seconds over a flame.
Frequently Asked Questions
What kind of fabric works best for a DIY satin flower clutch?
Medium-weight polyester satin works best because it holds a curl and singes cleanly. Heavy silk satin is gorgeous but harder to shape, and cheap costume satin frays fast even with interfacing.
How do I keep the pearl handle from falling off my clutch?
Glue the wire loops inside the bag with E6000 and let them cure a full 24 hours before using it. For extra security, stitch a small fabric patch over each loop end before the glue dries.
Can I make this clutch without a sewing machine?
Yes — everything here can be done by hand. Use hidden slip stitches for the flower and fabric glue for the bag structure. Hand-sewing the flower takes about 20 minutes.
How long does this DIY satin flower clutch take to make?
Plan on three to four hours of active work plus 24 hours of glue curing. The petals take about an hour, the bag core about 45 minutes, and the handle and lining the rest.
What size should the finished clutch be?
A 9-by-5-inch clutch fits a phone, lipstick, keys, and a card holder comfortably. Go up to 10 by 6 inches if you carry a larger phone.


