

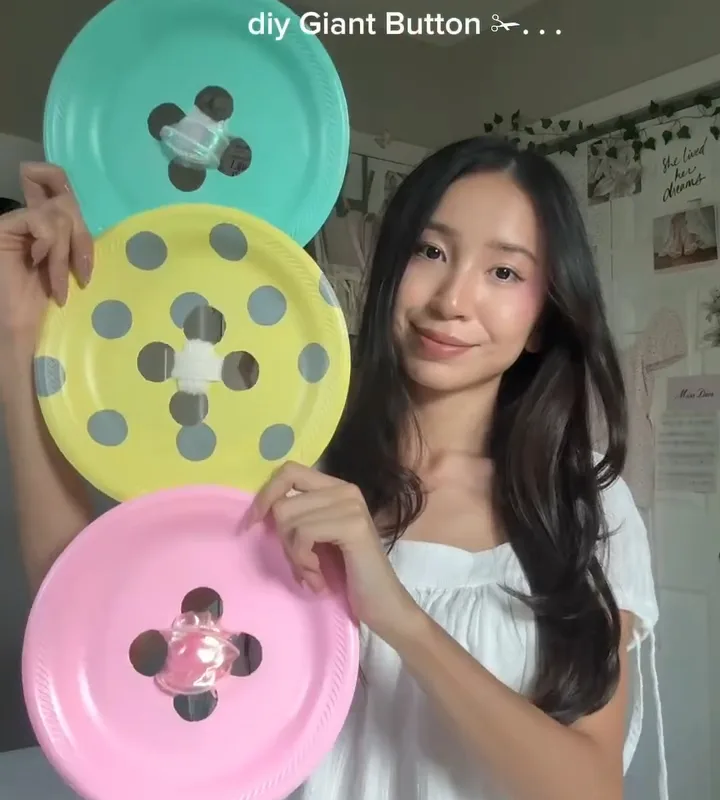
A disposable plastic plate, four holes, and 20 minutes of work will get you a 9-inch prop button that looks like it came off a cartoon giant's coat. Below are seven hacks I use in my own prop builds, each with the exact measurements, drill sizes, and failure modes I've hit so you don't repeat them.
Advertisements1
- A 9-inch plate gives you a 12x scale button — the sweet spot for costume props.
- Drill at 1,200–1,500 RPM with a brad-point bit and a wood backer, or the plate cracks.
- Plastic-bonding primer is mandatory on PP and PE plates; general primer flakes off.
- Two light coats beat one heavy coat every time on a curved surface.
- Clear coat adds about 0.1 mm of protection and roughly doubles finish life.
- Keep hole spacing at roughly 1:6 of the diameter to stay proportional.
Why a Plastic Plate Is the Right Blank (and Which Plate to Buy)
A standard 9-inch (23 cm) disposable plate is close to a perfect button blank because its rim already curves like a sewn button edge. The rim does the visual work for you — no sanding, no shaping. I buy the heavy-duty laminated kind, roughly 1.5 mm thick, because the cheap 0.8 mm foam-core plates crack when you drill them.
Material matters more than color. Polystyrene (PS, recycling code 6) takes spray paint and acrylic well. Polypropylene (PP, code 5) is tougher but resists paint — you'll need a plastic-bonding primer like Rust-Oleum Plastic Primer or the paint will flake off in a week. Flip the plate over and read the recycling triangle before you buy a stack.
– Target thickness: 1.2–1.6 mm
– Target diameter: 9 in (23 cm) for a costume-scale button
– Avoid: foam-core and compostable fiber plates — both tear at the drill hole
One warning: glitter-coated and printed plates look tempting, but the coating lifts under spray paint and leaves a mottled finish. Buy plain white or clear.
Drilling the Four Holes Without Cracking the Plate
This is where 80% of first attempts fail. A plastic plate is thin and unsupported, so a standard twist bit grabs and shatters it. Use a 3/16-inch (4.8 mm) brad-point bit or a step bit, and back the plate with a scrap of 1×4 pine clamped underneath. The wood supports the exit side and stops the blowout.
Run your drill at 1,200–1,500 RPM — fast enough to cut, slow enough not to melt. Plastic melts at the edges if you push hard; you'll see a white ring form around the hole. That ring is a stress fracture waiting to happen. Let the bit do the work and pull it out every few seconds to clear chips.
Measure before you drill. Mark a square 1.5 inches (38 mm) on center, centered on the plate. That gives you four holes that match real button spacing and lets a 1/8-inch ribbon or 1/4-inch elastic pass through cleanly. If your holes are off-center, the finished button will hang crooked on the costume and no amount of thread will fix it.
Painting and Sealing So It Survives a Convention Weekend
Two light coats of primer, then two light coats of color. That's it. Heavy coats on a curved plate pool at the rim and drip. Hold the can 10–12 inches away and keep the plate moving. Between coats, wait 20 minutes — not 5. Rushing the recoat window on enamel gives you a wrinkled, orange-peel surface that no topcoat will hide.
For the classic look, use a gloss red or navy and add a 1/8-inch white rim stripe with a paint pen. A Uni-Posca or Sharpie oil-based pen works on cured paint. Let the base color cure 24 hours before you touch it with a pen, or the pen tip will drag the paint.
Seal with two coats of matte or satin clear acrylic. This is not optional if the button will rub against a jacket. Clear coat adds about 0.1 mm of protection and roughly doubles the life of the finish. Skip it and you'll be touching up chips by day two of the con.
Threading and Mounting: Ribbon, Elastic, or Pin Back
You have three mounting options, and each has a different failure point. Ribbon through all four holes gives the most authentic look but requires you to thread from the front, cross the back, and tie off. Use 1/8-inch grosgrain — satin slips. Elastic (1/4-inch) is better for a wearable that needs to stretch over a sleeve.
For a flat prop that just sits on a costume, skip the thread entirely and hot-glue a 1.5-inch safety pin or a 2-inch brooch pin to the back. Score the back of the plate with 120-grit sandpaper first so the glue has something to bite. A smooth plastic surface plus hot glue equals a pin that pops off in an hour.
If you're threading, cut 24 inches of ribbon. That's enough to cross the back twice and tie a knot with 6 inches of tail on each side. Anything shorter and you'll be fighting the knot with your fingers inside a 9-inch disc.
Scaling Up or Down for Different Costumes
The math is simple. A real coat button is about 0.75 inches (19 mm). A 9-inch plate is 12x scale. If you want a 6x button for a smaller character, use a 4.5-inch plate. If you want a 20x button for a mascot build, you're past plastic plates — go to a 15-inch cake board or a cut acrylic disc.
Hole spacing should scale too. At 9 inches, keep the 1.5-inch square. At 4.5 inches, drop to a 3/4-inch square. At 15 inches, go to 2.5 inches. The ratio stays roughly 1:6 of the diameter, which keeps the button looking proportional instead of cartoonishly off.
– 4.5 in plate → 6x scale → 3/4 in hole spacing
– 9 in plate → 12x scale → 1.5 in hole spacing
– 15 in disc → 20x scale → 2.5 in hole spacing
One mistake I see constantly: people scale the button but not the thread. A 15-inch button with 1/8-inch ribbon looks like dental floss. Bump to 1/4-inch or 3/8-inch ribbon at that size.
Fixing the Three Most Common Failures
Cracked hole: back the plate with wood and drill slower. If it's already cracked, a drop of cyanoacrylate (super glue) on the back side will stop the crack from spreading, but the hole will always look rough. Better to redrill a fresh plate.
Paint flaking at the rim: you skipped primer or used the wrong one. Sand the rim with 220-grit, re-prime with a plastic-specific primer, and repaint. General-purpose primer does not bond to PP or PE plastics.
Crooked hang: your holes aren't square. Re-measure with a combination square, not a ruler and eyeball. A 1/16-inch error at the hole becomes a visible 1/4-inch tilt at the edge of a 9-inch plate. That's the difference between a prop and a joke.
The Hacks, Step by Step
- 1Buy the right plate
Choose a heavy-duty 9-inch polystyrene or polypropylene plate, 1.2–1.6 mm thick, plain white or clear. Skip foam-core and glitter plates. - 2Mark a 1.5-inch square
Center a 1.5 in (38 mm) square on the plate with a combination square and mark four hole centers. This matches real button spacing. - 3Back and drill
Clamp a scrap of pine behind the plate. Drill four 3/16-inch holes with a brad-point bit at 1,200–1,500 RPM, clearing chips as you go. - 4Prime and paint
Apply two light coats of plastic-bonding primer, then two light coats of color. Wait 20 minutes between coats and 24 hours before handling. - 5Add the rim stripe
Use a white oil-based paint pen to draw a 1/8-inch rim stripe. Let the base color cure first or the pen will drag the paint. - 6Seal it
Apply two coats of satin or matte clear acrylic. This roughly doubles the finish life against rubbing. - 7Mount it
Thread 24 inches of 1/8-inch grosgrain through all four holes, or hot-glue a 2-inch brooch pin to a sanded back. - 8Check the hang
Hold the button against the costume and verify it sits level. A 1/16-inch hole error becomes a 1/4-inch tilt at the edge.
A plastic plate is a 12x-scale button blank with the rim already shaped for you — the only real work is drilling four square holes without cracking it.
Frequently Asked Questions
What kind of plastic plate works best for a giant button?
Heavy-duty polystyrene (recycling code 6) plates, 1.2–1.6 mm thick, work best because they accept paint and drill cleanly. Avoid foam-core and compostable fiber plates — they tear at the hole.
How do I drill holes in a plastic plate without cracking it?
Clamp a scrap of wood behind the plate and drill with a 3/16-inch brad-point bit at 1,200–1,500 RPM. The wood supports the exit side and prevents blowout.
What size should the holes be for a giant button?
Use 3/16-inch (4.8 mm) holes spaced in a 1.5-inch square on a 9-inch plate. That spacing scales at roughly 1:6 of the diameter for other sizes.
Can I paint a plastic plate with regular spray paint?
Only if you use a plastic-bonding primer first. Regular spray paint flakes off polypropylene and polyethylene within days; polystyrene holds better but still needs primer.
How do I attach a giant button to a costume?
Thread 1/8-inch grosgrain ribbon through all four holes for the most authentic look, or hot-glue a 2-inch brooch pin to a sanded back for a flat prop.


