

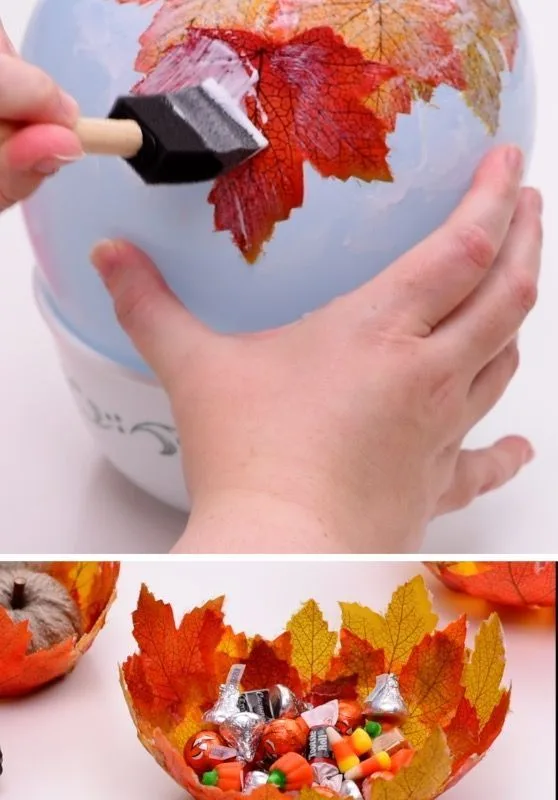
Transform fallen leaves into a beautiful, functional bowl with just a few simple materials. I've made dozens of these bowls over the years, and I'm sharing my top hacks to help you avoid common mistakes and create a stunning piece that captures the season.
Advertisements1
- Choose leathery leaves like maple or oak for durability.
- Press leaves for 24 hours to avoid wrinkles and gaps.
- Use a balloon and thin coats of Mod Podge for a smooth shape.
- Seal with acrylic spray to protect against moisture and fading.
- Add a felt base to prevent scratches and sliding.
- Store in a cool, dry place away from sunlight to extend life.
Why a DIY Fall Leaf Bowl Belongs on Your Table
Every autumn, I take my kids on a leaf hunt, and we come back with bags full of vibrant maple and oak leaves. Instead of letting them dry out and crumble, we turn them into bowls that hold everything from candy to candles. These bowls are not just crafts; they're memory keepers. They cost almost nothing, take an afternoon, and add a warm, organic touch to your home.
But there's a catch: if you don't prepare the leaves properly, your bowl will curl, crack, or attract mold. I learned this the hard way my first year, when a beautiful bowl turned into a science experiment. So, I've refined my process to ensure your bowl stays gorgeous for seasons to come.
In this guide, I'll walk you through seven hacks that make the process foolproof. Each hack includes why it works and the mistake to avoid. Let's get started!
Hack 1: Choose the Right Leaves for a Durable Bowl
Not all leaves are created equal. For a sturdy bowl, you want leaves with a leathery texture and strong veins, like maple, oak, or magnolia. Avoid thin leaves like willow or birch; they tear easily and don't hold shape. I usually gather about 30-40 leaves for a medium bowl, picking ones that are free of holes or mildew.
The best time to collect is after a dry spell, not after rain. Wet leaves are prone to mold. If you must pick after rain, pat them dry and let them sit between paper towels for a day.
**Why it works:** Leathery leaves have a higher lignin content, which makes them rigid when dried. Strong veins act like rebar in concrete, giving the bowl structure.
**Common mistake:** Using freshly fallen leaves that are still green. They'll shrink and lose color as they dry, ruining your design. Wait until they've turned color but are still pliable.
Hack 2: Press Your Leaves for Flat, Wrinkle-Free Results
Before you start gluing, press your leaves for at least 24 hours. I place them between sheets of parchment paper and stack heavy books on top. This flattens them and removes excess moisture. If you're short on time, you can iron them on low heat between two towels, but pressing is gentler.
**Why it works:** Pressing removes moisture and creates flat leaves that conform to the bowl's shape without buckling. It also helps the Mod Podge adhere evenly.
**Common mistake:** Skipping this step and trying to glue curly leaves. They'll pop up and create gaps, weakening the bowl. Trust me, a little patience here saves a lot of frustration later.
Hack 3: Use a Balloon and Mod Podge for a Perfect Shape
The secret to a smooth, round bowl is a balloon. Inflate a balloon to the size you want your bowl (about 8-10 inches for a medium bowl). Cover your work surface with newspaper. Brush a layer of Mod Podge onto the balloon, then start layering leaves. I like to begin with larger leaves at the bottom, overlapping them like shingles. Brush Mod Podge over each leaf as you go.
Work in batches: apply 3-4 layers, letting each dry for 15 minutes before adding more. I usually do 5-6 layers total for durability. Let it dry completely for 24-48 hours. Then, pop the balloon and gently peel it away.
**Why it works:** The balloon provides a smooth, curved mold that's easy to remove. Mod Podge dries clear and flexible, holding the leaves together without cracking.
**Common mistake:** Using too much Mod Podge. It will drip and create a gooey mess. Use a foam brush and apply thin, even coats.
Hack 4: Seal with an Acrylic Spray for a Water-Resistant Finish
Once your bowl is dry and the balloon removed, it's time to seal it. I use a clear acrylic spray sealer (matte or gloss, your choice). Take it outside or to a well-ventilated area, and spray 2-3 light coats, letting each dry for 20 minutes. This makes the bowl water-resistant and protects it from dust and fading.
**Why it works:** The spray creates a barrier that repels moisture and UV light, preventing the leaves from becoming brittle or discolored.
**Common mistake:** Spraying too close or too thick, which causes drips and bubbles. Hold the can 10-12 inches away and use sweeping motions. Also, don't skip the edges and the inside; they need protection too.
Hack 5: Add a Felt Base to Prevent Scratching
To protect your table and give the bowl a finished look, cut a circle of felt slightly smaller than the bowl's bottom. Glue it on with hot glue or fabric glue. I use a contrasting color like deep orange or brown for a polished touch.
**Why it works:** Felt is soft and non-slip, so your bowl won't scratch surfaces or slide around. It also hides any uneven edges from the leaf layers.
**Common mistake:** Using a thick, stiff felt that doesn't conform to the bowl's curve. Choose a thin, high-quality felt and cut it carefully to fit.
Hack 6: Store Your Bowl Properly to Keep It Looking New
When not in use, store your bowl in a cool, dry place away from direct sunlight. I wrap mine in tissue paper and place it in a box. Avoid stacking heavy items on top, as the bowl can dent. With proper care, your bowl will last for years.
**Why it works:** Sunlight and humidity break down the Mod Podge and fade the leaves. Protection keeps it pristine.
**Common mistake:** Leaving it on a windowsill or in a damp basement. Both will cause warping or mold. Treat it like a delicate decoration, not a utility bowl.
Hack 7: Personalize with Paint, Glitter, or Decoupage
Want to make it extra special? Add a touch of gold leaf to the edges, or decoupage a few small leaves in contrasting colors. I once made a bowl with a metallic gold rim that looked store-bought. You can also paint the back with acrylics for a solid color.
**Why it works:** Personal touches make it uniquely yours and can hide imperfections. It also lets you coordinate with your fall decor.
**Common mistake:** Overdoing it. Too much glitter or paint can make it look crafty rather than elegant. Use restraint and let the natural beauty of the leaves shine.
The Hacks, Step by Step
- 1Gather and press leaves
Collect 30-40 leathery leaves like maple or oak. Press them between parchment paper and heavy books for 24 hours to flatten and dry. - 2Prepare your workspace
Inflate a balloon to 8-10 inches and secure it on a cup. Cover your table with newspaper and have Mod Podge and a foam brush ready. - 3Layer leaves on balloon
Brush Mod Podge on the balloon. Add leaves in overlapping layers, brushing Mod Podge over each. Do 5-6 layers, drying 15 minutes between batches. - 4Dry and remove balloon
Let the bowl dry for 24-48 hours until hard. Pop the balloon and gently peel it away from the inside. - 5Seal with acrylic spray
In a ventilated area, spray 2-3 light coats of clear acrylic sealer, drying 20 minutes between coats. This makes it water-resistant. - 6Add felt base
Cut a felt circle slightly smaller than the bowl's bottom. Glue it on to prevent scratches and give a finished look.
The secret to a long-lasting leaf bowl is patience: press your leaves, layer thin coats, and let it dry completely.
Frequently Asked Questions
How do I make a fall leaf bowl?
Inflate a balloon, cover it with pressed leaves using Mod Podge, let it dry, then pop the balloon and seal with acrylic spray. This creates a sturdy, beautiful bowl.
What kind of leaves are best for a leaf bowl?
Leaves with a leathery texture and strong veins, like maple, oak, or magnolia, work best. Avoid thin leaves that tear easily.
How long does a DIY leaf bowl last?
With proper sealing and storage, it can last for years. Keep it out of direct sunlight and damp areas to prevent fading and warping.
Can I use Mod Podge for a leaf bowl?
Yes, Mod Podge is ideal because it dries clear and flexible. Apply thin coats to avoid drips and ensure a smooth finish.
How do I prevent my leaf bowl from getting moldy?
Use dry leaves, seal the bowl with acrylic spray, and store it in a dry place. Avoid using wet leaves or exposing it to humidity.


