

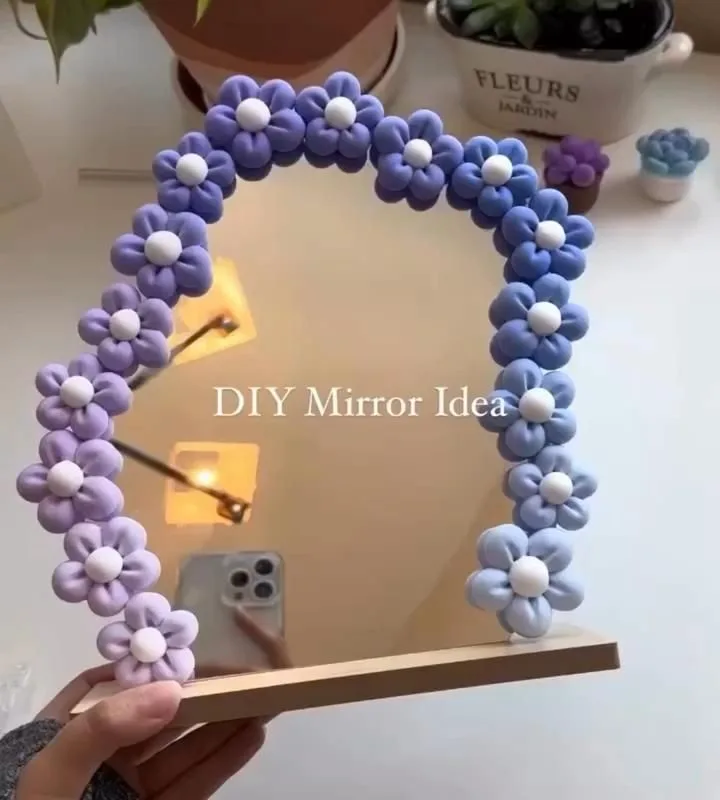
I made my first clay flower mirror last summer, and it completely transformed my entryway. With a few simple hacks, you can create a custom piece that looks boutique-quality. Let's dive into the specifics so you can avoid the mistakes I made.
Advertisements1
- Use fine-grained air-dry clay like DAS for detailed, crack-free flowers.
- Always create a cardboard base for the mirror to give clay something to grip.
- Let clay flowers dry to leather-hard before attaching to prevent warping.
- Seal your finished mirror with varnish to protect against moisture and dust.
- Hang at eye level (about 60 inches) for the best visual impact.
Hack 1: Choose the Right Clay for Lasting Beauty
I started with air-dry clay because it's forgiving and doesn't require a kiln. But not all air-dry clays are equal. I recommend a fine-grained, white air-dry clay like DAS or Creative Paperclay. These hold detail well and dry without cracking. Avoid cheap, fibrous clays that feel like papier-mâché; they're hard to smooth.
Why it works: Fine clay takes impressions and holds petal shapes, so your flowers look delicate. It also sands smoothly, giving a professional finish.
Common mistake: Using clay that's too dry. If it crumbles when you roll it, add a few drops of water and knead. Too-wet clay, on the other hand, will slump and lose its shape.
Hack 2: Build a Sturdy Base with a Thrifted Mirror
You don't need an expensive mirror. I found a 12-inch round mirror at Goodwill for $3. Remove the backing and clean the glass with rubbing alcohol. Then, cut a circle of cardboard slightly smaller than the mirror and glue it to the back with E6000. This gives the clay something to grip.
Why it works: The cardboard adds thickness and prevents the clay from sliding off the glass. It also makes the mirror easier to hang.
Common mistake: Skipping the cardboard and trying to attach clay directly to the mirror. Clay shrinks as it dries and can pop off. The cardboard acts as a buffer.
Hack 3: Shape Flowers with Simple Tools
You don't need fancy sculpting tools. A toothpick, a ballpoint pen, and a butter knife work wonders. For roses, roll small balls of clay into teardrop shapes, flatten them, and layer them around a central coil. Use the pen to curl petal edges. For daisies, roll a snake, cut it into equal pieces, and shape each into a petal.
Why it works: Teardrop and petal shapes mimic real flowers. Layering creates depth, and curling edges adds realism.
Common mistake: Making flowers too thick. Thin petals (about 1/8 inch) look more realistic and dry faster. If they're too thick, they may crack.
Hack 4: Attach Flowers Securely to the Mirror
Before attaching, let your clay flowers dry for 24 hours until they're leather-hard (slightly firm but still workable). Then, score the back of each flower and the mirror's cardboard base with a fork. Apply a dab of E6000 to both scored areas and press together. Hold for 30 seconds.
Why it works: Scoring creates texture for the glue to grip. E6000 is flexible and strong, so it won't brittle over time.
Common mistake: Using hot glue. It's not durable and can melt in warm rooms. Also, don't attach flowers while they're wet; they'll warp.
Hack 5: Paint and Seal for a Professional Finish
I used acrylic paint in soft pastels: blush pink, sage green, and cream. Paint each flower with two thin coats, letting them dry between coats. For a metallic touch, dry-brush gold acrylic on the petal edges. Once dry, seal with a matte varnish to protect against dust and moisture.
Why it works: Thin coats prevent brush strokes and drips. Dry-brushing adds dimension. Varnish keeps colors vibrant and makes cleaning easy.
Common mistake: Skipping the varnish. Without it, clay can absorb moisture and crack. Also, don't use spray varnish in a closed room; the fumes are strong.
Hack 6: Add Hanging Hardware That Holds
A clay mirror can be heavy. I use a 20-pound-rated sawtooth hanger attached to the cardboard backing with short screws. For extra security, add a picture wire. If your mirror is larger than 18 inches, use two D-rings and wire.
Why it works: Proper hardware distributes weight and prevents the mirror from crashing down.
Common mistake: Using a single small nail. It might hold for a while, but clay adds weight. Always use wall anchors in drywall.
Hack 7: Style Your Mirror for Maximum Impact
Place your mirror where it catches light, like above a console table or in a hallway. I hung mine above a vintage dresser and added a small vase of dried flowers nearby. The mirror reflects the room, making it feel larger and brighter.
Why it works: Mirrors amplify light and create depth. The clay flowers add texture and a focal point.
Common mistake: Hanging it too high. The center of the mirror should be at eye level (about 60 inches from the floor) for the best reflection.
The Hacks, Step by Step
- 1Gather Your Supplies
You'll need air-dry clay, a round mirror, cardboard, E6000 glue, acrylic paint, varnish, and basic tools like a toothpick and pen. Having everything ready saves trips to the store. - 2Prepare the Mirror Base
Clean the mirror, cut a cardboard circle slightly smaller, and glue it to the back. This creates a surface for the clay to adhere to. - 3Sculpt the Flowers
Roll, shape, and layer clay into flowers. Let them dry for 24 hours until leather-hard. Thin petals dry faster and look more realistic. - 4Attach Flowers to the Mirror
Score the back of each flower and the cardboard, apply E6000, and press firmly. Work in sections to avoid glue drying too fast. - 5Paint and Seal
Paint with acrylics in thin coats, add metallic accents if desired, and seal with matte varnish. This protects your work and enhances colors. - 6Install Hanging Hardware
Attach a sawtooth hanger or D-rings to the back, ensuring it can support the weight. Use wall anchors for drywall. - 7Hang and Style
Hang at eye level in a spot with good light. Style with complementary decor like a console table or plants.
The secret to a professional-looking clay mirror is patience: let each step dry fully before moving on.
Frequently Asked Questions
What type of clay is best for a flower mirror?
Air-dry clay like DAS or Creative Paperclay is ideal because it's easy to shape and doesn't require a kiln. Avoid cheap, fibrous clays that crack easily.
How do I prevent clay flowers from falling off the mirror?
Score both the flower back and the mirror base, then use a strong adhesive like E6000. Let the clay dry to leather-hard before attaching.
Can I use hot glue to attach clay to a mirror?
No, hot glue isn't durable and can melt. E6000 or another flexible, strong adhesive is much better for long-lasting hold.
How long does it take to make a clay flower mirror?
Plan for 2-3 days: one day for sculpting and drying, another for attaching and painting, and a final day for sealing and hanging.
Do I need to seal the clay flowers?
Yes, sealing with a matte varnish protects against moisture and dust, and keeps colors from fading. It also makes cleaning easier.


