

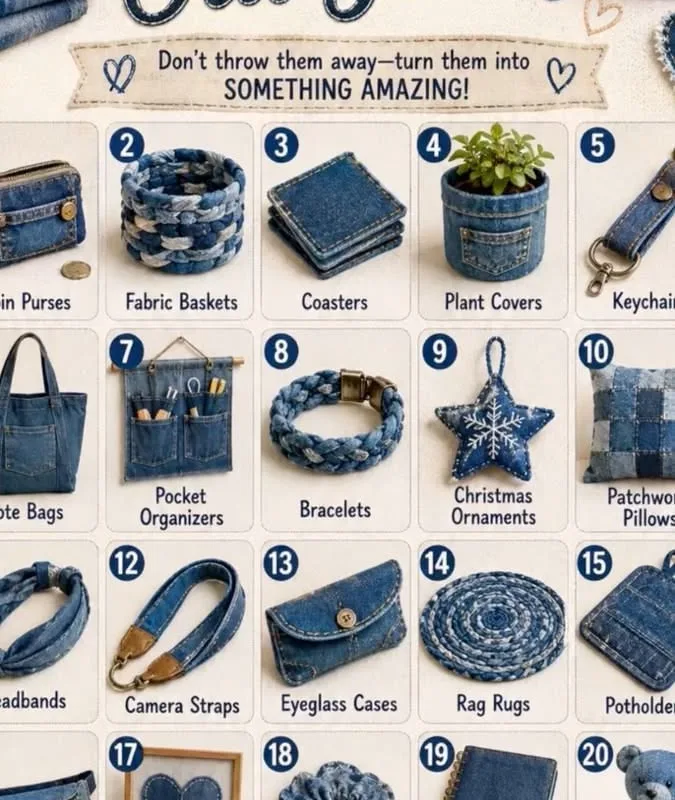
That pair of jeans you're about to toss? It's not trash—it's a stash of sturdy, beautiful material waiting for a second life. I've been cutting, stitching, and reimagining denim for years, and I can tell you: the best projects start with what you already own.
Advertisements1
- Denim is a durable, versatile fabric that can be upcycled into dozens of useful items.
- No-sew projects like bowls and coasters are perfect for beginners.
- Always pre-wash and pre-shrink denim before cutting to avoid distortion.
- Use the right tools: denim needles, heavy thread, and sharp scissors make all the difference.
- Small projects build skills and confidence for larger ones like rugs and quilts.
- Upcycling saves resources—it takes 1,800 gallons of water to make one pair of jeans.
Why Denim Deserves a Second Chance
Denim is a twill weave—two threads crossing at a right angle—which gives it that unmistakable diagonal texture and incredible strength. Unlike flimsy cotton, it holds shape, resists tearing, and softens beautifully with age. I once turned a worn-out pair of Levi's into a quilt that now lives on my reading chair; the indigo has faded into a soft, cloud-like blue that no new fabric could replicate.
But there's more at stake than aesthetics. It takes about 1,800 gallons of water to grow enough cotton for a single pair of jeans. When you toss them, that water—and the energy, dye, and labor—goes to landfill. By upcycling, you're not just saving money; you're honoring a resource that took a lot to create.
So before you donate or discard, consider what those jeans could become. The possibilities are quieter and more personal than you might think.
The Simple No-Sew Denim Bowl
If you can cut fabric and apply glue, you can make a sturdy denim bowl in under an hour. Start by cutting your jeans into strips about 1 inch wide and 6–8 inches long. You'll need roughly 30 strips for a medium bowl.
Coat each strip in a mixture of equal parts white glue and water, then drape them over an inverted bowl covered in plastic wrap. Layer the strips in a crisscross pattern, pressing them together. Let it dry for 24 hours, then peel it off the plastic. The result is a flexible yet firm bowl that's perfect for keys, coins, or a small plant.
Why it works: the glue stiffens the denim, and the woven layers create a surprisingly strong structure. Common mistake: using too much glue, which makes the bowl gummy and slow to dry. Aim for a thin, even coat.
Turn Jeans into a Sturdy Tote Bag
A pair of adult jeans yields enough fabric for a roomy tote. Cut off the legs, then cut along the inner seams to open the fabric flat. For the bag body, use the back panels—they already have the pockets, which become handy compartments.
Sew the sides and bottom together with a ½-inch seam allowance, using a denim needle (size 100/16) and heavy-duty thread. For the handles, cut two strips from the leg fabric, fold them in half lengthwise, and stitch. Attach them to the top edge, reinforcing with a square of stitching.
Why it works: denim's tight weave makes it naturally abrasion-resistant, so the bag can handle books, groceries, or tools. Mistake to avoid: skipping the reinforcement on the handles—they bear the most weight and can pull off if not secured properly.
The 15-Minute Denim Coasters
Coasters are the perfect beginner project. Cut six 4×4-inch squares from your jeans. If you want a finished edge, cut two squares per coaster and sew them right sides together, leaving a small opening. Turn them inside out, press, and topstitch around the edge.
For a no-sew version, simply fray the edges by pulling a few threads—denim frays beautifully into a soft fringe. Stack two squares and glue them together with fabric glue for extra absorbency.
Why it works: denim absorbs condensation and protects surfaces, and the texture adds a rustic touch. Mistake: using fabric with too much stretch (like jegging material), which won't lie flat. Stick to 100% cotton denim.
Create a Denim Pocket Organizer
Those back pockets are gold. Cut them out with a generous border of fabric, then arrange them on a backing—a piece of sturdy canvas or another denim panel—and stitch them in place. Hang it on a wall or inside a closet door.
I made one for my studio to hold scissors, marking pens, and a small ruler. It's become an indispensable part of my workspace. The pockets are already shaped and finished, so the project takes about 30 minutes.
Why it works: the pockets are pre-constructed, saving you time and effort. Mistake: placing pockets too close together, which makes it hard to fit items. Leave at least 1 inch between them.
Weave a Denim Rug or Mat
For a larger project, try weaving. Cut jeans into 2-inch-wide strips and sew them end-to-end to create a long continuous strip. Use a simple loom or a homemade frame with nails. Weave the strips over and under warp threads (strong cotton string works well).
A 2×3-foot rug takes about 4 pairs of jeans and a weekend. The result is a durable, washable mat that feels good underfoot. Why it works: the density of the weave creates cushioning and longevity. Mistake: pulling the strips too tight, which distorts the shape. Keep the tension even and gentle.
Repair and Reinforce with Denim Patches
Before you cut up a pair, consider mending. Denim patches can extend the life of your favorite jeans by years. Cut a patch slightly larger than the hole, then use a zigzag stitch or a simple running stitch to attach it from the inside. For a visible mend, use a contrasting thread and stitch around the edges.
I've patched the knees of my husband's work jeans three times; each patch adds character and strength. Why it works: the patch reinforces the weak area and distributes stress. Mistake: using a patch that's too stiff—pre-wash it to soften and prevent puckering.
The Hacks, Step by Step
- 1Sort your denim
Separate jeans by color and weight. Lightweight denim for small projects, heavyweight for bags and rugs. - 2Wash and dry
Always pre-wash and dry your jeans to shrink them and remove finishes. This prevents future distortion. - 3Gather tools
You'll need sharp scissors, a seam ripper, denim needles, heavy-duty thread, and fabric glue. A rotary cutter helps for straight lines. - 4Cut strategically
Cut along seams to maximize fabric. Save pockets, waistbands, and hems—they're ready-made features. - 5Start small
Begin with a coaster or bowl to build confidence. The skills transfer to larger projects. - 6Finish edges
Denim frays, so either sew a hem, use fray check, or embrace the frayed look by pulling threads evenly.
Every pair of jeans holds a story; upcycling lets you write the next chapter.
Frequently Asked Questions
What can I make from old jeans without sewing?
You can make no-sew denim bowls, coasters, and even rugs using fabric glue or weaving. The bowl project is a great start: just glue strips over a plastic-wrapped form.
How do I cut jeans for upcycling?
Cut along the seams to open the fabric flat. Use sharp scissors or a rotary cutter, and save pockets, waistbands, and hems for ready-made features.
What needle and thread should I use for sewing denim?
Use a denim needle (size 100/16) and heavy-duty polyester thread. This combination prevents needle breakage and ensures strong seams.
Can I upcycle stretch jeans?
Yes, but stretch denim (with elastane) is trickier for structured projects because it doesn't hold shape as well. It's better for soft items like pillows or quilts.
How do I prevent fraying on denim projects?
You can sew a hem, use fray check liquid, or embrace the fray by pulling threads evenly for a fringed edge. Pre-washing also reduces future fraying.


