

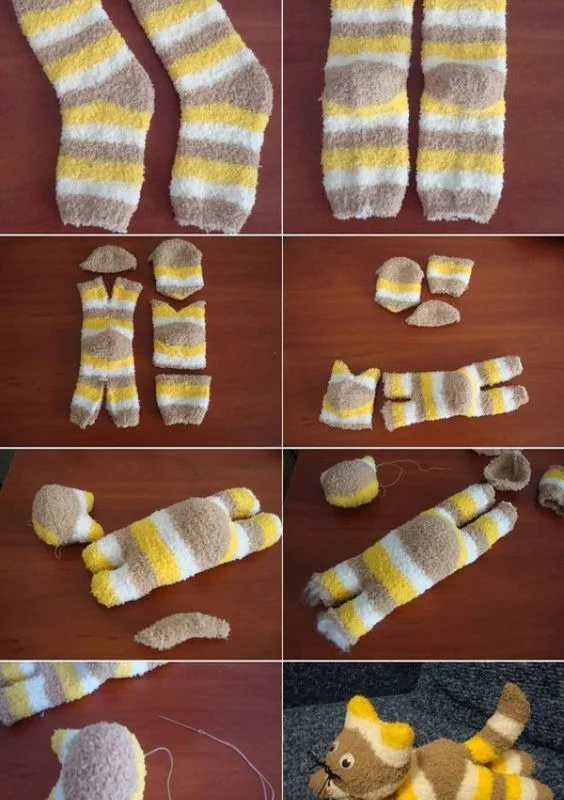
There's a particular magic in a stuffed animal small enough to cup in your palm — a pocket-sized fox, a thumb-sized bunny, a bear that fits in a teacup. Below are the hacks, techniques, and 50 tutorial ideas that turn scraps of felt and thread into tiny creatures with real personality.
Advertisements1
- Use a 3/16-inch seam allowance for animals under 4 inches — bulk is the enemy of clean turning.
- Felt (1mm wool-blend) is the best fabric for anything under 4 inches because it doesn't fray and holds crisp edges.
- Tease fiberfill into wispy tufts and stuff extremities first for a smooth, squeezable finish.
- Low, wide-set eyes read as cute; high, close-set eyes read as startled — it's a proportion rule, not a mystery.
- Add 5–10 grams of poly pellets to the base so tiny animals sit upright on shelves.
- Batch your cutting and sewing in groups of five to cut per-animal time by roughly 40%.
Why Small Stuffed Animals Are a Different Craft Entirely
Scale changes everything. A 12-inch bear forgives a lumpy seam; a 3-inch bear amplifies every wobble in your stitching. That's not a warning — it's the whole appeal. When you sew small, you're working in miniature, and miniature rewards precision in a way that big plush simply doesn't.
Here's the number that matters: most palm-sized patterns call for a 3/16-inch (about 5mm) seam allowance, not the standard 3/8 inch. Halve your seam allowance and you halve your bulk, which means the finished animal turns cleanly and the limbs don't look like sausages. I learned this the hard way after my first batch of felt mice came out looking like tiny boxing gloves.
What draws you to small plush — is it the speed, the scrap-busting, or the sheer cuteness of a creature that fits in a coat pocket? Answer that and you'll know which of the 50 tutorials below to try first.
The Three Fabric Rules That Separate Cute From Clunky
Rule one: match fabric weight to finished size. Felt (1mm wool-blend) is the gold standard for anything under 4 inches because it doesn't fray and holds a crisp edge. Cotton quilting fabric works beautifully from 4 to 7 inches. Anything larger and you can graduate to minky or fleece.
Rule two: use a stretch stitch on knits. A straight stitch on minky will pop the moment a child squeezes it. Set your machine to a narrow zigzag (1.5mm width, 2.5mm length) and the seam flexes with the pile.
Rule three: clip curves at 1/8-inch intervals before turning. Small animals are almost entirely curves — round ears, fat cheeks, stubby tails — and unclipped curves pucker into hard little corners. Use sharp embroidery scissors and snip right up to (never through) the stitch line.
Common mistake: choosing a fabric because it's cute in the flat. That glittery felt may sparkle on the bolt, but it sheds micro-glitter all over your machine and clogs the feed dogs. Test a scrap on a spare seam first.
Stuffing: The Invisible Skill Nobody Teaches
Polyester fiberfill is not one product — it's a spectrum. Cheap craft fill clumps and goes lumpy within weeks; a good siliconized cluster fill (like Morning Glory or Fairfield's premium grades) stays springy for years. For animals under 5 inches, reach for the finest cluster fill you can find.
Technique matters more than product. Tease the fill into loose, wispy tufts about the size of a cotton ball, then add them one at a time with a chopstick or hemostat. Pack the extremities — paws, ears, tail tips — first and firmly, then work toward the body with lighter density so the animal feels squeezable rather than rock-hard.
Here's the trick that changed my tiny plush forever: leave a 1-inch gap and use a 6-inch doll-making needle to add a few grams of steel shot or poly pellets in the bottom. A weighted base means your little fox sits upright on a shelf instead of doing a permanent face-plant.
Mistake to avoid: overstuffing. A tiny animal stuffed to bursting will split seams along the curve, and no amount of ladder stitching hides that.
Faces at 2 Inches: Where Cuteness Is Won or Lost
A face on a 6-inch plush has room to breathe. A face on a 2-inch plush is a haiku — every mark counts. The single most effective trick is to place the eyes low and wide. High, close-set eyes read as aggressive or startled; low, wide-set eyes read as baby-like and endearing. This is the same proportion rule that makes cartoon characters cute.
For eyes, use 4mm or 6mm safety eyes for anything over 3 inches. Below that, embroider with two strands of floss using a satin stitch over a tiny felt circle, or try French knots for a bead-like finish. Noses are best as a small triangle of felt with a single stitch of shine at the tip — that highlight is the difference between 'cute' and 'lifeless.'
Try this writing prompt as a design exercise: describe your animal's personality in one sentence before you sew the face. 'Sleepy hedgehog who hoards acorns' produces different eyebrows than 'mischievous raccoon who steals socks.' Let the sentence guide your stitch placement.
Speed Hacks: Finishing a Tiny Plush in Under an Hour
Small animals are fast if you stop treating them like large ones. Skip the turning hole and the ladder stitch entirely on felt projects — instead, sew right sides together leaving a 1-inch gap on a straight edge, turn, stuff, and close with a simple whipstitch in matching thread. On felt, that closure disappears completely.
Use fusible web (like Heat-n-Bond Lite) to attach appliqué details — cheeks, bellies, patches — before you sew the body. It holds everything flat and eliminates pinning, which is where most tiny-project time evaporates.
Batch your work. Cut five bodies at once, sew five at once, stuff five at once. Assembly-line sewing cuts per-animal time by roughly 40% because you're not rethreading, re-setting, and re-thinking between each one. My record for a 3-inch felt bunny, start to finish, is 22 minutes — and that includes the embroidered nose.
What's the one step in your current process that always slows you down? Name it, then build a hack around it — that's how the 50 tutorials below were born.
50 Tutorial Ideas to Try, Organized by Skill and Style
Here's your menu. For absolute beginners (felt, hand-sewn, under 1 hour): tiny felt fox, felt acorn mouse, felt mushroom with a face, felt bat with button eyes, felt bee in a jar, felt cat in a teacup, felt ghost, felt pumpkin bear. For confident beginners (machine-sewn, 4–6 inches): mini bear with jointed arms, pocket bunny, tiny elephant with floppy ears, mini dinosaur, small owl with felt feathers, mini whale, tiny turtle with a shell pouch, mini sloth.
For intermediate makers: 5-inch jointed teddy with a wobble head, miniature ragdoll cat, tiny alpaca with brushed yarn fleece, mini dragon with wire-supported wings, small hedgehog with a yarn-spike back, tiny penguin with a felt beak, mini octopus with poseable tentacles, small deer with embroidered spots. For scrap-busting and upcycling: sock monkey in miniature, glove-tip mice, sweater-felt bunnies, denim bear from old jeans, flannel shirt fox, felted wool-sweater owl, button-eyed fabric scrap cat, tiny tote-bag bear.
For seasonal and gift sets: mini advent-calendar animals, wedding-cake topper bears, tiny Halloween black cats, miniature Christmas mice in matchboxes, small Valentine's hedgehogs with felt hearts, Easter egg chicks, mini graduation bears, tiny birthday-cake toppers. And for the adventurous: needle-felted 2-inch animals, mini plush with moveable wire armatures, tiny animals with removable clothing, miniature animals in walnut-shell beds, and palm-sized animals with embroidered portraits on their bellies.
Pick three that make you grin. That grin is your best design compass.
The Hacks, Step by Step
- 1Downsize your seam allowance
Set a 3/16-inch (5mm) seam allowance for any animal under 4 inches. Standard 3/8-inch allowances create bulk that prevents clean turning and makes small limbs look bloated. - 2Clip every curve before turning
Snip at 1/8-inch intervals right up to the stitch line on all curved seams. This releases tension so ears and cheeks round out smoothly instead of puckering. - 3Tease and layer your stuffing
Pull fiberfill into wispy tufts and add them one at a time with a chopstick, packing paws and ears firmly and the body lightly. This prevents lumps and keeps the animal squeezable. - 4Weight the base
Add 5–10 grams of poly pellets or steel shot to the bottom before final stuffing. A weighted base lets tiny animals sit upright on shelves instead of tipping over. - 5Place eyes low and wide
Position eyes at roughly one-third down the face and set wider than feels natural. This baby-proportion trick is the fastest route to instant cuteness. - 6Batch-cut and batch-sew
Cut five bodies before sewing any, then sew all five in sequence. Assembly-line work cuts per-animal time by about 40% by eliminating repeated setup.
A face on a 2-inch plush is a haiku — every stitch counts, and the eyes do most of the talking.
Frequently Asked Questions
What is the easiest small stuffed animal to make for beginners?
A hand-sewn felt fox or bunny with a simple two-piece body is the easiest starting point. Felt doesn't fray, so you can sew, turn, stuff, and whipstitch the gap closed in under an hour without any finishing techniques.
What fabric is best for tiny stuffed animals?
Wool-blend felt at about 1mm thickness is best for animals under 4 inches. It holds a crisp edge, doesn't fray, and turns cleanly through small openings — cotton works well from 4 to 7 inches, and minky needs a narrow zigzag stitch.
How do you stuff a small stuffed animal without lumps?
Tease the fiberfill into loose, wispy tufts and add them one at a time with a chopstick, starting at the paws and ears. Packing small amounts repeatedly prevents clumping, while stuffing in one big handful creates lumps.
What size safety eyes should I use for small plush?
Use 4mm or 6mm safety eyes for animals 3 inches and larger. Below 3 inches, embroider the eyes with two strands of floss or use French knots, since safety eye posts need enough fabric depth to lock securely.
How long does it take to make a small stuffed animal?
A 3-inch hand-sewn felt animal takes about 20 to 40 minutes, while a machine-sewn 5-inch jointed bear takes 1.5 to 2 hours. Batching five at once cuts per-animal time by roughly 40%.


