

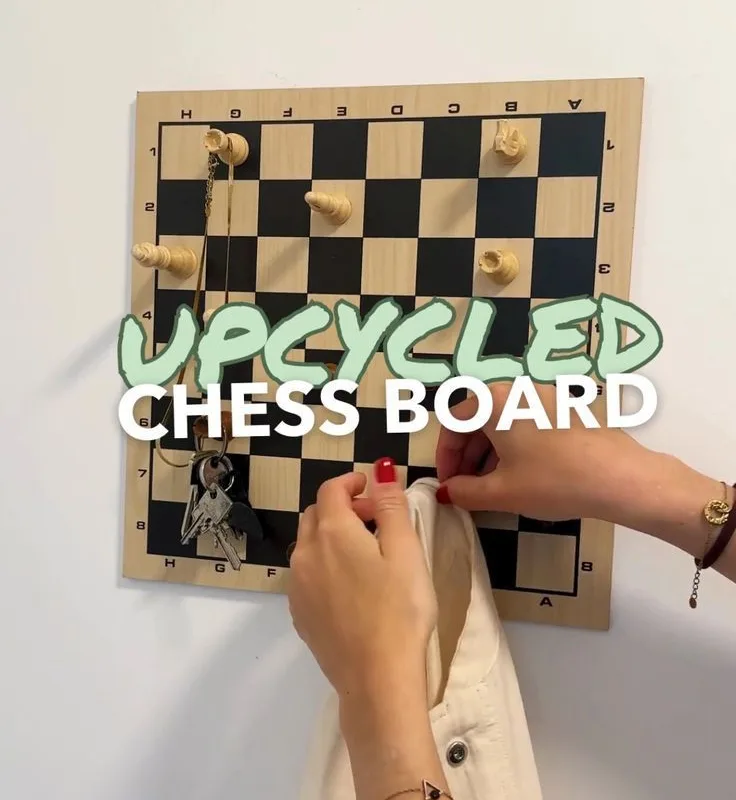
That scuffed chess board in the closet isn't finished — it's a 64-square canvas waiting for a second act. Here are seven upcycling projects I've tested myself, each with the exact steps, the reason it works, and the one mistake that ruins it.
Advertisements1
- A standard 20-inch board yields sixteen 5-inch coasters, one 16-square trivet, or a 12-compartment drawer insert — plan your cuts around those numbers.
- Veneer is only about 0.6mm thick, so hand-sanding or low-power sanding prevents burn-through.
- Always cut through the center of border squares to create a deliberate-looking frame.
- Seal every project with three thin coats of wipe-on poly; bare veneer stains permanently from a single spill.
- Match the project to the board's condition — a warped board becomes a shadow box, a clean one becomes a tray.
Why a Chess Board Is an Almost-Perfect Upcycling Blanket
Before you pick a project, it helps to know what you're working with. A standard tournament board is 20 inches square, and the playing surface is usually maple and walnut veneer over a plywood or MDF core. That veneer is only about 0.6mm thick, which means it sands beautifully but will burn through in seconds if you get impatient with a power sander. I learned that on my grandfather's folding board in 2019 — one pass too many with 80-grit and I had a pale bald patch where the a8 corner used to be.
The grid itself is the gift. Sixty-four squares give you a built-in measuring system, a ready-made color palette of two tones, and a visual rhythm that reads as intentional design rather than craft-project chaos. When I made a trivet from a broken board, guests assumed I'd bought it. The pattern did the work.
So before you cut anything, sit with the board for a minute. Run your thumb along the edge. Is there a scratch that reminds you of a particular game? That memory can guide the project — a piece you keep visible rather than one you sand away. With kindness, Sofia.
1. The 16-Square Trivet (The Easiest Real Win)
Cut a 4×4 block of squares — that's 5 inches square on a standard 20-inch board — and you have a trivet in under twenty minutes. The 16-square grid is visually dense enough to look deliberate on a table, and the veneer handles heat surprisingly well because it sits on a stable core. I've had one under a 400°F cast-iron pan for three years with no scorching.
Measure from the outer edge inward so you keep a clean factory edge on two sides — it makes the finished piece look more precise than it is. Sand the cut edges with 150-grit, then 220, and finish with two coats of a food-safe oil like mineral oil or a wipe-on poly if the trivet won't touch food directly.
The common mistake: cutting along the grid line instead of through the middle of a square. Cut through the center of the border squares and you get a half-square border that reads as a frame. Cut on the line and the edges look like they're missing something. Ask yourself: do you want a border, or do you want the pattern to fall off the edge?
2. A Wall-Mounted Key Rack With Brass Hooks
This one takes about 45 minutes and turns a board into a piece that earns its wall space. You need four to six small brass cup hooks, a drill with a 1/16-inch bit, and a picture-hanging kit rated for at least 10 pounds — the board itself weighs roughly 2 to 3 pounds, and keys add more than you'd think.
Mark your hook positions along the top row of squares, spacing them 3 inches apart and centering each hook within a square. Pre-drill every hole; the veneer will split if you drive a hook straight into it, and there is no fixing a split veneer. Screw the hooks in by hand until the cup faces up.
The mistake I see most: mounting it with adhesive strips. A loaded key rack pulls away from the wall over time, especially in a hallway with a door that slams. Use proper hardware, and if you're renting, use a single small nail rated for the load rather than strips. It's a two-minute difference and it saves your board from a fall.
3. The Chess-Board Serving Tray
A tray gives you the most usable object per square inch. Buy a set of four 3-inch brushed-brass handles (about $12 online), then attach them 1.5 inches in from each corner using 5/8-inch screws — check your board's thickness first, because a 3/4-inch board plus a 5/8-inch screw plus a handle is exactly at the limit. I use a strip of painter's tape on the drill bit as a depth stop. It sounds fussy. It has saved me twice.
Seal the surface with three thin coats of a wipe-on polyurethane, sanding with 320-grit between coats. The veneer is porous enough that an unsealed tray will stain from a single glass of red wine — I know because I tested it, and the ring is still there on the prototype.
The mistake: using a heavy epoxy pour as a finish. It looks gorgeous in photos, but a poured finish on a veneered board can delaminate the veneer as it cures and shrinks. Stick with thin wipe-on coats you control.
4. Turn Squares Into a Coaster Set
One board yields sixteen 5-inch coasters if you're careful, or twelve if you leave a margin. Cut 4×4-square sections, then round the corners with a 1/4-inch roundover bit or just sand them by hand — hand-sanding gives a softer, more handmade look that suits the material. Finish the faces with three coats of poly and add a cork or felt backing cut from a $3 sheet.
The reason this works so well: coasters are small enough that the chess pattern reads as an abstract checkerboard rather than a literal game piece. Nobody looks at a coaster and thinks "chess." They think "nice pattern." That's the magic of scale.
The mistake: skipping the backing. Bare wood on a wet glass will warp a thin coaster within a week, and the veneer will lift at the edges. The backing isn't decoration — it's structural. Also, keep one coaster for yourself. It's a small, daily reminder of the board's first life.
5. A Shadow Box for the Pieces Themselves
If the board is beyond saving — water damage, missing squares, a warped core — don't throw it out. Cut it down to fit inside a shadow box frame (an 8×8 or 10×10 frame works well) and mount a few of the original pieces inside. I did this with a board from a set my uncle taught me to play on, and the king and queen sit on their starting squares, glued in place with a dot of E6000.
This project honors the object instead of erasing it. The board's wear becomes part of the story. Use the frame's included backing, add a small label with the year and a line about the board's history, and hang it somewhere you'll pass daily.
The mistake: using hot glue. It fails in warm rooms and leaves a residue that's impossible to remove if you change your mind. E6000 or a clear craft adhesive gives you a clean, reversible-ish bond. And if you're hesitating about cutting up a sentimental board, ask yourself: would you rather it sit in a box, or hang where you see it?
6. The Desk Organizer Drawer Insert
This is the project for anyone with a shallow desk drawer and a chaotic pen situation. Measure your drawer's interior, then cut the board to fit with a 1/8-inch clearance on each side. Glue thin 1/4-inch basswood strips along the grid lines to create compartments — the existing squares tell you exactly where to place them, which is the whole advantage.
A 20-inch board cut to 18×12 inches gives you a 12-compartment organizer for pens, clips, a ruler, and a phone cable. Finish with a matte poly so pens don't slide. I built one in 2021 and it's still the most-used thing I've made.
The mistake: cutting to the exact drawer measurement. Wood moves with humidity, and a snug insert will jam. That 1/8-inch gap is the difference between a drawer that glides and one you dread opening.
7. A Small Plant Stand or Propagation Shelf
For a sturdier board — one with a solid core rather than hollow MDF — you can turn it into a low plant stand. Attach four 6-inch hairpin legs ($15–$20 for a set) with the included screws, positioning them 2 inches in from each corner. Seal the top with three coats of exterior-grade polyurethane, because a plant stand will get watered on.
The 20-inch square is a perfect footprint for three 4-inch nursery pots, and the two-tone grid looks intentional under terracotta. I keep mine by a south-facing window with a pothos and two small cacti, and the board's wear reads as patina rather than damage.
The mistake: skipping the seal because "it's just plants." Water rings and soil spills will stain bare veneer permanently within a season. Seal it before the first pot goes on, not after.
The Hacks, Step by Step
- 1Assess the board before you cut
Check thickness (1/2 to 3/4 inch is typical), core material, and veneer condition. Solid-core boards handle legs and hooks; hollow MDF boards are best for flat projects like trays and coasters. - 2Choose one project, not five
Pick the project that matches your board's condition. A warped board becomes a shadow box; a clean board becomes a tray or key rack. One finished piece beats four half-started ones. - 3Mark cuts through square centers
Use a pencil and a square, and cut through the middle of border squares so the pattern reads as a deliberate frame rather than a cropped edge. - 4Tape a depth stop on every drill bit
Wrap painter's tape around the bit at the depth you need. It prevents drilling through a 3/4-inch board when mounting handles or hooks. - 5Sand progressively: 150, then 220
Veneer is thin. Hand-sand or use a low setting on a random orbital sander, and stop as soon as the surface feels even and the color is uniform. - 6Seal with three thin coats
Wipe-on polyurethane, sanding with 320-grit between coats. Thin coats prevent the veneer from lifting and give a finish that lasts years. - 7Add hardware rated for the load
Use picture-hanging hardware rated for at least 10 pounds, and check screw length against board thickness before mounting anything heavy.
The board's wear isn't damage to hide — it's the story you're building the project around.
Frequently Asked Questions
Can you cut a chess board with a regular saw?
Yes, a fine-tooth hand saw or a jigsaw with a 20-TPI blade will cut through a veneered board cleanly if you score the veneer first with a utility knife. Score along your cut line on both faces before sawing to prevent the veneer from chipping out at the edges.
What's the best finish for an upcycled chess board?
Wipe-on polyurethane in three thin coats is the most reliable choice for most projects. It's forgiving, doesn't build up thickly enough to lift the veneer, and can be sanded and recoated if you make a mistake; use mineral oil only for food-contact pieces like trivets.
How do I remove the old finish from a chess board?
Start with a chemical stripper rather than sanding, because sanding thin veneer removes material you can't get back. Apply the stripper, wait the labeled time, and scrape gently with a plastic scraper; then hand-sand with 220-grit only to smooth what's left.
Is an old chess board worth upcycling or should I donate it?
Upcycle it if the board has sentimental value or a solid core that can hold hardware; donate it if it's complete and playable. A complete set in good condition is genuinely useful to a school or community center, and that's a fine second life too.
How much does it cost to upcycle a chess board?
Most projects cost under $20 in materials — brass hooks run about $8, a set of hairpin legs $15–$20, and a can of wipe-on poly around $12 and lasts for many projects. The board itself is the free part, which is why this is one of the most affordable upcycling projects you can take on.


