

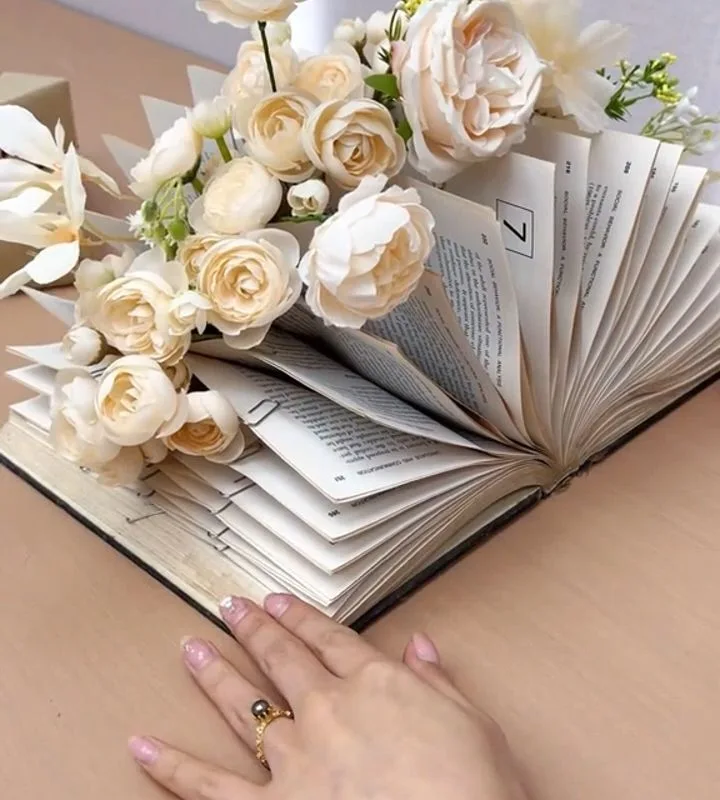
There’s a quiet magic in giving a forgotten book a second life—not as something to read, but as something to hold. Here are seven practical, hands-on ways to transform old books into vases that bring light and texture into your home.
Advertisements1
- Use hardcover books with at least 200 pages for stability.
- Always insert a glass or jar to protect pages from moisture.
- Seal the cut edges with wax or clear sealant to prevent warping.
- Cut in small page batches for a clean, even cavity.
- Choose lightweight, flexible stems to avoid tipping the book.
- Dust regularly with a soft brush to keep the pages pristine.
Choosing the Right Book for Your Vase
The best books for this craft have sturdy hardcovers and at least 200 pages—enough depth to cradle a glass insert without tipping. I once tried a flimsy paperback, and the whole structure sagged within a day. Look for cloth-bound or textured covers; they absorb glue and paint beautifully, while glossy dust jackets resist adhesion.
Essential Tools and Materials
You’ll need a sharp craft knife, a metal ruler, a cutting mat, pH-neutral PVA glue, a glass vase or jar that fits snugly inside the book’s footprint, and optional acrylic paint or wax to seal the edges. I prefer recycled glass jars—they’re free and add a lovely imperfection. Always work in a well-lit space; the precision of your cuts depends on seeing the grain of the paper.
The Hollow-Out Method: A Step-by-Step
Open the book about 20 pages in, place the glass vessel on the page, and trace its base with a pencil. Cut out that rectangle, then repeat every 10–15 pages, creating a cavity that deepens as you go. This method takes patience—about 45 minutes for a 300-page book—but yields a hidden vase that looks like a book from the outside. I’ve found that cutting in small batches prevents the pages from shifting.
The Fold-and-Fan Technique for a Sculptural Vase
If you want something more sculptural, fold every page in half vertically, then fan them out to form a circular opening. Glue the first and last pages to a flat base (like a wooden disc) to stabilize the structure. The folds create a beautiful accordion texture that catches light. Mistake to avoid: using thick, glossy pages—they crack instead of folding cleanly. Stick to standard paperback paper.
Waterproofing Your Book Vase
Even with a glass insert, moisture can seep into the pages over time. Brush a thin layer of clear matte sealant or melted beeswax over the inside cavity and the top edges of the pages. This creates a barrier that prevents warping. I learned this after losing a beloved poetry volume to a leaky glass—now I always seal twice, letting the first coat dry completely.
Styling Your Book Vase
Place your book vase on a windowsill where afternoon light can play across the spine, or nestle it among other books on a shelf. Use stems with gentle curves—like eucalyptus or ranunculus—to contrast the rigid geometry of the pages. Avoid heavy, top-heavy blooms that could topple the structure; a few sprigs of lavender are enough to make the piece breathe.
Caring for Your Creation
To keep your book vase beautiful, change the water every two days and trim stems at an angle. Dust the pages with a soft, dry brush—never a damp cloth. If you notice the glue loosening, reapply a small amount with a toothpick. These small rituals extend the life of your craft and honor the book’s former purpose.
The Hacks, Step by Step
- 1Select a sturdy hardcover book
Choose one with at least 200 pages and a cloth or textured cover. This ensures the structure can hold the weight of flowers and water. - 2Gather your tools
You’ll need a craft knife, metal ruler, cutting mat, PVA glue, a glass insert, and sealant. Having everything within reach keeps the workflow smooth. - 3Trace the glass insert
Place the glass vase on the first page you’ll cut and trace its base with a pencil. This gives you a precise template for the cavity. - 4Cut out the cavity
Using the ruler and knife, cut out the traced rectangle on every 10–15 pages. Work in small batches to keep the pages aligned and prevent tearing. - 5Seal the pages
Apply a thin layer of clear sealant or melted beeswax to the inside cavity and top edges. This waterproofs the paper and prevents mold. - 6Insert the glass and arrange flowers
Place the glass into the cavity, then add water and your chosen stems. Trim them at an angle for better water uptake.
A book vase is not just a container; it’s a conversation between the written word and the living bloom.
Frequently Asked Questions
What kind of book is best for turning into a vase?
A hardcover book with at least 200 pages and a cloth or textured cover works best. It provides enough depth and sturdiness to hold a glass insert and flowers without collapsing.
Do I need to use a glass insert?
Yes, you should always use a glass insert or jar to hold water and flowers. This protects the pages from moisture and prevents the book from getting damaged.
How do I waterproof the pages of a book vase?
Brush a thin layer of clear matte sealant or melted beeswax over the inside cavity and the top edges of the pages. This creates a moisture barrier that prevents warping and mold.
Can I use a paperback book for this project?
It’s possible, but paperbacks are less sturdy and may sag. If you try, choose one with a thick cover and use a smaller glass insert. However, hardcovers are strongly recommended for best results.
How do I keep the pages from tearing when I cut them?
Work in small batches of 10–15 pages and use a sharp craft knife with a metal ruler. Cutting on a self-healing mat also helps maintain precision and prevents tearing.


