

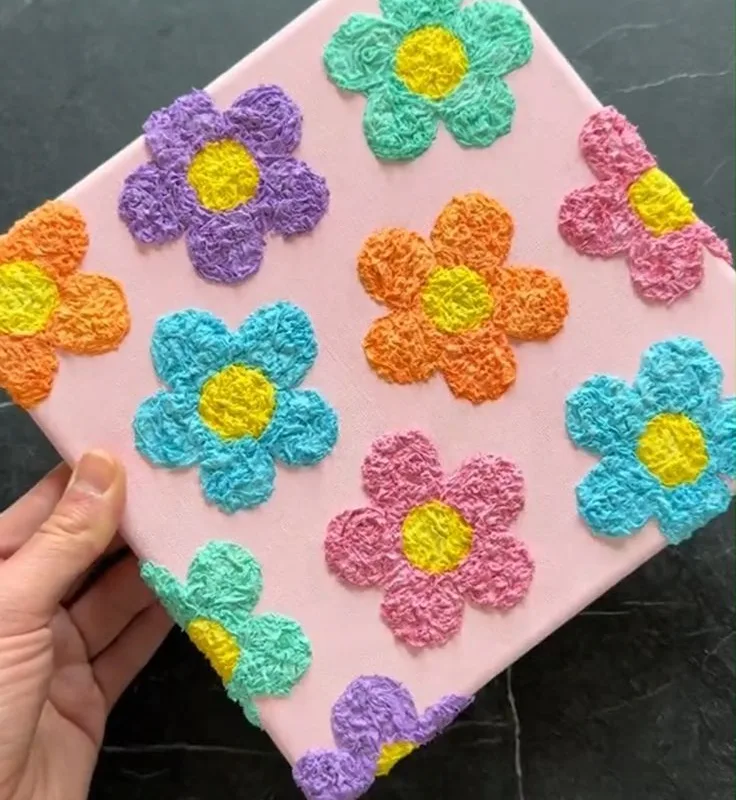
Tissue paper textured art is the easiest way to add dimension to your walls without expensive supplies. These 7 hacks will have you creating gallery-worthy pieces in under an hour.
Advertisements1
- Layer torn tissue paper to create depth—overlap edges for shadows.
- Use a hair dryer on low to speed drying without warping.
- Mix acrylic paint with water for a marbled effect, but don't over-wet.
- Hot glue dots under tissue create raised 3D shapes.
- Seal with matte medium, not Mod Podge, to avoid tackiness.
- A brayer removes bubbles and ensures even adhesion.
- Floating frames enhance texture by adding shadow and depth.
Hack 1: Layer Tissue Paper for Instant Depth
Tear tissue paper into 1-2 inch pieces. Apply a thin layer of Mod Podge to your canvas. Press the pieces down, overlapping edges. Add a second layer in a different color. The crinkled edges create shadows that look like expensive texture paste.
Why it works: The overlapping layers catch light differently, mimicking the look of carved plaster or fabric. A common mistake is using too much glue, which makes the paper soggy and flat. Use a foam brush and apply glue sparingly.
Hack 2: Use a Hair Dryer to Speed Up Drying
After applying tissue and glue, aim a hair dryer on low heat about 6 inches from the surface. Move it constantly for 2-3 minutes. The paper will dry faster and the glue will set without warping.
Why it works: Gentle heat evaporates moisture quickly, preventing the tissue from tearing or bubbling. But don't use high heat—it can scorch the paper or cause the canvas to warp. Keep it on low and keep moving.
Hack 3: Add Acrylic Paint for a Marbled Effect
Mix acrylic paint with a little water (1:1 ratio). Brush it over the dried tissue. While wet, use a plastic wrap to dab and lift paint. This creates a marbled, organic pattern.
Why it works: The plastic wrap creates unpredictable textures that look like stone or marble. A common mistake is using too much water—it can dissolve the glue. Use a light touch and blot, don't scrub.
Hack 4: Create 3D Shapes with Glue Dots
Apply small dots of hot glue or tacky glue to the canvas. Let them dry completely. Cover with tissue paper and press gently. The dots create raised bumps.
Why it works: The dried glue acts as a resist, so when you paint over it, the bumps stand out. Don't use too much glue or the bumps will be too large and look messy. Aim for pea-sized dots.
Hack 5: Seal with Matte Medium for a Professional Finish
After your art is completely dry, brush on a coat of matte medium. This seals the tissue and prevents tearing. It also gives a smooth, non-shiny finish.
Why it works: Matte medium is flexible and won't crack. A common mistake is using Mod Podge as a sealer—it can stay tacky in humid conditions. Matte medium dries clear and hard.
Hack 6: Use a Brayer to Smooth Bubbles
After gluing tissue, roll a brayer over the surface to push out air bubbles. Press firmly but evenly.
Why it works: Bubbles create weak spots that can tear later. A brayer applies even pressure. Don't use a rolling pin—it's too heavy and can crush the texture. A brayer is designed for this.
Hack 7: Frame with a Floating Frame for a Gallery Look
Mount your canvas in a floating frame, leaving a 1-inch gap between the canvas and frame. This adds depth and makes the art look professional.
Why it works: The gap creates a shadow that draws the eye to the texture. A common mistake is using a standard frame that presses against the canvas, flattening the texture. Floating frames are available at craft stores for under $20.
The Hacks, Step by Step
- 1Gather Supplies
You'll need: canvas (any size), tissue paper (assorted colors), Mod Podge, foam brushes, acrylic paint, matte medium, hair dryer, brayer, and optional floating frame. Total cost: about $25. - 2Prepare Your Workspace
Cover your table with parchment paper or a plastic drop cloth. Tissue paper art is messy—glue gets everywhere. Work in a well-ventilated area. - 3Tear Tissue Paper
Tear (don't cut) tissue into 1-2 inch pieces. Tearing creates soft edges that blend better. Sort by color if you're using multiple shades. - 4Apply Base Layer
Brush a thin layer of Mod Podge on the canvas. Place tissue pieces, overlapping slightly. Press down with your fingers. Don't worry about wrinkles—they add texture. - 5Add Texture
Use one or more hacks: glue dots for 3D shapes, plastic wrap for marbling, or extra layers for depth. Let your creativity guide you. - 6Dry and Seal
Dry with a hair dryer on low, then let air-dry for 1 hour. Seal with matte medium. This protects your art and gives a professional finish. - 7Frame and Display
Once completely dry (24 hours), frame in a floating frame. Hang in a spot with good lighting to show off the texture.
The secret to tissue paper art is embracing imperfection—wrinkles and tears become texture, not mistakes.
Frequently Asked Questions
What kind of tissue paper works best for textured art?
Standard gift-wrapping tissue paper works great. Avoid glossy or metallic tissue, as glue doesn't adhere well. Bleeding tissue can add interesting color effects but may muddy your design.
Can I use school glue instead of Mod Podge?
Yes, but school glue dries with a matte finish and may not be as durable. Mod Podge is preferred because it's archival and flexible. If using school glue, mix with water 1:1 for easier spreading.
How do I prevent tissue paper from tearing when gluing?
Apply glue to the canvas, not the paper. Use a foam brush to gently press the paper down. If it tears, just add another piece on top—it adds to the texture.
Can I make tissue paper art on wood instead of canvas?
Absolutely. Sand the wood first, then apply a coat of gesso or primer. The process is the same. Wood gives a sturdier base, great for large pieces.
How long does tissue paper art last?
With proper sealing (matte medium), it can last for years. Keep it out of direct sunlight to prevent fading. Avoid humid areas like bathrooms.


