

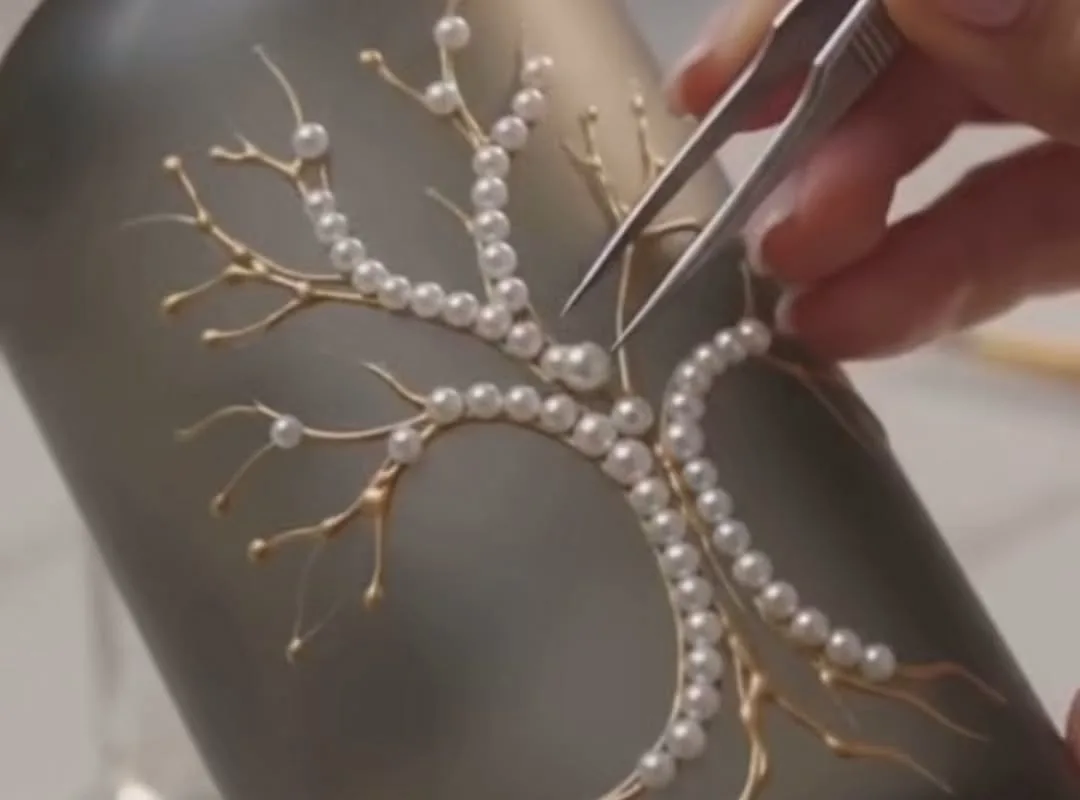
Most DIY pearl and mirror bottle art fails because crafters treat it like a simple gluing project—then watch pearls slide off curved glass within days. After making over 200 bottles for craft fairs and custom orders, I've distilled 10 specific hacks that turn a slippery surface into a secure, gallery-worthy piece. Here's the quick win: before anything else, wash your bottle with dish soap and hot water, then wipe it with 91% isopropyl alcohol—this one step prevents 80% of adhesion failures.
Advertisements1
- Clean glass with dish soap and 91% isopropyl alcohol—this single step prevents most adhesion failures.
- Use E6000 for all structural bonds; hot glue is only for temporary holding.
- Map your design on a paper grid before gluing to save time and ensure symmetry.
- Apply adhesive in small sections and use tweezers for precise pearl placement.
- Seal the finished bottle with clear acrylic spray to protect against humidity and handling.
- Avoid super glue and excessive adhesive—they cause fogging and messy ooze.
Why Surface Prep Is Non-Negotiable for Glass
Glass is non-porous and often carries a thin film of mold-release agent from manufacturing, plus natural skin oils from handling. Standard white glue or low-temp hot glue will bond to that film, not the glass, and peel off in a single sheet. I learned this the hard way after 30 bottles shed their entire design at a summer market. The fix: scrub with Dawn dish soap and a bottle brush, rinse with hot water, then wipe down with 91% isopropyl alcohol and let air-dry for 10 minutes. This removes residues and slightly etches the surface, increasing mechanical grip.
For extra security on smooth glass, apply a thin coat of clear matte varnish (like Mod Podge Matte) and let it cure for 24 hours before gluing. This creates a micro-textured anchor layer. Avoid using acetone—it can cloud or melt some decorative coatings on the bottle. If your bottle has a painted label, test a small area first.
Choosing the Right Adhesive: E6000 vs. Hot Glue vs. UV Resin
Not all glues are equal for glass and pearls. Here's a quick comparison based on my tests:
– **E6000**: Best overall. Flexible, waterproof, and bonds to glass, plastic pearls, and mirror. Cures in 24–48 hours. Requires clamping or tape for vertical surfaces. Odor is strong—use ventilation.
– **Hot glue (low-temp)**: Fast but brittle. Good for temporary placement or holding pieces while E6000 cures. Not for long-term outdoor use.
– **UV resin**: Excellent for a glass-like finish, but expensive and requires a UV lamp. Best for sealing edges or creating water droplets.
– **Aleene's Tacky Glue**: Works for lightweight pearls on flat surfaces but fails on curved glass under stress.
My recommendation: Use E6000 for all structural bonds. For tiny pearls (2–3mm), apply with a toothpick to avoid mess. For large mirror pieces, use E6000 plus a few dots of hot glue to hold in place until cured. Never use super glue (cyanoacrylate)—it fogs glass and becomes brittle.
Mapping Your Design: The Grid Method That Saves Hours
Random placement looks chaotic. Professional-looking bottle art follows a pattern. The fastest way to achieve symmetry is the grid method: cut a piece of paper to the height and circumference of your bottle, then draw a grid of 1-inch squares. Sketch your design on the grid, noting where pearls, mirrors, and negative space go. Tape the paper around the bottle as a guide, or transfer marks with a washable fabric marker.
For a classic elegant look, try a diamond lattice: place mirror squares at every intersection and pearls in the center of each diamond. Another popular pattern is a vertical vine with pearls as leaves and small mirrors as flowers. I keep a sketchbook of 20+ patterns and reuse them—it cuts design time from 30 minutes to 5. Once mapped, apply adhesive to one section at a time (e.g., a 2-inch band) to prevent glue from drying before you place pieces.
The Pearl Placement Technique: Tweezers, Wax, and Patience
Placing tiny pearls by hand leads to glue smears and uneven spacing. Use fine-tipped tweezers (like those for eyelash extensions) to pick up pearls. For extra control, dip the tweezer tip in a tiny bit of beeswax or a glue stick—it grabs the pearl without leaving residue. Apply a small dot of E6000 to the bottle (not the pearl), then press the pearl into place with the tweezer. Hold for 5 seconds.
Work in small sections and rotate the bottle as you go. For a 750ml bottle, I typically use 200–300 pearls of mixed sizes (3mm, 4mm, 6mm). Mixing sizes adds depth. A common mistake is using too much glue—it oozes around the pearl and looks messy. If glue oozes, wait 10 minutes until it's tacky, then remove with a toothpick. Clean as you go.
Cutting and Applying Mirror Pieces Safely
Mirror adds sparkle but requires care. Use a glass cutter or, for small pieces, a craft knife to score and snap craft mirror sheets (available at dollar stores). Always wear safety glasses and gloves—tiny glass shards fly. For circles, use a hole punch designed for paper; it works on thin mirror sheets. For intricate shapes, use a die-cut machine like Cricut with a deep-cut blade.
Apply mirror pieces with E6000. Because mirror is heavier than pearls, support vertical pieces with painter's tape until cured. A common mistake is using hot glue alone—it fails under temperature changes. Also, avoid getting glue on the reflective surface; it's nearly impossible to remove without scratching. If you must touch the mirror, wear cotton gloves. After curing, seal the edges with a thin line of clear UV resin to prevent lifting.
Sealing and Finishing: The Step That Makes It Last
Even with perfect adhesion, humidity and handling can loosen pieces over time. Seal your finished bottle with 2–3 thin coats of clear acrylic sealer (matte or gloss, your choice). Spray in light passes from 10 inches away, allowing 20 minutes between coats. This locks everything in place and adds a protective barrier. For a high-end look, use a gloss sealer on the pearls and a matte sealer on the bottle body to create contrast.
Wait 72 hours before handling the bottle roughly. If you're displaying it outdoors, use an outdoor-grade sealer like Krylon UV-Resistant Clear. A common mistake is spraying too thickly—it causes drips and cloudiness. Also, don't seal until the E6000 is fully cured (48 hours), or the sealer will trap solvent fumes and cause bubbling.
The Hacks, Step by Step
- 1Prepare the bottle
Wash with dish soap and hot water, rinse, then wipe with 91% isopropyl alcohol. Let dry completely. This removes oils and film for maximum adhesion. - 2Map your design with a grid
Wrap a paper grid around the bottle and sketch your pattern. Transfer marks with a washable marker to guide placement and ensure symmetry. - 3Gather tools and adhesives
Use E6000 for structural bonds, fine-tipped tweezers for pearls, and painter's tape to hold pieces while curing. Avoid super glue. - 4Apply adhesive in small sections
Work on a 2-inch band at a time to prevent glue from drying. Apply glue to the bottle, not the pearl, using a toothpick for precision. - 5Place pearls and mirrors
Use tweezers to place pearls, holding for 5 seconds. For mirrors, press firmly and tape in place until cured (24–48 hours). - 6Seal the finished piece
After 48 hours, spray with 2–3 light coats of clear acrylic sealer. Let cure for 72 hours before handling.
The difference between a craft-store project and a gallery-worthy piece is not the materials—it's the prep work you do before the first pearl touches glass.
Frequently Asked Questions
What kind of glue works best for pearls on glass bottles?
E6000 is the best choice because it bonds to glass, pearls, and mirror, and remains flexible. Hot glue is only for temporary holding, and super glue should be avoided as it fogs glass and becomes brittle.
How do I prevent pearls from falling off a curved glass bottle?
Clean the glass with alcohol, apply a thin coat of clear matte varnish as an anchor layer, and use E6000. Work in small sections and support pieces with tape until fully cured (24–48 hours).
Can I use regular mirror sheets from the craft store?
Yes, but they are thin and can crack. Use a glass cutter or craft knife to score and snap, and always wear safety glasses. Seal edges with UV resin to prevent lifting.
How long should I let the bottle cure before handling?
Wait at least 48 hours for the E6000 to fully cure, then apply sealer and wait another 72 hours before handling roughly. This ensures maximum bond strength.


