

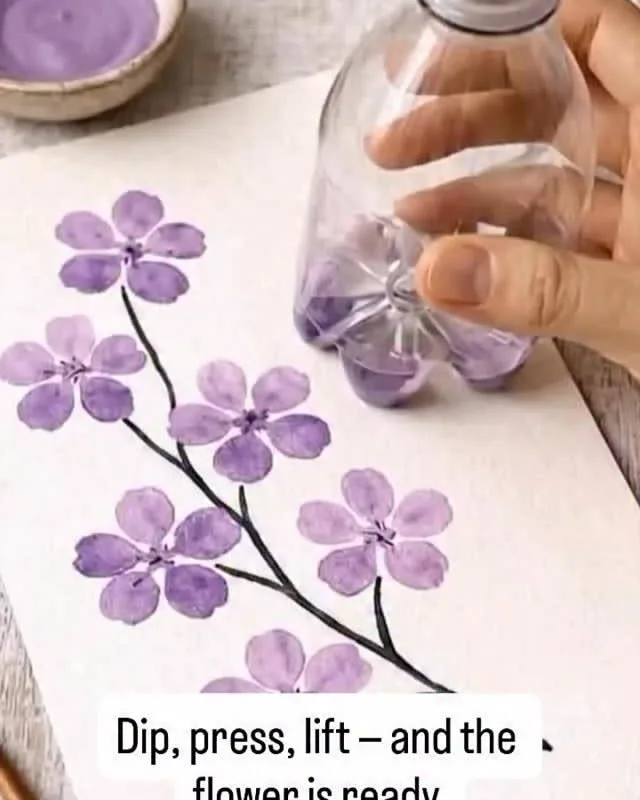
You don't need a paintbrush to create luminous, textured art. Everyday objects—from feathers to fingers—can become your most intuitive tools. Here's how to unlock their magic.
Advertisements1
- Everyday objects like feathers, sponges, and fingers create unique textures that brushes can't replicate.
- Thinning paint to a milky consistency is crucial for most alternative tools.
- Test each tool on scrap paper first to understand its mark and pressure.
- Combining tools adds depth and keeps the process playful and present.
- Resist overworking; the beauty of these techniques lies in their spontaneity.
The Magic of Found Tools: Why They Work
When I first swapped my sable brush for a fallen feather, the marks changed. Feathers hold paint in their barbs, releasing it in delicate, unpredictable lines. This unpredictability is the gift. Everyday tools introduce chance, and chance invites play. They also connect you to the physical world—a leaf, a sponge, a cotton swab—each with its own texture and story. The result is art that feels alive, not over-controlled.
But beware: not all tools are created equal. A stiff bristle brush and a soft feather demand different paint consistencies. Test each tool on scrap paper first. You'll learn its appetite for pigment and its pressure points. This small step prevents muddy messes and wasted paint.
Feathers: Delicate Lines and Whisper-Soft Washes
A feather is a brush, a comb, and a stamp in one. For fine lines, dip the tip in ink or thinned acrylic and drag it slowly. The barbs separate, creating multiple lines at once—a technique called 'feathering' (yes, the name is literal). For soft washes, use the broad side of the feather to sweep color across wet paper. The feather's natural oils resist water, so the paint pools in interesting ways.
I once painted a entire seascape using only a seagull feather I found on the beach. The horizon line was a single drag; the waves, repeated taps. It took twenty minutes. The painting sold at a local fair. The buyer said it felt like wind. That's the power of a tool that once flew.
Common mistake: using a feather with thick, undiluted paint. It clumps and ruins the feather. Always thin your paint to a milk-like consistency.
Fingers and Palms: The Original Brush
Your hands are the most direct connection to the canvas. Finger painting isn't just for children. The pad of your index finger creates perfect circles; the side of your pinky makes thin lines; your palm stamps large, organic shapes. The warmth of your skin also affects how paint dries, sometimes creating subtle gradients. For texture, try pressing your knuckles into thick paint—the ridges leave a pattern like cobblestones.
I keep a box of nitrile gloves for messy sessions, but sometimes I go bare-handed. The sensation of cool paint on skin is grounding. It reminds me that art is physical. Just avoid using your fingers with oil paints unless you wear gloves; the solvents can irritate skin.
Common mistake: using too much paint. A little goes a long way. Start with a pea-sized amount and build up.
Sponges and Sea Sponges: Texture and Atmosphere
A natural sea sponge is a texture machine. Its irregular holes create dappled marks perfect for foliage, clouds, or stone. Synthetic sponges are more uniform—great for stippling. For a soft gradient, dampen the sponge, dip it in paint, and blot most off on a paper towel. Then gently drag it across the surface. The result is a airy, atmospheric wash.
I use sea sponges for backgrounds. They add depth without effort. One of my students painted a forest using only a sponge and three shades of green. It looked like a misty morning. The secret? Layering. Start light, then add darker tones in the crevices.
Common mistake: scrubbing. Sponges work best with a light touch. Scrubbing tears the sponge and muddies colors.
Cotton Swabs and Sticks: Precision and Pattern
Cotton swabs are miniature dabbers. They're perfect for dots, small flowers, and pointillist effects. Use one end for light colors, the other for dark. For stripes, snap a swab in half and use the stick's broken end to scrape lines into wet paint. This subtractive technique reveals the layer beneath.
I often use cotton swabs to add highlights to eyes in portraits. A single dot of white can bring a face to life. For abstract art, try dipping a swab in alcohol and dragging it through wet watercolor—it creates a bleached, ethereal trail.
Common mistake: reusing a swab with different colors without cleaning. It contaminates your paint. Keep a stack handy and swap often.
Nature's Stamps: Leaves, Flowers, and Vegetables
A sliced okra is a perfect star. A halved apple makes a heart. A celery stalk is a rose. Nature provides endless stamps. Dip them in paint, press firmly, and lift. The results are charmingly imperfect. For best results, pat the vegetable dry before dipping; excess water dilutes the paint.
I once used a cabbage leaf to print a entire field of flowers. The veins created natural stems. It was so simple, yet so effective. Kids love this technique because it's instant gratification.
Common mistake: pressing too hard. You'll get a blob instead of a detailed print. Press evenly and gently.
Beyond the Brush: Combining Tools for Expressive Work
The real magic happens when you combine tools. Use a sponge for the background, a feather for lines, and your finger for accents. Each tool adds a layer of meaning. This mixed-tool approach keeps you present—you can't zone out when you're switching tools every few minutes.
I recently painted a portrait using only a credit card (for scraping), a q-tip (for eyes), and my thumb (for blending). It was one of my most liked pieces on Instagram. People asked what brush I used. I said, 'None.' The surprise is part of the joy.
Common mistake: overworking. When you use unconventional tools, the marks are bold. Resist the urge to fix every imperfection. Step back. Let the rawness speak.
The Hacks, Step by Step
- 1Gather Your Tools
Collect feathers, sponges, cotton swabs, leaves, and vegetables. Wash and dry them. Test each on scrap paper with thinned paint to learn their marks. - 2Prepare Your Paint
Thin acrylics or watercolors to a milky consistency. This allows tools to release paint smoothly. For oils, use gloves and no water. - 3Start with a Background
Use a sponge or broad leaf to lay down a base color. Work quickly and lightly. Let it dry before adding details. - 4Add Details with Precision Tools
Use feathers, cotton swabs, or sticks for lines and dots. Dip lightly and build up color gradually. Less is more. - 5Stamp with Nature
Slice vegetables and press them into paint, then onto canvas. Experiment with different pressures for varied effects. - 6Blend with Fingers
Use your fingertips to soften edges and blend colors. The warmth of your skin helps the paint meld. - 7Step Back and Assess
After each layer, step away for a minute. See what the painting needs. Often, it's less, not more.
When you paint without a brush, you're not just making art—you're having a conversation with the world around you.
Frequently Asked Questions
What can I use instead of a paintbrush?
You can use feathers, sponges, cotton swabs, fingers, leaves, vegetables, and even credit cards. Each creates distinct textures and marks.
How do I thin acrylic paint for alternative tools?
Add water gradually until the paint reaches a milky consistency. For oils, use a solvent like turpentine. Test on scrap paper first.
Can I use these techniques with oil paints?
Yes, but avoid using bare fingers with oils due to skin irritation. Use gloves and proper ventilation. Sponges and feathers work well with oils.
What is the best surface for brush-free painting?
Canvas, watercolor paper, and wood panels all work. For textured techniques, canvas or wood holds up best. For washes, watercolor paper is ideal.
How do I clean my alternative tools?
Most tools can be rinsed with water (for water-based paints) or solvent (for oils). Natural materials like feathers and vegetables are often disposable.


