

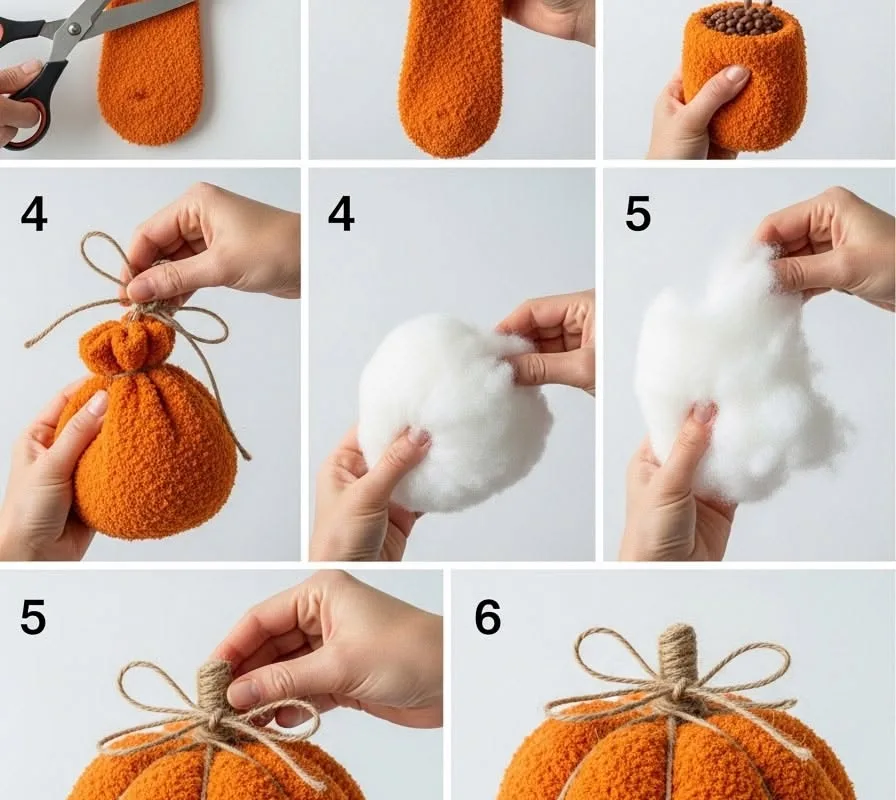
You can make a fluffy sock pumpkin in under 10 minutes with zero sewing, using just a sock, rice, and a rubber band. This guide gives you exact measurements, pro techniques, and common mistakes to avoid, so your pumpkin looks plush and holds its shape.
Advertisements1
- A standard adult crew sock holds exactly 1.5 cups of rice, creating a 4-inch pumpkin that weighs about 12 ounces.
- Use #64 rubber bands (3.5 x 0.25 inches) and double them for security; thin office bands snap.
- Four rubber bands create the classic pumpkin shape; space them evenly at 90-degree intervals.
- Rice is the best filler for weight and moldability; fiberfill is lighter and may tip over.
- Avoid overstuffing: more than 1.5 cups in a crew sock causes bands to pop and a bloated look.
Why sock pumpkins work: the math and materials
A standard adult crew sock (size 9-11) holds about 1.5 cups of rice, creating a 4-inch-diameter pumpkin that weighs roughly 12 ounces. That weight is enough to keep it stable but light enough to sit on a shelf. Use long-grain white rice (not instant) because its uniform shape packs evenly and resists settling. For a larger pumpkin, use a knee-high sock and 2.5 cups of filling; it will be about 6 inches wide.
You also need a strong rubber band (or hair tie) and a pair of scissors. Avoid thin office rubber bands; they snap under pressure. A #64 rubber band (3.5 x 0.25 inches) is ideal. Polyester fiberfill is an alternative to rice, but it's lighter and may not hold the pumpkin's bottom flat. Rice gives a satisfying heft and natural shape.
One common mistake: using a sock with a hole. Even a small hole will leak rice. Inspect the heel and toe before starting. If you find a hole, choose another sock or reinforce it with a dab of fabric glue and let it dry for 10 minutes.
Step-by-step: from sock to pumpkin in 8 minutes
First, cut the sock just above the heel, leaving the toe and about 6 inches of the leg. You'll use the toe section as the pumpkin body. Turn the sock inside out and fill it with 1.5 cups of rice. Use a funnel or a rolled paper to avoid spills. Once filled, squeeze the opening closed and twist it tightly.
Wrap a rubber band around the twisted section, about 1 inch from the top, to create the pumpkin's stem area. Double the rubber band for security. Then, take another rubber band and wrap it around the middle of the pumpkin to create the first segment. Add two more rubber bands at equal distances to form four segments total. This gives the classic pumpkin look.
Finally, cut the excess sock above the rubber band, leaving a 1-inch stub for the stem. You can tuck the stub under or leave it as is. For a more realistic stem, wrap a small piece of green felt or a cinnamon stick around the top. The whole process takes about 8 minutes once you have your materials ready.
Techniques for a professional finish
To get deep, defined segments, use the 'pinch and band' method: after filling, pinch the sock at the center and wrap a rubber band tightly. Then, pinch at the 3 o'clock and 9 o'clock positions and band those. This creates four even lobes. For a six-lobe pumpkin, space bands every 60 degrees. The key is to pull the rubber band as tight as possible without breaking it.
Another trick: use a hair straightener on low heat to gently press the sock's fabric before filling. This relaxes the knit and reduces wrinkles. Test on a scrap first. Also, choose a sock with a tight knit (like a cotton-poly blend) rather than a loose, fluffy sock. Loose knits show rice bumps.
Common mistake: overstuffing. If you use more than 1.5 cups in a crew sock, the rubber bands will pop off or the pumpkin will look bloated. Stick to the measurement. If you want a bigger pumpkin, size up the sock, not the filling.
Filling options: rice vs. beans vs. fiberfill
Rice is the best all-around filler: it's cheap, heavy, and molds well. Dried beans (like black beans) work but are larger and can create lumps. Fiberfill is lightweight and won't leak, but the pumpkin may tip over because it lacks weight. For a 4-inch pumpkin, rice costs about $0.25; fiberfill costs about $0.50. If you're making 10 pumpkins, rice saves you $2.50.
For a sensory-friendly version, use plastic pellets (like those in beanbags). They're heavier than rice and won't spoil. But they're more expensive: $8 for 2 pounds. Rice is still the practical choice for most. If you're concerned about pests, add a tablespoon of dried lavender or a bay leaf to the rice; it deters insects naturally.
One mistake: using instant rice. It's precooked and dusty; it will sift through the sock's weave. Always use regular long-grain rice. Also, don't use wet fillings; they'll mildew.
Stem and embellishment ideas
The stem makes or breaks the pumpkin's realism. A simple option: cut a 2-inch piece of a cinnamon stick and hot-glue it to the top. Cinnamon adds a seasonal scent. For a rustic look, use a twig from the yard, about 3 inches long and 1/4 inch thick. Sand the ends smooth. If you want a fabric stem, roll a 2×3-inch piece of green felt into a cylinder and glue it.
For leaves, cut simple leaf shapes from green felt and glue them near the stem. You can also use artificial leaves from a craft store. To add a vine, twist a 6-inch piece of green floral wire around a pencil and attach it. Keep embellishments light; heavy decorations will pull the pumpkin over.
Mistake to avoid: using too much hot glue. It seeps through the sock and creates hard spots. Use a low-temp glue gun and apply glue to the embellishment, not the pumpkin.
Troubleshooting and durability
If your pumpkin looks lumpy, it's likely underfilled or the rice isn't packed evenly. Remove the filling and repack, shaking the sock gently as you fill. If the rubber bands slip, use two bands per segment or switch to hair ties with silicone grips. For a pumpkin that lasts, keep it away from moisture and direct sunlight; rice can absorb humidity and become moldy. In a dry room, it will last for years.
If you notice rice dust escaping, the sock's weave is too loose. Choose a tighter-knit sock or line the inside with a piece of nylon stocking. To clean, spot-clean with a damp cloth and mild soap; don't submerge. Let it air-dry completely.
For a no-sew pumpkin that holds up to handling, reinforce the top closure with a zip tie instead of a rubber band. Zip ties are stronger and won't degrade. Just trim the tail. This is especially useful if you're making these with kids.
The Hacks, Step by Step
- 1Choose the right sock
Use a clean, hole-free adult crew sock (size 9-11) for a 4-inch pumpkin. Avoid loose knits or thin dress socks; they show lumps and leak rice. - 2Cut and fill
Cut the sock above the heel, turn it inside out, and fill with 1.5 cups of long-grain white rice. Use a funnel to avoid spills. - 3Create the segments
Twist the top and secure with a rubber band 1 inch from the top. Add three more rubber bands evenly around the middle to form four lobes. Pull each band tight. - 4Form the stem
Cut the excess sock above the top rubber band, leaving a 1-inch stub. Tuck it under or cover with a cinnamon stick or felt for a realistic stem. - 5Add embellishments
Glue on felt leaves or a twig stem using a low-temp glue gun. Keep decorations light to avoid tipping. - 6Secure and display
For extra durability, replace the top rubber band with a zip tie. Place the pumpkin on a shelf away from moisture and direct sun.
The difference between a lumpy sock pumpkin and a plush one is 1.5 cups of rice and four tight rubber bands—measure, don't guess.
Frequently Asked Questions
How much rice do I need for a sock pumpkin?
Use 1.5 cups of long-grain white rice for a standard adult crew sock. This amount creates a 4-inch pumpkin that weighs about 12 ounces and holds its shape without being too heavy.
Can I use beans instead of rice?
Yes, but dried beans are larger and can create lumps. Rice is preferred for its uniform shape and weight. If using beans, choose small ones like black beans and fill to the same volume.
How do I make the pumpkin segments stay in place?
Use tight rubber bands and double them if needed. For a more secure hold, use hair ties with silicone grips or zip ties. Pull each band as tight as possible without breaking it.
Will the rice attract pests?
Dry rice doesn't attract pests, but to be safe, add a tablespoon of dried lavender or a bay leaf to the filling. Keep the pumpkin in a dry area and inspect periodically.
How long does a sock pumpkin last?
In a dry, indoor environment, it can last for years. Avoid moisture and direct sunlight. If the rice gets damp, it can mold, so spot-clean only and let it air-dry completely.


