

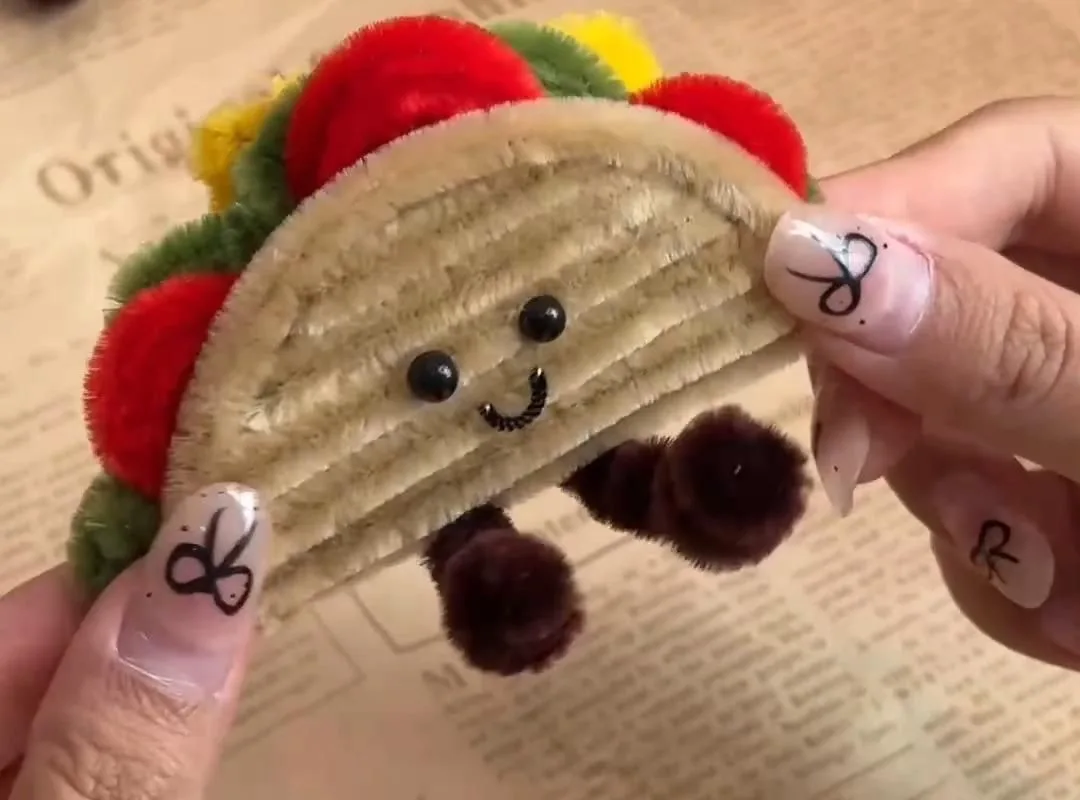
If you've ever wanted to make something adorable with your hands but felt intimidated by complicated crafts, this pipe cleaner taco is your perfect starting point. With just a few twists, you'll have a tiny taco that's full of charm—and I'll share my favorite hacks to make it even easier.
Advertisements1
- Use two pipe cleaners twisted together for a sturdy taco shell.
- Keep fillings small and layered to avoid bulkiness.
- Curve the shell upward for a realistic taco look.
- Add a face for instant charm and personality.
- Experiment with colors and variations to make each taco unique.
- Don't strive for perfection—handmade tacos are charming in their imperfections.
Why Pipe Cleaners Are the Perfect Beginner Craft Supply
Pipe cleaners (also called chenille stems) are forgiving, flexible, and come in every color imaginable. Unlike yarn or paper, they hold their shape without glue or needles, making them ideal for kids and adults who want a quick, satisfying project. I remember my first pipe cleaner flower—it was wonky, but I loved it because it was mine. That's the magic: pipe cleaners let you create something tangible in minutes, and mistakes are easy to fix. Plus, they're inexpensive—a pack of 100 costs around $3 at craft stores, so you can experiment freely.
Gathering Your Taco-Making Supplies: What You Really Need
For this craft, you'll need: 2 tan or orange pipe cleaners for the shell (I like using two to make the taco sturdy), 1 green pipe cleaner for lettuce, 1 red for tomato, 1 yellow for cheese, and 1 brown for the meat (or use any colors you like). You'll also need scissors and optional googly eyes or a tiny felt face to give your taco personality. Don't overthink it—you probably have most of these at home. I once made a whole taco family with just a mixed pack from the dollar store, and they turned out adorable.
The Basic Taco Shape: My Step-by-Step Foundation
Start by taking your two tan pipe cleaners and twisting them together at one end, like a braid, to create a single longer stem. Then, fold it in half to form a 'U' shape—that's your taco shell. To make it look like a real taco, curve the ends slightly upward, like a smile. I like to pinch the bottom to create a slight fold, mimicking the crispy shell. If it doesn't look perfect, don't worry—the filling will hide any imperfections. Remember, this is your creation, and handmade charm is part of the appeal.
Filling Your Taco with Colorful Pipe Cleaner Ingredients
Now for the fun part: fill the taco with your 'ingredients.' Cut small pieces of each colored pipe cleaner—about an inch long—and fold them into tiny zigzags or curls. For the lettuce, I make a loose spiral by wrapping the green around a pencil. For the meat, I use small brown pieces twisted into little clusters. Place them inside the taco shell, layering as you go. I like to start with the meat, then cheese, then lettuce and tomato on top, so it looks like a loaded taco. Don't overstuff—you want the taco to close slightly, like it's holding everything in.
Adding a Face to Make Your Taco Irresistibly Cute
To give your taco a personality, glue on two small googly eyes (or draw them with a marker) and a tiny smile. I use a hot glue gun for a secure hold, but craft glue works too if you're patient. Position the eyes near the top of the shell, and draw a little 'U' mouth below. I once added rosy cheeks with a pink marker, and it made my taco look so happy. This step turns a simple craft into a character that makes people smile—and it's why these tacos are perfect for gifts or desk buddies.
Five Variations to Try Once You've Mastered the Basic Taco
Once you're comfortable, try these twists: 1) Make a mini taco by using half a pipe cleaner for the shell and smaller fillings—perfect for earrings or charms. 2) Create a 'taco family' by making several tacos with different expressions—angry, sleepy, or surprised. 3) Turn your taco into a keychain by adding a small ring to the top. 4) Use pastel colors for a 'sweet taco' that looks like a dessert. 5) Make a taco bookmark by flattening the shell and inserting a ribbon. Each variation teaches you a new skill, like shaping, layering, or attaching hardware.
Common Beginner Mistakes and How to Avoid Them
The biggest mistake I see is using too many pipe cleaners, making the taco bulky and hard to shape. Stick to two for the shell and small pieces for filling. Another mistake is not twisting the shell tightly enough—if it's loose, the taco will flop. Give it a firm twist at the base. Also, be careful with hot glue—it can burn your fingers. I always keep a bowl of cold water nearby just in case. And don't worry if your first taco isn't perfect; my first one looked more like a potato, but my second was adorable. Practice makes progress.
The Hacks, Step by Step
- 1Twist two tan pipe cleaners together
Hold both pipe cleaners side by side and twist them together from one end to the other, creating a single thicker stem. This adds strength to your taco shell. - 2Fold in half to form a U
Fold the twisted stem in half, bringing the ends together. Pinch the bottom to create a slight crease, which will give your taco a realistic folded shape. - 3Shape the shell with a curve
Bend the two ends outward and upward slightly, like a smile. This makes the taco look open and ready for filling. Adjust the curve until it looks like a taco shell. - 4Cut and prepare fillings
Cut small pieces (about 1 inch) of green, red, yellow, and brown pipe cleaners. For lettuce, wrap a green piece around a pencil to make a spiral. For tomato, cut a red piece and fold it into a small triangle. For cheese, cut a yellow piece and curl it slightly. For meat, twist a brown piece into a tiny cluster. - 5Layer fillings inside the shell
Place the meat at the bottom of the U, then add cheese, then top with lettuce and tomato. Don't overstuff—leave a little room so the taco can close slightly. - 6Add a face
Glue two small googly eyes near the top of the shell, and draw a smile with a marker. You can also add rosy cheeks with a pink marker for extra cuteness. - 7Let it dry and display
If you used glue, let it dry completely before handling. Then display your taco on a shelf, give it as a gift, or attach a keychain ring to make it a charm.
The beauty of pipe cleaner crafts is that perfection isn't the goal—joy is.
Frequently Asked Questions
What kind of pipe cleaners are best for crafting?
Standard chenille stems (12 inches long) are best for beginners. They're flexible, easy to twist, and come in a wide range of colors. Avoid the extra-thin ones, as they may not hold shape well.
Can kids make this pipe cleaner taco?
Absolutely! With adult supervision for cutting and glueing, kids as young as 6 can make this craft. It's a great way to develop fine motor skills and creativity.
How do I make my pipe cleaner taco last longer?
To keep your taco in shape, avoid bending it too much after finishing. If you used glue, ensure it's fully dry. Store it in a dry place away from direct sunlight to prevent fading.
Can I use other materials for the filling?
Yes! You can use felt, pom-poms, or even small beads for the filling. Just make sure they're lightweight so they don't weigh down the shell.
What if I don't have googly eyes?
You can draw eyes with a black marker or use small buttons. Alternatively, skip the face entirely—your taco will still look cute with just the colorful filling.


