

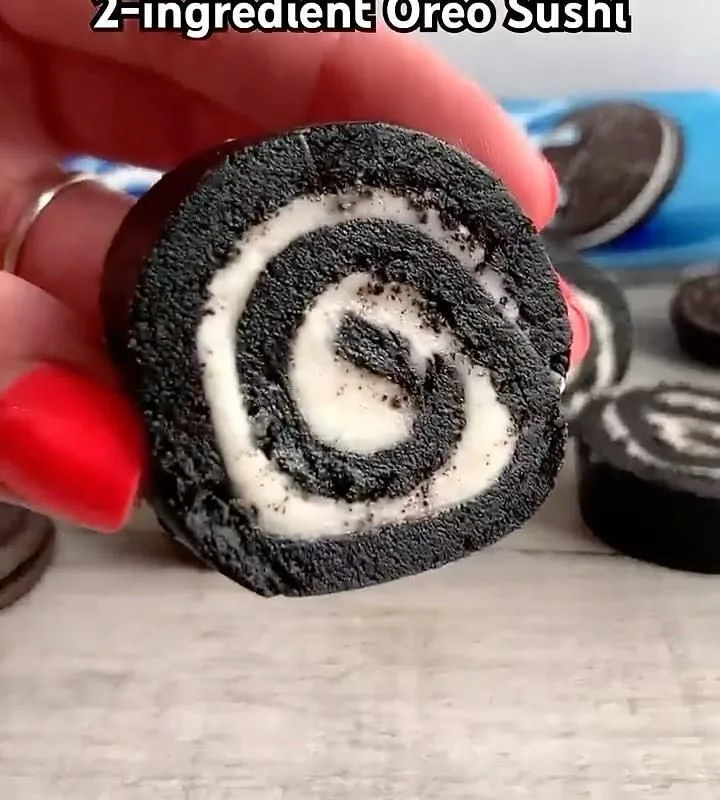
Oreo Sushi is the dessert that makes everyone do a double-take. It looks like delicate sushi rolls, but each bite is a creamy, crunchy, chocolatey treat. And the best part? It comes together in just 20 minutes with no oven required.
Advertisements1
I first made this for a kids' party, and it disappeared before the pizza did. The combination of soft, chewy Oreo crumbs wrapped in a sweet cream cheese filling and a dark chocolate 'nori' layer is irresistible. Plus, it's a fantastic way to get kids involved in the kitchen.
Whether you're looking for a fun weekend project, a unique party platter, or a clever homemade gift, Oreo Sushi is your answer. Let's roll!
Why You'll Love This Recipe
About the Ingredients
24 Oreo cookies (about 2 cups / 240g crushed)
Use classic Oreos for the true cookies-and-cream flavor. You can substitute any chocolate sandwich cookie, but avoid double-stuf for a sturdier roll.
4 oz (113g) cream cheese, softened
Use full-fat cream cheese for the best texture. If you only have low-fat, add a tablespoon of butter to compensate.
1/4 cup (55g) unsalted butter, softened
Salted butter works too – just skip the added salt in the filling. Make sure it's soft for easy mixing.
1 cup (120g) powdered sugar
Also called confectioners' sugar. If you're out, you can blend granulated sugar until fine, but sift it well.
1 tsp vanilla extract
Pure vanilla extract gives the best flavor, but imitation works fine. You can also use the cream from inside the Oreos for extra flavor.
8 oz (225g) dark chocolate, melted
Use dark chocolate for the 'nori' look. You can substitute milk or semi-sweet chocolate, but dark gives the best contrast. Melt it gently in the microwave or over a double boiler.
White chocolate or candy melts, for drizzling (optional)
This is for the decorative 'rice' effect on top. You can skip it or use a simple powdered sugar glaze instead.
Tips & Tricks
- Crush the Oreos into fine crumbs using a food processor or a zip-top bag and rolling pin. Fine crumbs help the roll hold together without cracking.
- Soften the cream cheese and butter completely before mixing – this prevents lumps in your filling. Leave them on the counter for 30 minutes.
- When melting chocolate, do it in 20-second bursts in the microwave, stirring between each, or use a double boiler. Overheating makes it seize and become grainy.
Pro Tips
Step-by-Step Instructions
1. Crush the Oreos
Place the Oreos (including filling) in a food processor and pulse until you have fine crumbs. Alternatively, put them in a zip-top bag and crush with a rolling pin. You want a uniform texture – no big chunks.
2. Mix the filling
In a medium bowl, beat the softened cream cheese and butter together until smooth and fluffy. Add the powdered sugar and vanilla, and continue beating until fully combined. The mixture should be light and spreadable.
3. Form the roll
Lay a sheet of plastic wrap on a clean surface. Spread the Oreo crumbs evenly over the plastic wrap in a rectangle about 8×10 inches and 1/4 inch thick. Gently press the crumbs down to compact them.
4. Add the cream filling
Spread the cream cheese mixture evenly over the Oreo layer, leaving a 1/2-inch border on the long sides. The filling should be about 1/4 inch thick.
5. Roll it up
Using the plastic wrap to help you, carefully roll the Oreo layer from the short end into a tight log, like a sushi roll. Press gently to seal the edge. Wrap the log tightly in the plastic wrap and refrigerate for at least 2 hours, or until firm.
6. Coat with chocolate
After chilling, unwrap the roll and place it on a wire rack set over a baking sheet. Pour the melted dark chocolate evenly over the top, using a spatula to spread it. Let the excess drip off. Refrigerate for 15 minutes until the chocolate sets.
7. Slice and decorate
Using a sharp knife, slice the roll into 1/2-inch thick pieces. For a sushi look, drizzle each piece with white chocolate or place a small dot on top. Serve chilled or at room temperature.
Delicious Variations
Peanut Butter Sushi
Mix 2 tablespoons of peanut butter into the cream cheese filling for a nutty twist.
Mint Oreo Sushi
Use mint Oreos and add 1/4 teaspoon peppermint extract to the filling. Dip in dark chocolate for a refreshing combo.
Strawberry Sushi
Add 2 tablespoons of strawberry jam to the cream cheese filling and top with a slice of fresh strawberry before rolling.
How to Store Oreo Sushi
Refrigerator
Store in an airtight container in the fridge for up to 5 days. Place parchment paper between layers to prevent sticking.
Freezer
Freeze the uncoated roll for up to 2 months. Wrap tightly in plastic wrap and then foil. Thaw overnight in the fridge before coating and slicing.
Reheating
This dessert is best served chilled or at room temperature. No reheating needed – just take it out 10 minutes before serving.
Frequently Asked Questions
Q: Can I use regular Oreos instead of Double Stuf?
Yes, you can use any Oreo variety. Regular Oreos work great, but you might want to add a few extra cookies if you need more crumbs.
Q: How do I make the chocolate coating smooth?
Make sure your chocolate is melted slowly and not overheated. Stir in a teaspoon of coconut oil or shortening to help it flow smoothly and set with a glossy finish.
Q: Can I make Oreo sushi ahead of time?
Absolutely! You can prepare the roll and keep it refrigerated for up to 3 days before slicing and serving. The flavors actually meld together better after a day.
Q: What if I don't have a food processor?
Place the Oreos in a zip-top bag and crush them with a rolling pin or a heavy pan. It takes a few extra minutes but works perfectly.
Q: How do I get clean slices without cracking the chocolate?
Use a sharp serrated knife and cut with a gentle sawing motion. Wipe the blade clean between cuts, and let the roll sit at room temperature for a few minutes if it's too hard.
If you loved this Oreo Sushi, don't forget to share it with your friends and family! Tag me in your photos and follow for more fun, easy desserts. Happy saving, Maya!

Oreo Sushi
Oreo Sushi – a fun, no-bake dessert that looks like sushi but tastes like cookies and cream. Perfect for parties, kids, and gifting!
🧂 Ingredients
- 24 Oreo cookies (about 2 cups / 240g crushed)
- 4 oz (113g) cream cheese, softened
- 1/4 cup (55g) unsalted butter, softened
- 1 cup (120g) powdered sugar
- 1 tsp vanilla extract
- 8 oz (225g) dark chocolate, melted
- White chocolate or candy melts, for drizzling (optional)
📋 Instructions
- 1Crush the Oreos — Place the Oreos (including filling) in a food processor and pulse until you have fine crumbs. Alternatively, put them in a zip-top bag and crush with a rolling pin. You want a uniform texture – no big chunks.
- 2Mix the filling — In a medium bowl, beat the softened cream cheese and butter together until smooth and fluffy. Add the powdered sugar and vanilla, and continue beating until fully combined. The mixture should be light and spreadable.
- 3Form the roll — Lay a sheet of plastic wrap on a clean surface. Spread the Oreo crumbs evenly over the plastic wrap in a rectangle about 8×10 inches and 1/4 inch thick. Gently press the crumbs down to compact them.
- 4Add the cream filling — Spread the cream cheese mixture evenly over the Oreo layer, leaving a 1/2-inch border on the long sides. The filling should be about 1/4 inch thick.
- 5Roll it up — Using the plastic wrap to help you, carefully roll the Oreo layer from the short end into a tight log, like a sushi roll. Press gently to seal the edge. Wrap the log tightly in the plastic wrap and refrigerate for at least 2 hours, or until firm.
- 6Coat with chocolate — After chilling, unwrap the roll and place it on a wire rack set over a baking sheet. Pour the melted dark chocolate evenly over the top, using a spatula to spread it. Let the excess drip off. Refrigerate for 15 minutes until the chocolate sets.
- 7Slice and decorate — Using a sharp knife, slice the roll into 1/2-inch thick pieces. For a sushi look, drizzle each piece with white chocolate or place a small dot on top. Serve chilled or at room temperature.

Maya writes about everyday budgeting and frugal living, focusing on simple, actionable ways to save money without feeling deprived. She enjoys testing money-saving hacks and sharing what actually works in real life.


