

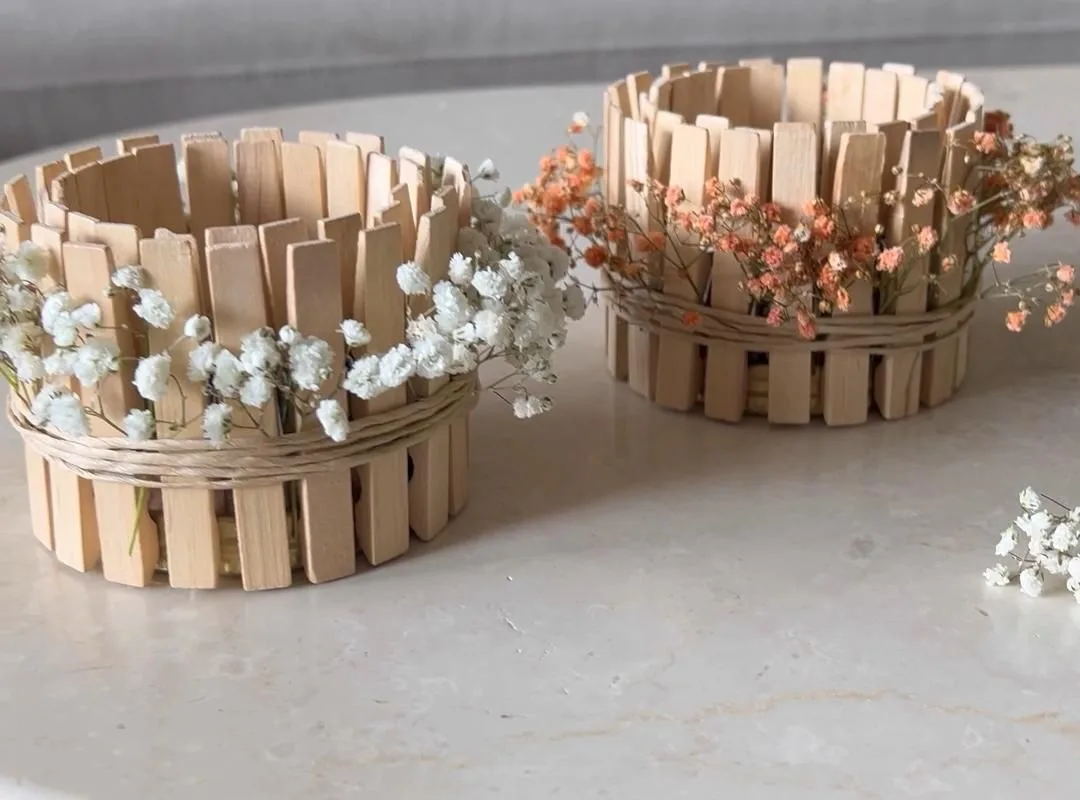
There is a particular kind of quiet that comes from making something with your own hands. A windlicht—a little lantern—built from wooden clothespins and a simple glass jar can transform a corner of your home into a place of calm. Here are seven practical hacks to create one that glows with intention.
Advertisements1
- Choose a clean, chip-free glass jar about 10–12 cm tall for the best proportion.
- Use wooden clothespins, not plastic, and sand rough edges for a smooth finish.
- Attach clothespins with a small dot of strong glue, working in sections to prevent sliding.
- Vary the direction and height of clothespins to add visual interest and texture.
- Always use a heat-resistant base for real candles and never leave them unattended.
- Personalize with paint, stain, or decoupage to make the windlicht uniquely yours.
Choose the Right Glass Jar for Your Windlicht
The foundation of your windlicht is the glass jar. A clean, clear jar with a wide mouth works best—think of an empty jam jar or a mason jar. The glass should be free of chips or cracks, as heat from a candle can cause weak spots to fail. I once used a jar with a tiny nick near the rim; it cracked within an hour, spilling wax across my table. Now I always run my finger around the rim and hold it up to the light to check for imperfections.
The size matters, too. A jar that is too tall will make the clothespins look sparse, while a squat jar can feel cramped. I find that a jar about 10–12 cm tall and 7–8 cm in diameter gives a pleasing proportion—enough surface for the clothespins to wrap around without overwhelming the light. If you are using a jar with a metal lid, remove it; the lid can trap heat and cause the glass to overheat.
Select and Prepare Your Clothespins
Not all clothespins are created equal. The classic wooden spring clothespins—about 7–8 cm long—are ideal. Avoid plastic ones; they can melt or discolor with heat. I prefer old-fashioned wooden pins with a natural finish. If you want a cohesive look, sort through your pins and choose ones that are similar in color and size. A mismatched set can look charming, but too much variation can feel chaotic.
If your clothespins are new, they may have rough edges. A quick sanding with fine-grit sandpaper (220 grit) smooths them and makes them feel nicer to the touch. This also helps if you plan to stain or paint them. I often leave mine natural, but a light rub with a beeswax finish brings out the grain and adds a subtle sheen. If you are using old clothespins, check for splinters and remove the metal springs if they are rusty—rust can stain the wood and the glass.
Attach the Clothespins: Glue vs. No Glue
There are two main ways to attach clothespins to the jar: with glue or without. The no-glue method involves simply clipping the clothespins around the rim of the jar. This works if the jar has a pronounced lip or if you use a rubber band to hold them in place temporarily. However, the pins can shift and may not stay put if the jar is moved. I used this method for a quick centerpiece once, and by the end of the evening, half the pins had slid down.
For a permanent windlicht, use a strong, clear-drying adhesive like E6000 or a hot glue gun. Apply a small dot of glue to the inside of the clothespin where it will touch the glass. Press it firmly against the jar for a few seconds. Work in sections, gluing 5–6 pins at a time, and let them set before moving on. This prevents the pins from sliding out of place. A common mistake is using too much glue; it oozes out and looks messy. A little goes a long way.
Arrange the Clothespins for Visual Harmony
The arrangement of the clothespins determines the character of your windlicht. For a classic look, align them vertically with the spring side facing outward. This creates a rhythmic pattern of wood and metal. For a more organic feel, alternate the direction of the pins—some with the spring out, some with the spring in. This adds texture and catches the light differently.
You can also vary the height. Instead of lining them up perfectly at the top, let some pins sit slightly lower or higher. This breaks the monotony and gives a handcrafted feel. I once made a windlicht where I staggered the pins in a spiral pattern; the light cast dancing shadows on the wall. It was magical. But be careful not to make it too irregular—if the pins are too random, it can look sloppy rather than intentional.
Add a Candle or LED Light
The light source is the heart of your windlicht. A real candle—tea light or votive—gives a warm, flickering glow that is unmatched. But safety first: never leave a burning candle unattended, and place the windlicht on a heat-resistant surface. The glass can get hot, especially if the clothespins are tightly packed and trap heat. I learned this the hard way when a tea light melted the glue on a few pins. Now I always use a candle that sits in a small metal cup or a glass votive inside the jar to contain the heat.
If you prefer a flameless option, LED tea lights are a safe alternative. Look for ones with a warm white glow and a flicker effect. They are perfect for mantels or shelves where you might forget to blow out a candle. I use them in my bedroom windlicht; the soft light is enough to read by without being harsh.
Personalize with Paint, Stain, or Decoupage
A windlicht can be as simple or as decorated as you like. If you want a pop of color, paint the clothespins before attaching them. Acrylic craft paint works well; seal it with a matte varnish to protect against heat and handling. I painted a set in soft sage green and left the tips natural—it looked like a little forest. For a more subtle effect, use a wood stain in a warm walnut tone. It deepens the grain and gives an aged, cozy feel.
Decoupage is another option. Apply a thin layer of Mod Podge to the flat side of the clothespin, press on a small piece of decorative paper or a dried flower, and seal with another layer of Mod Podge. This is a lovely way to incorporate memories—a snippet of map from a trip, a piece of sheet music, or a pressed leaf from your garden. Just avoid bulky items that prevent the pins from sitting flat against the glass.
Display and Care for Your Windlicht
Where you place your windlicht matters. It is meant to be seen and enjoyed. A windowsill, a bedside table, or the center of a dining table are all natural spots. The light will reflect off the glass and the wood, creating a warm, inviting atmosphere. If you use a real candle, keep it away from curtains, drafts, and anything flammable. I like to place mine on a small tray with a few other treasures—a smooth stone, a sprig of eucalyptus—to create a little vignette.
To clean your windlicht, remove the candle and any decorations. Wipe the glass with a damp cloth and mild soap. If you used glue, avoid soaking it; a gentle wipe is enough. The clothespins can be dusted with a soft brush. Over time, the wood may darken slightly from the heat and light—this is part of its story. If a clothespin comes loose, a dab of glue will fix it. With care, your windlicht will last for years, a small beacon of handmade warmth.
The Hacks, Step by Step
- 1Gather materials
Collect a clean glass jar (10–12 cm tall), 30–40 wooden clothespins, strong clear-drying glue (E6000 or hot glue), a tea light or LED candle, and optional decorations like paint or dried flowers. Having everything at hand makes the process smooth. - 2Prepare the clothespins
Sand any rough edges with fine-grit sandpaper. If you plan to paint or stain, do it now and let dry completely. This ensures a smooth, professional finish and prevents splinters. - 3Attach clothespins to jar
Apply a small dot of glue to the inside of each clothespin and press it firmly against the jar. Work in sections of 5–6 pins, aligning them vertically with the spring facing outward. Let each section set before moving on. - 4Arrange for visual harmony
Vary the direction and height of the clothespins slightly to create texture. Step back to check the overall look. Adjust any pins that seem out of place before the glue fully cures. - 5Insert light source
Place a tea light in a metal or glass cup at the bottom of the jar, or use an LED candle. For real candles, add a layer of sand or small stones for stability and heat protection. - 6Personalize (optional)
Add paint, stain, or decoupage to the clothespins before attaching them. Test on a spare pin first to ensure compatibility with your chosen finish. - 7Display and enjoy
Place your windlicht on a heat-resistant surface away from drafts and flammable materials. Clean gently with a damp cloth as needed. Enjoy the warm glow.
A handmade windlicht is not just a object; it is a small act of mindfulness that glows.
Frequently Asked Questions
Can I use plastic clothespins for a windlicht?
No, plastic clothespins can melt or discolor from the heat of a candle. Always use wooden clothespins for safety and a natural look.
How many clothespins do I need for a standard jar?
For a jar about 10–12 cm tall and 7–8 cm in diameter, you will need approximately 30–40 wooden clothespins, depending on how tightly you pack them.
What kind of glue works best for attaching clothespins to glass?
A strong, clear-drying adhesive like E6000 or a hot glue gun works well. Apply a small dot to the inside of the clothespin and press firmly against the glass.
Is it safe to use a real candle in a windlicht?
Yes, but always place the candle in a metal or glass cup to contain heat, set the windlicht on a heat-resistant surface, and never leave it unattended.
How do I clean my windlicht?
Remove the candle and any decorations, then wipe the glass with a damp cloth and mild soap. Avoid soaking if glued. Dust the clothespins with a soft brush.


