

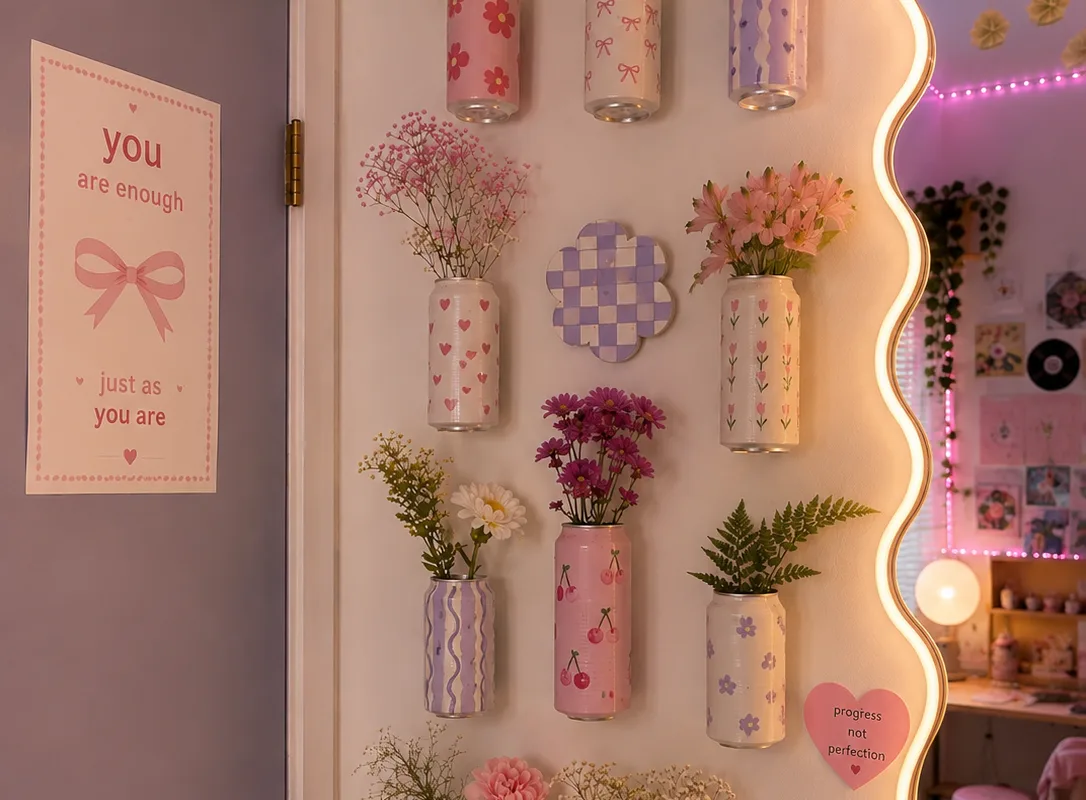
I turned a sad, empty corner of my room into a blooming flower wall using just tin cans and faux flowers – for under $20. You can do it too, and I'll show you exactly how with these 7 hacks.
Advertisements1
- A flower can wall is an affordable, renter-friendly way to decorate a boring corner.
- Cleaning cans thoroughly is crucial to prevent paint peeling.
- Use lightweight faux flowers and secure them with hot glue or floral foam.
- Plan your layout on the floor before hanging to avoid a lopsided result.
- Swap flowers seasonally to keep the display fresh and interesting.
- Total project cost can be under $20 if you use recycled cans and dollar store flowers.
Why a Flower Can Wall Belongs in Your Girly Corner
I first tried this in my apartment when I had a bare corner next to my vanity. It felt cold and unfinished. I wanted something that felt like me—soft, floral, and a little whimsical—without spending a fortune. A flower can wall is perfect because it's modular: you can start with 3 cans and add more over time. It adds vertical interest, which is great for small rooms. Plus, it's renter-friendly: no major holes, just small nails or adhesive hooks. The cans act as tiny vases, so you can swap flowers with the seasons. In my experience, it instantly makes the corner feel intentional and cozy. And the best part? It's forgiving—if a can is slightly crooked, it still looks charming. This isn't about perfection; it's about progress.
Gather These Supplies (Most Are Under $5)
Here's exactly what I used: 6 empty tin cans (14-15 oz size), acrylic paint in soft pink and white, a foam brush, faux flowers (I used peonies and roses from Dollar Tree), a hot glue gun, and adhesive wall hooks (Command brand, the small ones). You'll also need a ruler and pencil for marking. Optional: ribbon or lace for embellishment. I got the flowers in a bunch and cut them apart with wire cutters. Total spend: $18. If you don't have a glue gun, you can use strong craft glue like E6000, but it takes longer to dry. I prefer hot glue because it's instant. Also, make sure your cans are clean and dry—any residue will make paint peel. I soaked mine in warm soapy water and scrubbed with a bottle brush. Dried them overnight. That prep step is key.
Step-by-Step: How to Make the Flower Can Wall
First, paint your cans. I did two coats of pink, letting each dry for 30 minutes. While they dried, I prepared the flowers by cutting stems to about 1 inch. Then, I arranged the cans on the floor to decide the layout. I went with a staggered honeycomb pattern—3 cans on top, 2 in the middle, 1 on bottom—but you can do any shape. Next, I attached adhesive hooks to the wall where the cans would hang. I used a level to make sure they were straight (a ruler works too). Then, I glued a small loop of ribbon to the back of each can to hang on the hook. Alternatively, you can glue a picture hanger tab. Once the cans were hung, I inserted the flowers. I used a bit of hot glue on the stem ends to secure them inside the can. That prevents them from falling out when you dust. Finally, I added a few loose flowers around the base for a fuller look. The whole project took about 2 hours, including drying time.
Design Tips for a Cohesive Girly Look
Stick to a color palette. I chose blush pink, white, and a touch of gold (I painted one can gold as an accent). This keeps it from looking cluttered. Also, vary the flower types but keep them in the same color family. I used different shades of pink and white. For texture, mix matte and metallic finishes. I painted some cans matte and one metallic. Another tip: add a trailing element like a string of fairy lights or a faux ivy vine draped around the cans. It softens the edges. I wrapped a small strand of fairy lights around the top row, and it looks magical at night. Finally, don't overcrowd. Leave some breathing room between cans so each one stands out. I spaced mine about 2 inches apart. If you have a larger corner, you can do a bigger cluster, but keep the spacing consistent.
Common Mistakes to Avoid
The biggest mistake I made the first time: I didn't clean the cans well enough, and the paint chipped within a week. So scrub them thoroughly and let them dry completely. Another mistake: using heavy flowers. If your flowers are too heavy, the adhesive hooks might fail. I learned to use lightweight faux flowers or even paper flowers. Also, don't hang them too high. I initially placed them near the ceiling, and they looked disconnected. Aim for eye level or slightly above. Another pitfall: ignoring the wall type. If you have textured walls, adhesive hooks might not stick. In that case, use small nails. I have textured walls in my current place, so I used tiny white nails—they blend in. Finally, don't rush the layout. I once hung them without planning and ended up with a lopsided mess. Take the time to arrange on the floor first.
How to Style Your Corner Around the Flower Wall
The flower wall is the star, but you can enhance it with complementary pieces. I placed a small vanity table underneath with a cute mirror and a candle. It creates a getting-ready nook. If you don't have a vanity, a simple chair with a throw blanket works. Add a small rug in a matching color to tie it together. I found a pink shag rug at Five Below for $5. Also, consider a floor plant like a faux fiddle leaf fig to add height. I put one in a woven basket next to the vanity. Lighting is key: a warm-toned lamp or fairy lights make the corner glow. I used a small salt lamp on the vanity. Finally, keep it tidy. Since it's a display, clutter distracts. I have a small tray for jewelry and that's it. This corner is now my favorite spot to read or do my makeup.
Seasonal Swaps to Keep It Fresh
One of the best things about this wall is how easy it is to change with the seasons. For spring, I use pastel flowers like tulips and daisies. In summer, bright sunflowers and greenery. Fall, I swap in faux leaves and orange blooms. Winter, I use white flowers and add a touch of silver or snow-dusted pinecones. I keep a small box of extra flowers in my closet, so I can switch them out in minutes. I just pull out the old stems and push in new ones. Since I glued the stems, I actually use a different method now: I place a small piece of floral foam inside each can and stick the stems in. That way, I can change them easily. I cut the foam to fit and hot glue it to the bottom of the can. Then I can rearrange anytime. This keeps the project fresh and prevents boredom.
The Hacks, Step by Step
- 1Clean and dry your cans
Soak in warm soapy water, scrub with a bottle brush, and let dry overnight. This ensures paint adheres and prevents chipping. - 2Paint cans in your color palette
Apply two coats of acrylic paint, letting each dry for 30 minutes. Use a foam brush for smooth coverage. Add a metallic accent can for interest. - 3Plan your layout on the floor
Arrange cans in a pattern (honeycomb, grid, or random) to visualize before hanging. Space them 2 inches apart for balance. - 4Attach adhesive hooks to the wall
Use a level to mark where each can will go. Press hooks firmly and wait 1 hour before hanging anything, per package instructions. - 5Create hanging loops on cans
Hot glue a small ribbon loop or picture hanger tab to the back of each can. Let cool completely before hanging. - 6Insert flowers and secure
Cut stems to 1 inch, add a dab of hot glue, and push into the can. For easy swaps, use floral foam instead of glue. - 7Add finishing touches
Drape fairy lights or faux ivy around the cans. Style the corner with a small table, rug, and lamp to complete the look.
The magic of a flower can wall is that it's forgiving—every little imperfection adds to its charm.
Frequently Asked Questions
How do I hang tin cans on the wall without nails?
Use adhesive hooks like Command strips. Clean the wall with rubbing alcohol first, press the hook firmly for 30 seconds, and wait an hour before hanging. For textured walls, use small nails instead.
What kind of paint works best on tin cans?
Acrylic paint works great and adheres well after cleaning. Spray paint is another option for smooth coverage. Always apply a primer if you want extra durability.
Can I use real flowers in the cans?
Yes, but you'll need to line the cans with a small plastic cup or floral foam to hold water. Real flowers require more maintenance and may drip, so faux is easier for a wall display.
How many cans do I need for a corner?
Start with 5-7 cans for a small corner. You can always add more. A typical arrangement uses 6 cans in a staggered pattern.
How do I keep the flowers from falling out?
Secure them with a dab of hot glue on the stem, or use floral foam inside the can to hold stems in place. This also makes swapping flowers easy.


