

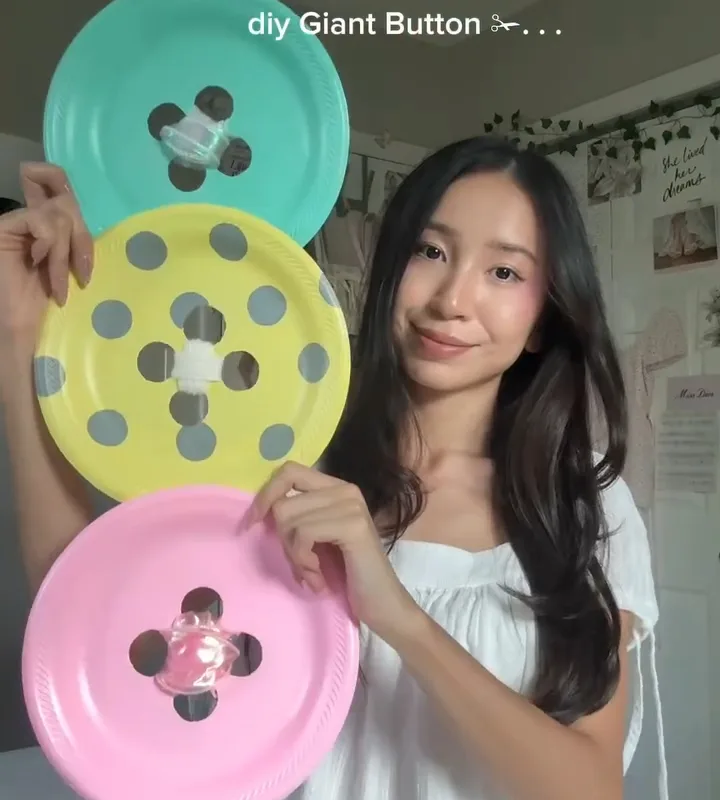
Turn a plain plastic plate into a giant, colorful button that's perfect for games, decor, or costumes. In just 20 minutes and with a few simple supplies, you'll create a durable, lightweight prop that looks just like a real button—only much bigger!
Advertisements1
- Plastic plates are ideal for giant buttons because they're lightweight, durable, and inexpensive.
- Always cut holes before painting to prevent chipping, and apply thin coats of paint for a smooth finish.
- Sealing the paint with Mod Podge or varnish is crucial for longevity and a professional look.
- A hot glue rim mimics a button's raised edge and adds structural strength.
- Get creative with variations like glitter, patterns, or metallic finishes to match any theme.
- These giant buttons are perfect for costumes, decor, games, and photo props.
Why a Plastic Plate Makes the Perfect Giant Button
I've tried making giant buttons from cardboard, foam, and even wood, but plastic plates are my go-to. They're lightweight, durable, and already have that perfect round shape with a slight rim that mimics a button's edge. Plus, they're cheap—I got a pack of 50 for $3 at the dollar store.
The key is to choose the right plate. Look for sturdy, rigid plastic plates (not the flimsy ones). I prefer 9-inch plates because they're big enough to be a statement piece but still easy to handle. Avoid plates with deep rims; a shallow rim works best because it looks more like a button's raised edge.
One mistake I see often: people use paper plates. They warp when painted and won't hold up to handling. Stick with plastic—it's worth the extra few cents.
Gather Your Supplies: What You Really Need
Before you start, gather everything. You'll need: a plastic plate (9-inch works great), a craft knife or sharp scissors, a hot glue gun, a pencil, a ruler, acrylic paint in your chosen color, a paintbrush, and a clear sealer (like Mod Podge or spray varnish). Optional: a drill with a 1/4-inch bit if you want real holes.
I also recommend a cutting mat and a self-healing mat to protect your table. And keep a damp cloth nearby for wiping paint smudges.
Don't skip the sealer. It protects the paint from chipping and gives a glossy finish that makes the button look realistic. I learned this the hard way when my first button got scratched after one use.
Step-by-Step: How to Make Your Giant Button
First, decide on the size of your button's holes. Traditional buttons have two or four holes. For a giant button, two holes look more proportional. Mark two dots about 1.5 inches apart in the center of the plate using a pencil and ruler.
Next, carefully cut out the holes. If you have a drill, use a 1/4-inch bit—it's faster and cleaner. If not, use a craft knife to pierce the plastic, then twist to enlarge. Always cut away from yourself. I like to place the plate on a cutting mat and press firmly.
Now, paint the plate. Apply two thin coats of acrylic paint, letting each dry for 10 minutes. Thin coats prevent drips and give a smooth finish. I used a bright red for my first button, and it popped beautifully.
Once the paint is dry, seal it with a clear sealer. Two light coats are enough. Let it cure for an hour before handling.
Finally, add the rim detail. Real buttons have a raised edge. To mimic that, run a bead of hot glue around the outer edge of the plate. This also reinforces the plate and hides any rough edges. Let the glue cool completely.
Creative Variations to Make It Your Own
Once you've mastered the basic button, try these twists:
– **Glitter buttons:** While the paint is still tacky, sprinkle fine glitter over the surface. Seal it well to prevent shedding.
– **Patterned buttons:** Use stencils or painter's tape to create stripes, polka dots, or chevron patterns. I made a polka-dot button for my niece's Minnie Mouse costume, and it was a hit.
– **Metallic finish:** Use metallic acrylic paint and a dry brush technique to give an aged, vintage look. Rub a little dark paint into the crevices and wipe off the excess.
– **Giant button jewelry:** Attach a pin back or a strong magnet to the back to wear it as a brooch or fridge magnet.
Remember, the hot glue rim can be painted over if you want a uniform color. Just paint it after the glue dries.
Common Mistakes and How to Avoid Them
Even simple crafts can go wrong. Here are pitfalls I've encountered:
– **Using too much paint:** Thick paint cracks when dry. Always apply thin coats.
– **Skipping the sealer:** Without it, paint scratches off easily. I recommend at least two coats of Mod Podge.
– **Cutting holes after painting:** This can chip the paint. Cut holes first, then paint.
– **Not reinforcing the rim:** The hot glue rim isn't just decorative; it strengthens the plate. Don't skip it.
– **Using a dull knife:** A sharp craft knife makes clean cuts. Replace blades often.
By avoiding these, your button will look professional and last through many uses.
Fun Ways to Use Your Giant Button
These oversized buttons aren't just for looks—they're versatile props. Here are some ideas:
– **Costume accents:** Sew or glue them onto a clown costume, a Coraline-inspired outfit, or a doll-themed dress.
– **Party decor:** String them into a garland or use as napkin rings for a craft-themed party.
– **Games:** Use them as markers in giant board games or as tokens in a life-size game of Candy Land.
– **Photo booth props:** Attach a stick to the back for a fun photo prop.
– **Learning tool:** Teach kids about colors, shapes, and counting with a set of these buttons.
I recently used a set of these buttons as part of a 'Button Man' costume for Halloween, and everyone asked how I made them. It was a proud moment!
The Hacks, Step by Step
- 1Choose the Right Plate
Select a sturdy 9-inch plastic plate with a shallow rim. Avoid paper or flimsy plates. This ensures durability and a realistic look. - 2Mark and Cut Holes
Use a pencil and ruler to mark two holes 1.5 inches apart in the center. Cut with a drill (1/4-inch bit) or sharp craft knife on a cutting mat. Cut before painting to avoid chipping. - 3Paint with Thin Coats
Apply two thin coats of acrylic paint, letting each dry for 10 minutes. Thin coats prevent drips and cracks. Choose a bold color for impact. - 4Seal the Paint
Once paint is dry, apply two light coats of clear sealer (Mod Podge or spray varnish). Let cure for an hour. This protects against scratches and gives a glossy finish. - 5Add a Glue Rim
Run a bead of hot glue around the outer edge to mimic a button's raised rim. This also reinforces the plate and hides rough edges. Let cool completely. - 6Personalize (Optional)
Add glitter, patterns, or metallic finishes. Use stencils or painter's tape for designs. Seal again if needed.
The secret to a realistic giant button is in the details: a sturdy plate, thin paint coats, and that hot glue rim.
Frequently Asked Questions
What kind of plastic plate works best for a giant button?
A sturdy 9-inch plastic plate with a shallow rim works best. Avoid paper or flimsy plates as they warp and don't hold paint well.
How do I make holes in the plastic plate?
Use a drill with a 1/4-inch bit for clean holes, or a sharp craft knife on a cutting mat. Always cut before painting to prevent chipping.
Can I use spray paint instead of acrylic?
Yes, spray paint designed for plastics works, but apply thin coats in a well-ventilated area. Acrylic paint gives more control and is easier for details.
How do I seal the paint to make it durable?
Apply two light coats of clear sealer like Mod Podge or spray varnish. Let it cure for at least an hour before handling.
What can I use giant buttons for?
They're great for costumes, party decor, games, photo props, and even as learning tools for kids. The possibilities are endless!


