

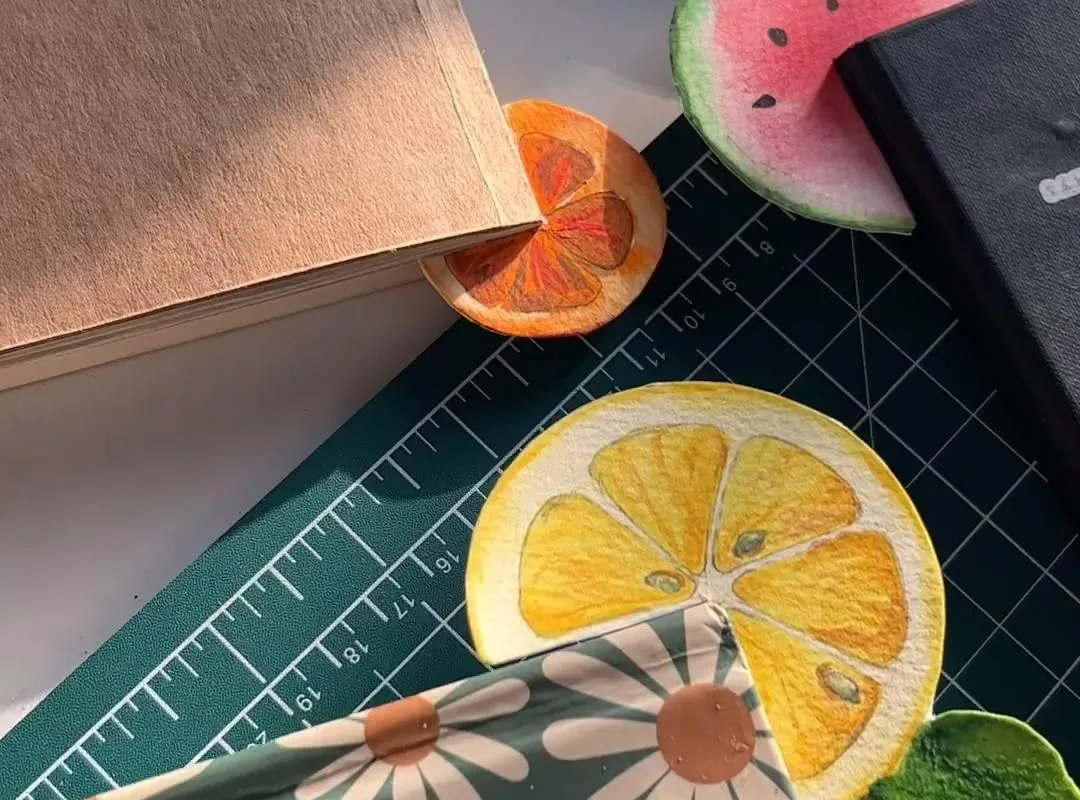
Most DIY fruit bookmarks are cute for about five minutes, then they slip out, stain your page, or fall apart. If you want a bookmark that looks like a strawberry but holds like a real tool, these seven hacks will get you there—without the Pinterest fail.
Advertisements1
- Use craft foam or cork, not paper—rigidity is non-negotiable.
- Add a slit or velcro to grip the page; flat bookmarks always slip.
- Layer details with glue only in the center to prevent curling.
- Create a 3D effect with a partial second layer for visual appeal.
- Seal paper and felt bookmarks to prevent stains and water damage.
- Test every bookmark before gifting or selling—function matters.
Why Most Fruit Bookmarks Fail (and How to Fix It)
The problem is almost always material. Paper fruit cutouts are too flimsy, felt fruit is too thick, and glued-on seeds fall off the first time you shove the bookmark into a bag. The fix is to think like a bookmark, not like a craft project. A bookmark needs three things: rigidity, a grip mechanism, and a flat profile.
Rigidity means it won't bend in your book. Grip means it won't slide out. Flat profile means it won't warp your pages. Most tutorials ignore at least one of these. My rule: if you can't slide it into a paperback without effort, it's not a bookmark—it's a paperweight.
The Best Materials for a Fruit Bookmark That Lasts
Skip construction paper and standard felt. Go for craft foam (2mm thick) or plastic canvas—both are durable, water-resistant, and easy to cut. For a softer look, use wool felt (not acrylic) because it's denser and won't pill. But the real MVP is adhesive-backed cork sheet. It's thin, grippy, and won't damage pages.
If you want a fabric look, iron-on interfacing stiffens any cotton print. That's a trick from sewing—it gives you the pattern you want with the structure you need. And for the stem or leaf, use a real twig or a pipe cleaner, not paper, because it needs to flex without tearing.
Cutting and Shaping: Precision Over Guesswork
Don't freehand a strawberry. Print a template from a free site, or draw a simple geometric shape: a strawberry is just a rounded triangle with a flat top. Use a craft knife on a self-healing mat for clean edges—scissors crush the foam and leave jagged lines.
For a watermelon slice, cut a half-circle and then a smaller inner half-circle to create the rind. For a lemon, cut a full circle and then scallop the edge with tiny V-cuts. The key is to work in layers: base shape, then details like seeds or rind lines. Each layer should be glued with fabric glue or hot glue, but apply glue only to the center—if you glue the edges, they'll curl.
The 3D Trick That Makes Your Fruit Pop (Without Bulk)
A flat fruit bookmark is fine, but a 3D one feels special. The trick is to use a single layer of foam for the main shape, then add a second layer only for the top half. This creates a subtle raised effect without making the bookmark too thick to slide between pages.
For a strawberry, cut two identical shapes. Glue the first one flat. Then cut the second one in half horizontally, and glue only the top half onto the first, aligning the edges. This gives you a rounded top and a flat bottom—perfect for the stem. For a pineapple, you can score diagonal lines with a blunt knife to create texture without cutting through.
How to Make a Fruit Bookmark That Grips the Page
The biggest complaint is bookmarks slipping out. The fix is a notch or a tab that hooks over the page. Cut a small slit in the top of your fruit shape, about 1 cm deep, and slide the page into that slit. This creates a physical grip that won't let go.
Alternatively, glue a small piece of self-adhesive velcro (the loop side) to the back of the bookmark. The velcro catches on the paper fibers just enough to hold, but it won't leave residue. Test it on a cheap book first—some papers are too smooth, and then you'll need the slit method.
Sealing and Protecting: Keep It Looking Fresh
If you use paper or felt, you need to seal it. A clear acrylic spray (like Krylon) will waterproof it and prevent color bleed. But don't spray too thick—it can make the bookmark sticky. Two light coats are better than one heavy one.
For foam, you don't need a sealant, but you should add a layer of clear nail polish to the edges to prevent fraying. And if you use a real leaf or twig, press it first to dry it out—otherwise, it'll mold and warp your book. I learned that the hard way with a banana leaf bookmark that turned into a science experiment.
Turning Your Bookmark into a Gift Set (and Making It Stick)
The real value is in making a set. A 'farmer's market' set of six fruit bookmarks—strawberry, lemon, watermelon, apple, orange, and blueberry—makes a perfect gift. Package them in a small muslin bag or a paper sleeve. Add a card that explains the gripping slit.
If you're selling them at a craft fair, price them at $4–$6 each or $20 for a set of six. That's competitive with Etsy, but you're offering a better product because it actually works. And don't forget to test each one before you sell it—put it in a book, shake it, and make sure it doesn't fall out.
The Hacks, Step by Step
- 1Choose your material
Use 2mm craft foam or adhesive cork sheet for durability. Avoid paper unless you seal it. - 2Print or draw a template
Search for a free fruit bookmark template or draw a simple shape. Accuracy matters more than artistry. - 3Cut the base shape
Use a craft knife on a cutting mat for clean edges. Scissors are fine for felt but not for foam. - 4Add the gripping slit
Cut a 1 cm vertical slit in the top of the bookmark. Slide the page into the slit to keep it in place. - 5Layer details
Glue smaller pieces (seeds, rind, leaves) with fabric glue or hot glue, applying glue to the center only. - 6Create 3D effect
Cut a second shape, halve it, and glue the top half onto the first for a raised look without bulk. - 7Seal and finish
Spray with clear acrylic sealer if using paper or felt. Add clear nail polish to foam edges to prevent fraying. - 8Test your bookmark
Slide it into a book, shake it, and open the book to see if it stays. Adjust the slit depth if needed.
A bookmark that falls out isn't a bookmark; it's a garnish.
Frequently Asked Questions
What is the best material for a DIY fruit bookmark?
Craft foam (2mm) or adhesive cork are the best because they're durable, water-resistant, and thin enough not to damage pages. Paper is only okay if you seal it with acrylic spray.
How do I make a fruit bookmark that doesn't slip out?
Cut a small vertical slit in the top of the bookmark and slide the page into it, creating a physical grip. Alternatively, glue a small piece of loop-side velcro to the back.
Can I use real fruit to make a bookmark?
No, real fruit will rot and stain your book. Instead, use craft materials to mimic fruit shapes, like a strawberry from red foam with yellow seed dots.
How do I make a 3D fruit bookmark without making it too thick?
Cut two identical shapes, glue the first flat, then cut the second in half and glue only the top half onto the first. This gives a subtle raised effect without bulk.
How do I seal a paper fruit bookmark?
Apply two light coats of clear acrylic spray (like Krylon) to waterproof it and prevent color bleeding. Let it dry completely between coats.


