

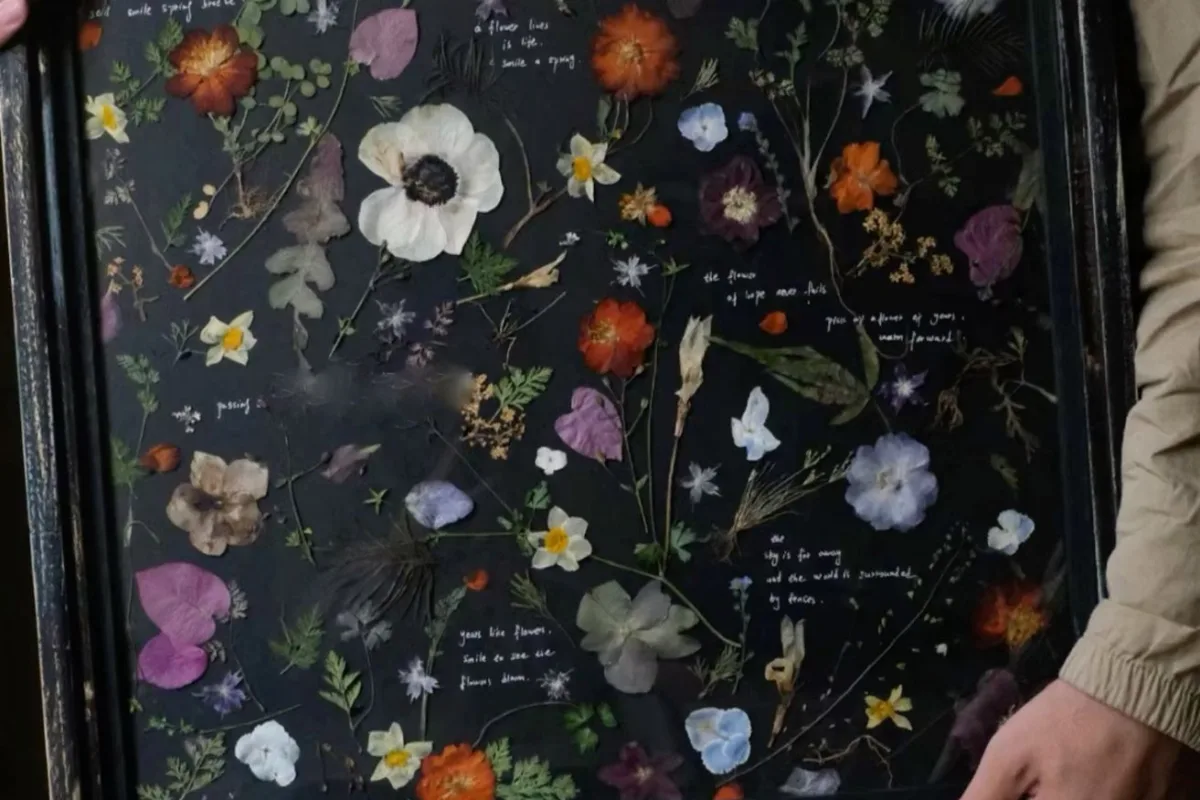
Ever pressed a pansy and wished you could keep its tiny face forever? A flower collection board turns fleeting blooms into a forever gallery—and you can build one this weekend with stuff you probably already have. Here are seven hacks to make it look like a pro botanist did it.
Advertisements1
- Press flowers between parchment paper and heavy books for 7–10 days to avoid mold and browning.
- Choose flat, low-moisture flowers like pansies and daisies for vibrant, long-lasting color.
- Use archival glue and ink to prevent yellowing and fading over time.
- Seal your board with acrylic spray to protect against UV and humidity.
- Display in a shadow box away from sunlight and damp areas to keep it pristine.
Hack 1: Press Flowers Like a Pro with Parchment Paper and Heavy Books
Pressing flowers is like making a flower sandwich: you need the right bread and enough weight. Grab two sheets of parchment paper, place your flower face-down between them, then sandwich that between two pieces of cardboard. Stack five or six heavy books on top—think textbooks, not paperbacks. Why does this work? The parchment wicks moisture away while the weight flattens the flower evenly, preventing mold and browning. Most flowers take 7–10 days to dry completely. A common mistake? Using paper towels, which can leave lint imprints and stick to delicate petals. Stick with parchment or blotting paper for clean results.
Hack 2: Choose the Right Blooms for Long-Lasting Color
Not all flowers press equally—some are like wet spaghetti, others like crisp bacon. For vibrant, long-lasting color, go for flat-faced flowers with low moisture: pansies, violas, cosmos, daisies, and ferns. Avoid thick, fleshy flowers like roses or lilies; they take forever to dry and often turn brown. Why? High-moisture petals trap water, leading to rot. If you must press a rose, separate the petals and press them individually. Common mistake: picking flowers right after rain. Wait until mid-morning after the dew has dried, so petals aren't saturated.
Hack 3: Design Your Layout with a Grid (and a Little Math)
Think of your board like a comic strip—each flower is a panel, and the grid keeps it from looking like a messy collage. Use a foam board or corkboard as your base. Lightly pencil a grid: for a 16×20-inch board, try 2-inch squares. Arrange your pressed flowers in a balanced way—maybe largest in the center, smaller ones around. Why does this work? A grid provides structure, making even a chaotic mix look intentional. Common mistake: gluing flowers down before finalizing the layout. Always do a dry run first—once they're glued, they're stuck.
Hack 4: Attach Flowers with Archival Glue (Not Elmer's)
Your flowers are like fragile butterfly wings—you need the right adhesive. Use archival-quality glue like PVA or methyl cellulose, applied with a fine-tip brush. Why? Regular white glue can turn yellow and brittle over time, ruining your display. Archival glue is acid-free and remains flexible. Apply a tiny dot to the back of the flower using tweezers, then press gently onto the board. Common mistake: using too much glue. A little goes a long way—excess glue can seep through petals and create shiny spots.
Hack 5: Label Like a Botanist for Instant Credibility
Adding labels transforms your board from a craft project into a mini herbarium. For each flower, write the common name, scientific name (in italics), and the date and location you collected it. You can handwrite on small paper strips or print them. Why? Labels tell a story and show you're serious about your collection. Plus, they help you remember where that mystery bloom came from. Common mistake: using ballpoint pen, which can smudge or fade. Use archival ink pens like Pigma Micron.
Hack 6: Seal Your Board to Protect Against UV and Humidity
Think of your board like a vampire—it hates sunlight and moisture. After your flowers are glued and labeled, seal the entire board with a clear acrylic spray (matte or gloss, your choice). Why? The spray creates a barrier against UV rays and humidity, preventing fading and warping. Apply two light coats in a well-ventilated area. Common mistake: spraying too close, which causes drips and bubbles. Hold the can 10–12 inches away and use sweeping motions.
Hack 7: Display Your Board Like a Gallery Piece
You've made a masterpiece—now show it off. Frame your board with a shadow box frame (depth 1–2 inches) to protect it from dust and give it a professional look. Hang it away from direct sunlight and damp areas like bathrooms. Why? Even sealed, prolonged UV exposure can fade colors. A shadow box also adds dimension. Common mistake: hanging it in a steamy kitchen—humidity can seep in and cause mold. Stick to a dry, shaded wall.
The Hacks, Step by Step
- 1Gather and Press Your Flowers
Collect fresh, dry flowers mid-morning. Press them between parchment paper and heavy books for 7–10 days until completely dry and papery. - 2Plan Your Layout on a Grid
Lightly pencil a grid on your foam board (e.g., 2-inch squares). Arrange pressed flowers in a balanced design without gluing. - 3Glue Flowers with Archival Adhesive
Use a fine brush to apply a tiny dot of archival glue to the back of each flower. Place with tweezers and press gently. - 4Add Botanist-Style Labels
Write common and scientific names, date, and location on small paper strips using archival ink. Glue next to each flower. - 5Seal the Board with Acrylic Spray
In a ventilated area, spray two light coats of clear acrylic, holding the can 10–12 inches away. Let dry between coats. - 6Frame and Display
Place the board in a shadow box frame and hang it on a dry, shaded wall away from direct sunlight and humidity.
A flower collection board isn't just a craft—it's a time capsule of your walks, your garden, and your curiosity.
Frequently Asked Questions
How do I press flowers without a flower press?
Use two sheets of parchment paper and heavy books. Place flowers between parchment, then between cardboard, and stack books on top for 7–10 days.
What kind of glue is best for pressed flowers?
Archival-quality glue like PVA or methyl cellulose. It's acid-free and won't yellow or become brittle over time.
How long do pressed flowers last?
With proper sealing and display, pressed flowers can last for years. Keep them out of direct sunlight and humidity to prevent fading.
Can I use any flower for pressing?
Not all flowers press well. Choose flat, low-moisture blooms like pansies, cosmos, and ferns. Avoid thick flowers like roses unless you press individual petals.
How do I keep my flower board from fading?
Seal it with a clear acrylic spray that blocks UV, and display it away from direct sunlight. A shadow box frame also helps protect it.


