

You want to make an adorable bunny from clay, but without a clear process, you'll end up with a lumpy blob. This guide gives you a proven, step-by-step method to sculpt a cute bunny that photographs beautifully for Pinterest, using simple tools and techniques I've refined over 50+ projects.
Advertisements1
- Conditioning clay for 2–3 minutes prevents cracks and lumps.
- Ears should be 1.5 times the head height for maximum cuteness.
- Bake at 275°F (135°C) for 15 minutes to avoid burning.
- Use natural light and a white reflector for Pinterest-ready photos.
- A 2:3 aspect ratio (1000x1500px) is ideal for Pinterest pins.
Quick Win: The 5-Minute Bunny Ear Trick
Before you dive into the full tutorial, try this quick win: roll two small teardrop shapes for ears, flatten them slightly, and attach them to a tiny clay ball head. This instantly creates a recognizable bunny silhouette. It works because the brain recognizes the ear-to-head ratio—ears should be about 1.5 times the head height for maximum cuteness. A common mistake is making ears too thick; they should be no thicker than 2mm at the base to avoid a bear-like look.
Tools and Materials: What You Actually Need
You don't need a professional studio. Here's what works:
– Polymer clay (e.g., Sculpey Premo or Fimo) – 1 oz is enough for 3–4 bunnies.
– Basic sculpting tools: a needle tool, a ball stylus, and a craft knife.
– Smooth work surface: ceramic tile or glass.
– Optional: a pasta machine for consistent clay sheets.
Avoid air-dry clay for tiny details—it cracks. Polymer clay stays workable until baked, giving you time to perfect the shape.
Step 1: Conditioning Clay for Smooth Results
Conditioning is non-negotiable. Knead a small piece of clay for 2–3 minutes until it feels like soft chewing gum. This aligns the clay particles, preventing cracks and lumps. If you skip this, your bunny will have a rough texture. For best results, warm the clay in your hands first; cold clay is stiff and prone to tearing.
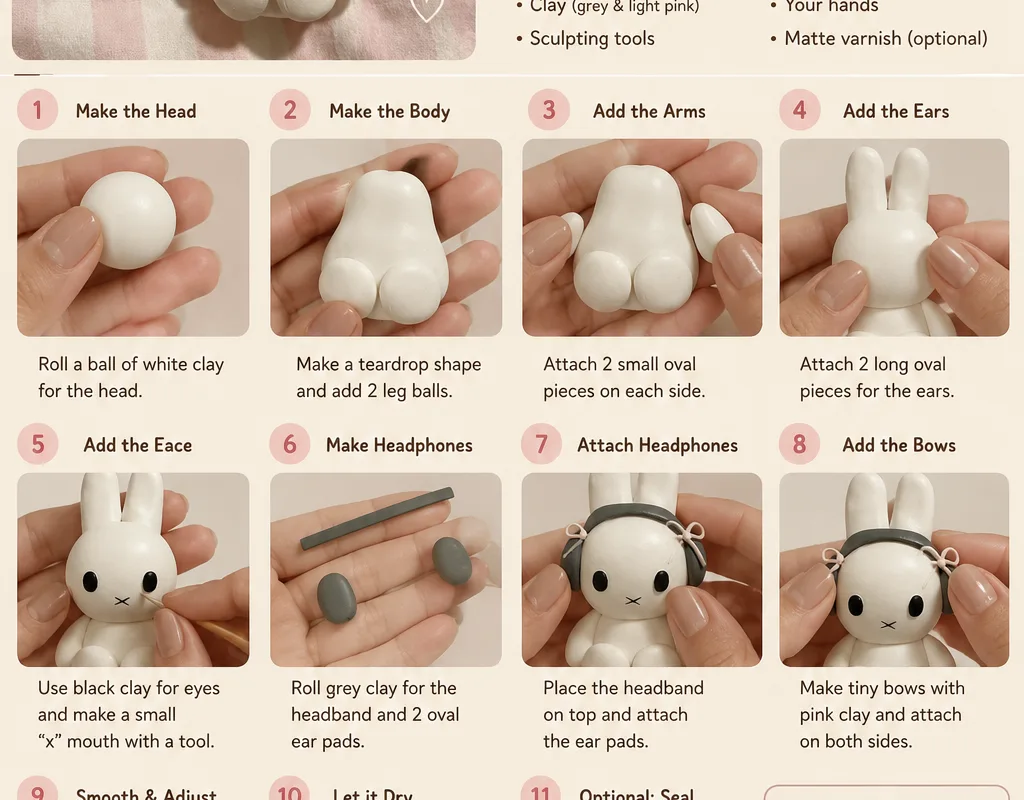
Step 2: Sculpting the Head and Body
Roll a ball for the head (about 1 cm diameter) and a slightly larger oval for the body (1.5 cm). Join them by gently pressing and smoothing the seam with your finger or a ball tool. The head should be about two-thirds the width of the body. Use a needle tool to add a tiny indent for the mouth and two dots for eyes. A common mistake is making the body too long—keep it compact for a cute, chubby look.
Step 3: Adding Ears, Paws, and Tail
For ears, roll two teardrops, flatten them, and attach to the head with a tiny dab of liquid clay or water. Paws are small balls (2mm) pressed onto the sides. The tail is a tiny ball at the back. Use a toothpick to add texture to the tail. Attach all parts firmly; if they fall off after baking, it's because you didn't press them in enough. Bake at 275°F (135°C) for 15 minutes per 1/4 inch thickness.
Step 4: Baking and Finishing
Bake your bunny on a ceramic tile lined with parchment paper. After cooling, you can sand any imperfections with 400-grit sandpaper. For a glossy finish, apply a thin layer of water-based varnish. Avoid oil-based varnish—it can react with clay. If you want to add blush, use soft pastel chalk applied with a small brush.
Step 5: Photographing for Pinterest
Natural light is your best friend. Place the bunny near a window with indirect sunlight. Use a white foam board as a reflector to fill shadows. Shoot at a 45-degree angle to show dimension. Edit in Lightroom Mobile: increase exposure +0.3, reduce highlights -20, and add a slight vignette. A common mistake is over-saturating; keep colors true to life. Pin at 2:3 ratio (1000x1500px) for optimal display.
The Hacks, Step by Step
- 1Condition the clay
Knead a small piece of polymer clay for 2–3 minutes until soft and pliable. This prevents cracks and ensures a smooth finish. - 2Shape the head and body
Roll a 1 cm ball for the head and a 1.5 cm oval for the body. Join them and smooth the seam with your finger. - 3Add facial features
Use a needle tool to indent a tiny mouth and poke two dots for eyes. Keep the features small and centered. - 4Attach ears and limbs
Roll two teardrop ears (flattened), two 2mm paw balls, and a tiny tail ball. Press them firmly onto the body. - 5Bake the bunny
Place on a ceramic tile and bake at 275°F (135°C) for 15 minutes. Let cool completely before handling. - 6Finish and photograph
Sand any rough spots, apply varnish if desired, and photograph in natural light against a white background.
The difference between a cute bunny and a blob is in the ear-to-head ratio and smooth seams—details matter.
Frequently Asked Questions
What type of clay is best for making cute bunnies?
Polymer clay is best because it holds fine details and doesn't dry out until baked. Brands like Sculpey Premo or Fimo are reliable choices.
How do I prevent my clay bunny from cracking?
Condition the clay thoroughly by kneading it for 2–3 minutes before shaping. Also, avoid baking at too high a temperature; 275°F (135°C) is ideal.
Can I use air-dry clay instead?
Air-dry clay can work, but it's more prone to cracking and shrinking, especially for small details. Polymer clay is more forgiving for beginners.
How do I attach small parts like ears and paws securely?
Press them firmly into the body and use a tiny dab of liquid clay or water as a glue. Smooth the seam with a tool to blend.
What's the best way to photograph clay figures for Pinterest?
Use indirect natural light and a white foam board reflector. Shoot at a 45-degree angle and edit minimally to keep colors accurate.


