

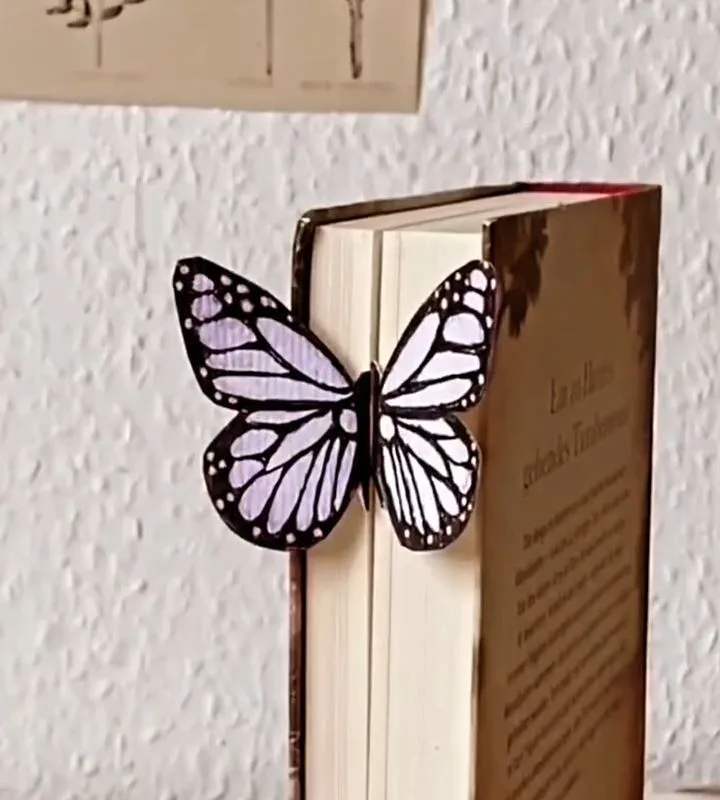
There's a particular kind of quiet that settles in when you press a handmade butterfly bookmark between the pages of a book you love. These seven hacks are the ones I've refined over years of folding paper at my kitchen table — each one specific, doable in an afternoon, and designed to make your next reading session feel a little more like a small ceremony.
Advertisements1
- 160-200 gsm cardstock is the sweet spot for durability and foldability — printer paper fails within a week.
- Pressing folded butterflies under a heavy book for 20 minutes prevents the wing-curl that catches pages.
- Wet-on-wet watercolor fold-and-press creates professional symmetrical wing patterns in under 10 minutes.
- Neodymium magnets (6mm x 2mm) turn a paper butterfly into a clip that holds up to 30 pages in heavy hardbacks.
- Batching three bookmarks at once takes 90 minutes total versus 45 minutes each made individually.
- Always use permanent or archival pens before laminating — water-soluble ink smears inside the seal.
Why a Handmade Butterfly Bookmark Changes How You Read
I started making butterfly bookmarks the year my grandmother passed, because her garden was full of cabbage whites and I wanted something of that garden to travel with me. What surprised me was how the bookmark itself changed my reading: a page with something beautiful resting on it invites you back. It's a tiny ritual, but rituals are how we make space for attention.
There's a practical side too. A well-made paper butterfly bookmark — roughly 6 inches long, 2 inches at the wing span — is thin enough not to strain a spine and wide enough not to slip out in a bag. Commercial bookmarks are often too stiff and crack at the fold; handmade ones, if you choose the right paper weight (around 160-200 gsm cardstock), flex just enough to last for months.
Before we start, take a breath and ask yourself: what book is this bookmark for? Choosing the book first — a poetry collection versus a chunky novel — will guide your paper weight and size. That single question saves you from making a bookmark that's beautiful but wrong for its purpose.
Hack 1: The Folded-Wing Butterfly That Actually Stays Flat
The classic origami butterfly bookmark fails for one reason: the wings curl upward and catch on the pages. The fix is simple — after folding, press the butterfly under a heavy book for 20 minutes with a sheet of baking parchment on each side. The parchment prevents ink transfer and the weight trains the folds to lie flat.
Use a 6×6 inch square of double-sided cardstock for the body and wings. Fold the standard waterbomb base, then instead of creasing the wings sharply upward, crease them at a shallow 20-degree angle. This gives you the recognizable butterfly silhouette while keeping the profile under 3mm thick — thin enough to close a book without marking pages.
The common mistake here is using printer paper. It folds beautifully but collapses within a week. Cardstock at 160 gsm is the sweet spot: foldable by hand, durable enough to survive a tote bag.
Hack 2: The Pressed-Flower Wing (A Mindfulness Practice)
This is the hack I return to when I need to slow down. Instead of drawing wings, you laminate a real pressed flower or leaf between two layers of clear contact paper cut into wing shapes. The result is translucent — light passes through the petals when you hold it up to a window.
Press your flowers at least two weeks ahead: place them between sheets of newspaper under a stack of books, changing the paper every three days. Pansies, violets, and fern fronds press best because they're thin and hold color. Once pressed, arrange them on the sticky side of contact paper, seal with a second sheet, and trim with a 5mm border so the seal holds.
The mistake to avoid: pressing flowers with thick centers (like daisies). They mold before they dry. Remove the center or choose flat-faced blooms instead. As you arrange the petals, notice the small act of choosing placement — that's the mindfulness prompt: let the flower decide its own shape rather than forcing symmetry.
Hack 3: The Magnetic Butterfly Clip for Heavy Readers
If you read thick hardbacks — I'm thinking of the 900-page novel I carried all last winter — a paper bookmark slides out. A magnetic butterfly clip solves this. Glue a small neodymium magnet (6mm x 2mm) to the back of a cardstock butterfly, and a matching magnet to a second butterfly. They snap together over the page, holding firm.
Keep the magnets on opposite poles so they attract rather than repel — test before gluing. Use E6000 or a strong craft glue, and let it cure 24 hours. The clip holds up to about 30 pages without slipping, which is plenty for marking your place.
The common mistake: using craft magnets that are too weak. A 6mm x 2mm neodymium disc costs pennies and holds 10 times what a fridge magnet does. Also, keep magnets away from e-readers and credit cards — a small caution worth remembering.
Hack 4: The Watercolor Wash That Looks Professional
You don't need to be a painter to make a watercolor butterfly bookmark. The trick is wet-on-wet blending: dampen your watercolor paper (140 lb cold press), then drop three colors — say cerulean, rose madder, and a touch of gold — onto one half. Fold the paper in half while wet and press. When you open it, you get a symmetrical butterfly print that looks intentional and organic.
Let it dry completely, then cut out the wing shape and add a body with a fine black pen. The symmetry is the magic — it reads as a butterfly because our brains are wired to recognize bilateral patterns.
The mistake: overworking the paint. Once you fold and press, stop. Every additional brushstroke muddies the colors. Let the paper do the work, and notice how trusting the process feels a little like trusting a good book to carry you.
Hack 5: The Laminated Keepsake With a Hidden Message
Here's one for the sentimental readers. Write a short message — a line from a favorite poem, a date, a name — on the back of your butterfly before laminating. Because it's sealed inside, the message stays hidden until someone holds it up to the light, or until years later when the lamination peels.
Use a thermal laminator or self-sealing laminating pouches, and leave a 3mm sealed border around the edges. Trim with a corner rounder so the points don't snag pages. A laminated bookmark lasts years — I still have one from 2018 with a pressed violet inside.
The common mistake: writing with a water-soluble pen. Lamination traps moisture and the ink smears. Use a permanent fine-liner or an archival pen. And before you seal it, read your message aloud once — there's something lovely about hearing the words that will live inside the paper.
Hack 6: The Upcycled Book-Page Butterfly
There's a gentle irony in making a bookmark from the pages of a damaged book. Take a page from a book that's already falling apart — never a good one — and fold it into an origami butterfly. The printed text becomes the wing pattern, and the bookmark carries a second life.
Choose a page with a passage you love, and position the fold so a favorite sentence runs across one wing. A 5.5-inch square cut from a trade paperback page works well. Because book paper is thin, back it with a 2-inch strip of cardstock along the body for strength.
The mistake: using pages from a book you might want to read again. Cut from a duplicate, a damaged copy, or a discarded library book. Ask yourself: what story would you want to carry with you? That question turns a craft project into a small act of curation.
Hack 7: The Gift Set That Feels Store-Bought
The final hack is presentation. Make three bookmarks in a coordinated palette, tie them with cotton twine, and tuck them into a small glassine envelope with a pressed petal. Add a handwritten tag with the book you'd pair it with. This is the version people ask me to make for them.
Batch your work: cut all cardstock at once, paint all wings in one session, laminate in another. Three bookmarks take about 90 minutes total when batched, versus 45 minutes each made individually. The coordination — same palette, same wing shape — is what makes the set look intentional.
The mistake: over-decorating. One pressed petal, one tag, one piece of twine. Restraint is what makes handmade gifts look refined rather than cluttered. And as you tie the twine, pause and think of the person who'll receive it — that small moment of intention travels with the gift.
The Hacks, Step by Step
- 1Choose your paper weight
Pick 160-200 gsm cardstock for folded bookmarks or 140 lb cold press watercolor paper for painted ones. This weight folds without cracking and holds shape for months — printer paper collapses within a week. - 2Cut a precise 6×6 inch square
Use a craft knife and metal ruler rather than scissors for clean edges. Precision here determines whether your folds line up, and misaligned folds are the number one reason origami butterflies look messy. - 3Fold and press flat
Complete your folds, then press the butterfly under a heavy book with baking parchment on both sides for 20 minutes. This trains the wings to lie flat so the bookmark doesn't catch on pages. - 4Add your decorative layer
Paint, press flowers, or write a hidden message before sealing. Let everything dry completely — at least 2 hours for watercolor, 24 hours for glued magnets. - 5Seal or laminate
Use self-sealing pouches or a thermal laminator, leaving a 3mm border. Trim corners with a rounder so points don't snag pages. This step is what makes the bookmark last years instead of weeks. - 6Test it in a real book
Close the book on your finished bookmark and carry it in a bag for a day. If it slips or bends, adjust the size or add a magnetic clip before gifting.
A handmade bookmark isn't just a placeholder — it's a small daily invitation to return to the page, and that invitation is what turns reading into ritual.
Frequently Asked Questions
What paper is best for a DIY butterfly bookmark?
160-200 gsm cardstock is best because it folds cleanly by hand and survives months of use without cracking. Watercolor paper at 140 lb is the alternative if you plan to paint your wings.
How do I stop my paper butterfly bookmark from slipping out?
Add a small neodymium magnet (6mm x 2mm) to the back and a matching one to a second butterfly so they clip over the page. This holds up to 30 pages and keeps the bookmark secure in thick hardbacks.
Can I laminate a pressed flower bookmark at home?
Yes — use self-sealing laminating pouches and leave a 3mm sealed border around the edges. Press your flowers for at least two weeks first and remove thick centers so they don't mold.
How long does a handmade butterfly bookmark last?
A laminated or magnet-sealed bookmark lasts several years with normal use. Unlaminated cardstock bookmarks typically last three to six months before edges soften.
What's the easiest butterfly bookmark for beginners?
The fold-and-press watercolor butterfly is the most beginner-friendly — dampen watercolor paper, drop three colors, fold while wet, and press. The symmetry does the work for you.


