

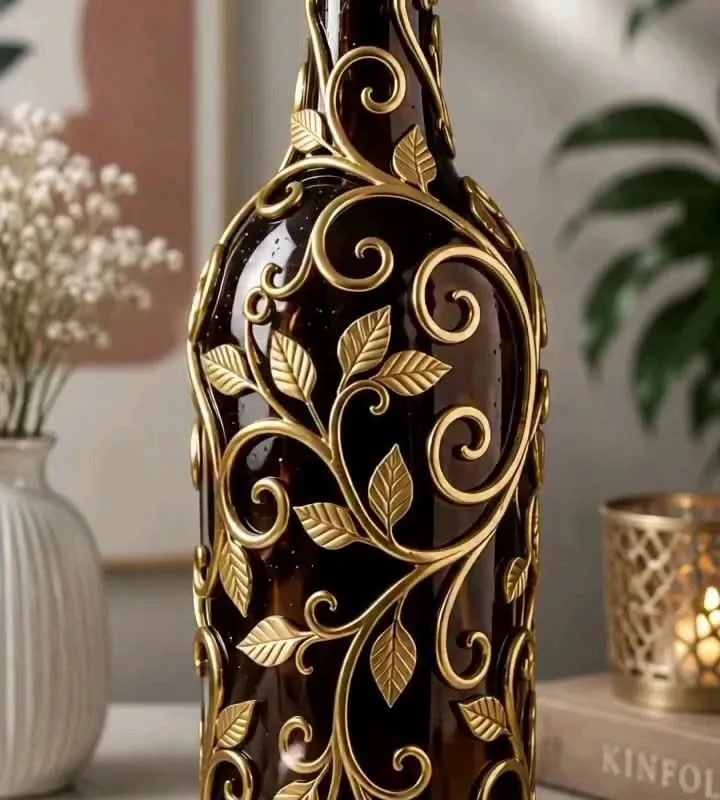
Got a plain glass bottle and a lump of clay? Let's turn that 'trash' into a boho-chic vase that looks like it cost $40 at a boutique. In this tutorial, I'll show you five playful techniques to wrap, stamp, and sculpt clay onto bottles—no kiln required.
Advertisements1
- Always clean glass with rubbing alcohol before applying clay—it's the secret to long-lasting adhesion.
- Air-dry clay shrinks ~3-5%, so leave small gaps between coils and avoid wrapping too tightly.
- Use slip (clay + water paste) to glue clay pieces together; score the surfaces first for a strong bond.
- Dry your project slowly at room temperature for 48 hours to prevent cracks.
- Seal finished clay with matte varnish to make it moisture-resistant and durable.
Why Clay and Glass Are a Match Made in Craft Heaven
Glass bottles are smooth, non-porous, and free—perfect for clay to grip when you score and slip the surface. Air-dry clay (like DAS or Crayola Model Magic) shrinks only about 3-5% as it dries, so it won't crack off a sturdy bottle. Plus, the contrast between glossy glass and matte clay gives that handmade, organic look we all save on Pinterest.
But here's the catch: if you slap wet clay onto a dusty bottle, it'll peel off like a sunburn. Always wash and dry your bottle, then wipe with rubbing alcohol to remove oils. That one step is the difference between a keepsake and a craft fail.
Hack 1: The Coil Wrap Vase (No Pottery Wheel Needed)
Roll clay into 1/4-inch-thick snakes (coils) and wrap them around the bottle from bottom to top, pressing gently so each coil sticks to the one below. This creates a textured, woven look that hides the bottle's original label area. Why it works: coils are forgiving—if one breaks, just smush it back together. Aim for 8-10 coils for a standard 750ml wine bottle.
Common mistake: wrapping too tightly. Clay shrinks as it dries, and if it's pressed hard against the glass, it can crack. Leave a tiny gap between coils and let them air-dry for 24 hours before handling.
Hack 2: Stamped Patterns with Household Items
Flatten clay into a 1/8-inch sheet, then press found objects—a fork, a lace doily, a rubber stamp, even the bottom of a textured glass—into the surface to create imprints. Cut the sheet into a rectangle and wrap it around the bottle, sealing the seam with a little water. This gives you a professional-looking pattern in minutes.
Why it works: the pressure embosses the clay, and when it dries, the shadows create depth. Mistake to avoid: using too much water to smooth the surface—it weakens the clay and causes cracks. Use a damp finger, not a soaked sponge.
Hack 3: Sculpt 3D Flowers and Leaves
Make small balls of clay, flatten them into petal shapes, and layer them onto the bottle to form flowers. Add leaves by pinching clay into teardrops and scoring the veins with a toothpick. Attach them with 'slip'—a paste of clay and water—and press gently. This turns a plain bottle into a sculptural piece.
Why it works: slip acts like glue, bonding the clay pieces to each other and to the glass. Mistake: making the petals too thick. Keep them under 1/4 inch, or they'll slump and crack as they dry. Let them dry slowly—overnight in a cool room, not near a heater.
Hack 4: Two-Tone Dip (Clay Meets Paint)
After your clay design is completely dry (at least 48 hours), paint the bottom half of the bottle with acrylic paint in a contrasting color, leaving the clay natural or painting it a solid hue. Use painter's tape to get a crisp line. Seal with a matte varnish to protect the clay from moisture.
Why it works: the paint adds a modern color-block effect, and the varnish keeps air-dry clay from getting tacky in humid weather. Mistake: painting over damp clay—it'll trap moisture and cause mold. Wait until the clay is bone-dry and feels cool to the touch.
Hack 5: Upcycled Yarn and Clay Combo
Wrap the neck of the bottle with jute twine or colorful yarn, securing the ends with a dab of hot glue. Then add clay accents—like small beads or a sculpted tag—on top of the yarn. This mixes textures and hides any messy clay edges.
Why it works: the yarn adds a rustic touch and provides a grip for the clay. Mistake: using too much glue, which can seep through the yarn. Use a low-temp glue gun and apply tiny dots.
The Hacks, Step by Step
- 1Prep Your Bottle
Wash and dry a glass bottle, then wipe with rubbing alcohol to remove oils. This ensures the clay adheres properly. - 2Condition the Clay
Knead air-dry clay for 1-2 minutes until soft and pliable. This prevents cracks and makes it easier to shape. - 3Apply Clay Design
Choose a technique (coil wrap, stamping, sculpting) and attach clay to the bottle using score-and-slip method: scratch the surface, apply slip (clay+water paste), and press firmly. - 4Smooth and Refine
Use a damp finger or silicone tool to smooth seams and edges. Avoid over-wetting, which weakens the clay. - 5Dry Slowly
Let the bottle dry at room temperature for 24-48 hours, turning occasionally to ensure even drying. Do not use a hair dryer or heater. - 6Paint and Seal
Once dry, paint with acrylics if desired, then seal with matte varnish to protect the clay from moisture and dust.
The best part about clay on glass? If you mess up, you can peel it off and start over—no kiln, no pressure, just play.
Frequently Asked Questions
Can I use polymer clay on glass bottles?
Yes, but polymer clay requires baking, and most glass bottles aren't oven-safe. Use air-dry clay instead for no-bake projects.
How do I make clay stick to glass without glue?
Use the score-and-slip method: scratch the glass with sandpaper, apply a paste of clay and water, then press the clay on. This creates a mechanical and chemical bond.
Will air-dry clay crack on a glass bottle?
It can if applied too thickly or dried too fast. Keep clay layers under 1/4 inch and dry slowly at room temperature.
Can I put water in a clay-decorated bottle?
Only if the inside is uncoated and the clay is sealed on the outside. Better to use it as a vase with a glass insert or for dry flowers.
What's the best air-dry clay for bottle decoration?
DAS Air-Hardening Clay or Crayola Model Magic are great for beginners—they're smooth, easy to shape, and take paint well.


