

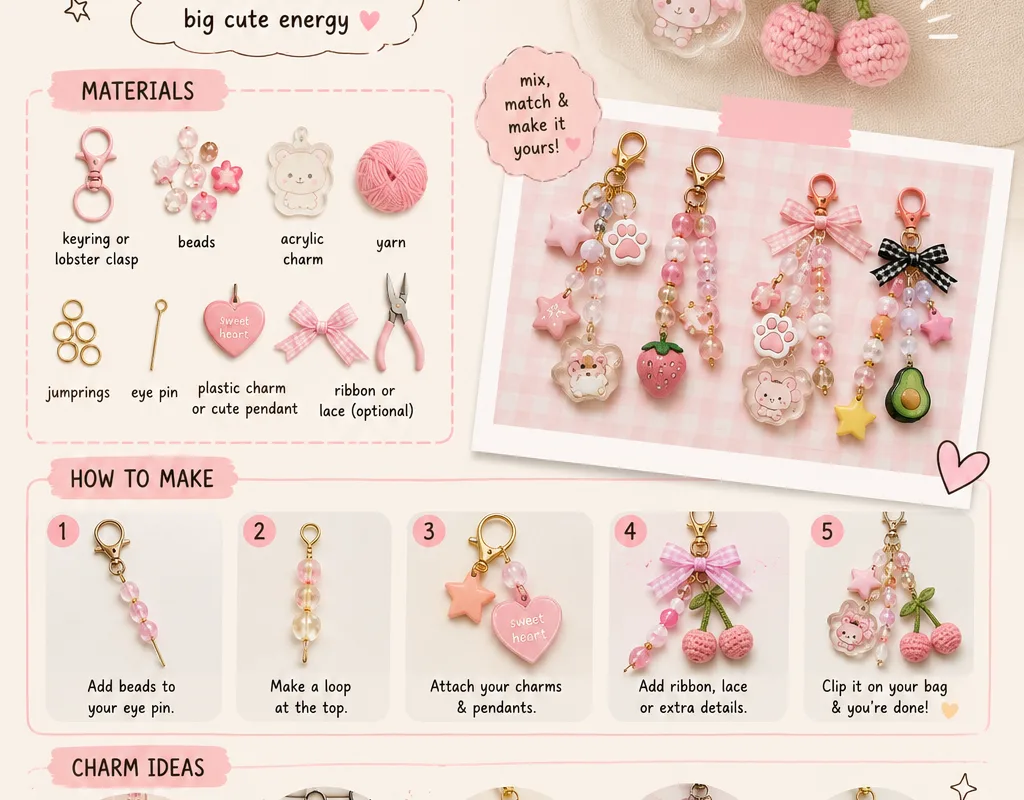
A bag charm is the cheapest way to make a $30 tote look like it came from a boutique. These seven DIY versions take under an hour each, use supplies you can grab at any craft store, and cost $3 to $10 per charm. Here's exactly how to build each one — and the mistake that ruins most first attempts.
Advertisements1
- A bag charm needs only three parts: a 1-inch swivel snap hook, an 8mm split ring, and one focal piece — about $1 in hardware per charm.
- Keep total charm weight under 2 ounces and length under 4 inches to avoid pulling or denting soft leather.
- Use split rings, not jump rings — jump rings pull open under bag weight and you lose the charm.
- The two-charm rule: two charms at staggered lengths (2 inches and 4 inches) look curated; three or more looks cluttered.
- Seal ribbon and leather edges with flame, clear polish, or beeswax — unsealed edges fray within two weeks.
Why Bag Charms Are the Easiest DIY Win
A bag charm needs three things: a clip, a connector, and a focal piece. That's it. You're not fitting a garment or soldering anything. Most charms fail because people overbuild them, not because they underbuild them.
Start with a lobster clasp swivel snap hook in the 1-inch to 1.25-inch range. That size clips onto a tote handle or a zipper pull without looking oversized. Anything smaller than 3/4 inch is fiddly to open; anything bigger than 1.5 inch swings like a keychain and dents soft leather.
Budget realistically. A 10-pack of swivel snap hooks runs about $6 on Amazon. Split rings (8mm to 10mm) cost around $4 for 100. That means your hardware cost per charm is roughly $1. The rest is your focal piece.
Hack 1: Turn a Broken Earring Into a Charm in 4 Minutes
We all have a single earring whose partner vanished. Don't toss it. Open an 8mm split ring with two pliers, thread it through the earring's loop or post hole, and clip a swivel hook to the ring. Done.
Why it works: earrings are already designed to hang and catch light, so they read as intentional jewelry rather than craft-project clutter. A chunky gold hoop earring on a black leather tote looks like a $40 designer add-on.
Common mistake: using a jump ring instead of a split ring. Jump rings pull open under bag weight and you lose the charm. Split rings are double-looped and hold. If you only have jump rings, use two, threaded in opposite directions.
Hack 2: The Beaded Charm That Doesn't Look Cheap
The trick is scale. Most DIY beaded charms fail because the beads are too small and too uniform. Buy beads in three sizes — 6mm, 8mm, and 10mm — and mix finishes: one matte, one shiny, one natural (wood or shell).
String them on 20-gauge craft wire, not elastic. Elastic stretches and sags within a week. Cut 4 inches of wire, make a small loop at one end with round-nose pliers, thread your beads, then loop the other end. Attach a split ring to each loop.
A realistic bead recipe: one 10mm focal bead, two 8mm accent beads, and three 6mm spacers. That's six beads and about 1.5 inches of charm length — proportional to a standard handbag handle. Total cost: about $4 if you buy a mixed bead strand on sale.
Hack 3: Ribbon and Tassel Charms for Under $3
Cut five strands of 1/4-inch grosgrain ribbon, each 6 inches long. Stack them, fold in half, and tie a tight knot 1 inch below the fold. That 1-inch loop is your attachment point. Slide a split ring through the loop and clip on your swivel hook.
Why it works: grosgrain has a ribbed texture that catches light and holds its shape, unlike satin, which creases and frays. Five strands give you visual weight without actual weight.
Common mistake: not sealing the ends. Grosgrain frays after two weeks of bag rubbing. Run each cut end quickly through a lighter flame — 1 second, no more — or dab with clear nail polish. Let it dry 10 minutes before assembling.
Hack 4: Charm a Zipper Pull With a Keychain Charm
Zipper pulls are the most overlooked charm spot. A small charm here adds personality without competing with the handle. Keep it under 2 inches long so it doesn't catch in the zipper teeth.
Use a 3/4-inch swivel hook or a small split ring directly on the zipper slider's loop. A vintage key, a small enamel pin backing, or a single chunky bead all work. This is also the best spot for a charm that's slightly too heavy for the main handle.
Common mistake: hanging a charm on a zipper that gets opened constantly. It will snag and break within days. Put zipper charms on exterior pockets or decorative zips, not the main compartment you open 20 times a day.
Hack 5: The Two-Charm Rule (And How to Layer Without Clutter)
One charm looks deliberate. Three looks like a craft fair. The sweet spot is two charms at different lengths — one at 2 inches, one at 4 inches — so they don't tangle or overlap.
Attach both to the same swivel hook, or use two hooks on the same handle ring, spaced about an inch apart. Vary the materials: one metal, one textile. A brass key charm next to a ribbon tassel reads as curated. Two metal charms read as a keyring.
Common mistake: matching your charm to your bag color exactly. Contrast is what makes it pop. A cream ribbon charm on a black bag, or a gold charm on a tan tote. If everything matches, nothing stands out.
Hack 6: Make It Swappable With a Clasp System
Build a base clip that stays on the bag, then swap the charm itself. Use a 1-inch swivel snap hook on the bag handle and a small split ring on each charm. To change looks, open the snap hook and move it to a new charm — takes 5 seconds.
Why it works: you get a wardrobe of charms for the price of one bag. Make four charms for $15 total and you have four different bags.
Common mistake: using a keyring instead of a swivel snap. Keyrings don't open, so you're committed to one look. Swivel snaps are the whole point.
Hack 7: The 10-Minute Leather Scrap Charm
Cut a 1-inch by 6-inch strip of leather scrap — most craft stores sell bags of remnants for $5. Fold it in half, punch a hole 1/2 inch from the fold with a 1/8-inch hole punch, and thread a split ring through. That's the whole charm.
Why it works: leather scraps have a finished edge and a natural texture that reads as premium. A single leather loop on a canvas tote looks like it came with the bag.
Common mistake: using leather thicker than 2mm. It won't fold cleanly and the hole punch will struggle. Look for 1mm to 1.5mm garment-weight leather. If your scrap is stiff, soften it by working it between your fingers for 30 seconds before folding.
The Hacks, Step by Step
- 1Buy the right hardware first
Get a 10-pack of 1-inch swivel snap hooks and 100 8mm split rings. This costs about $10 total and covers every charm in this guide. - 2Pick your focal piece
Choose one hero object per charm — a broken earring, a chunky bead, a ribbon tassel, or a leather scrap. Don't combine more than two materials per charm. - 3Open split rings with two pliers
Hold the ring with flat-nose pliers in each hand and twist apart sideways. Never pull the ring open — it won't close flush again. - 4Attach the charm to the split ring
Thread the focal piece onto the split ring, then close the ring by twisting back. Test by pulling firmly. - 5Clip the swivel hook to the ring
Open the swivel snap, hook it through the split ring, and snap shut. Give it a tug to confirm the latch is engaged. - 6Test weight and swing
Hang the finished charm on your bag and walk 20 steps. If it swings more than 2 inches side to side, it's too heavy or too long — shorten it. - 7Seal any fabric or leather edges
Flame-seal ribbon ends or wax leather edges. Let dry 10 minutes before using the charm.
The best bag charms aren't the most complicated ones — they're the ones with one strong focal piece and hardware that actually holds.
Frequently Asked Questions
What size swivel hook do I need for a bag charm?
A 1-inch to 1.25-inch swivel snap hook fits most tote handles and zipper pulls without looking oversized. Anything under 3/4 inch is hard to open, and anything over 1.5 inch swings too much and can dent soft leather.
How do I stop my DIY bag charm from fraying?
Seal ribbon and fabric ends with a 1-second pass through a lighter flame or a dab of clear nail polish. For leather, burnish the cut edge with beeswax. Unsealed edges fray or curl within about two weeks of daily bag use.
Can I use a jump ring instead of a split ring for a bag charm?
No — use a split ring. Jump rings pull open under the weight and swing of a bag and you'll lose the charm. If you only have jump rings, use two threaded in opposite directions as a backup.
How much should a DIY bag charm weigh?
Keep it under 2 ounces. Anything heavier pulls the strap, tilts the bag, and can stretch leather handles over time. A beaded charm with six beads or a leather loop weighs well under an ounce.
How many charms should I put on one bag?
Two is the sweet spot — one at 2 inches and one at 4 inches, in different materials. One looks deliberate, two looks curated, and three or more starts to look like a keyring.


