

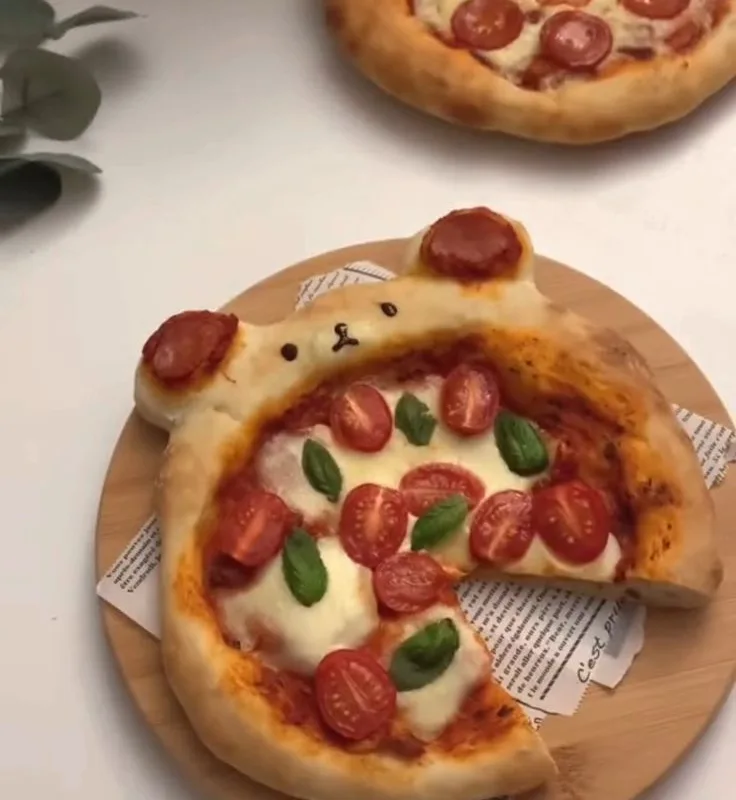
Pizza night just got a whole lot cuter! This Adorable Bear-Shaped Pizza starts with a soft, pillowy homemade dough, gets topped with tangy tomato sauce and gooey mozzarella, and finishes with two little ears and a happy face that makes everyone at the table smile. It is the kind of recipe that turns a regular Tuesday into a memory.
Advertisements1
The best part? You do not need any special pans or fancy tools. A sharp knife or a round cookie cutter handles the ears, and a few strips of bell pepper, olives, and pepperoni do all the decorating. Kids can jump in and build their own bear, which means less whining and more eating.
I tested this with my own two kids, and the ears were the first thing to disappear. The dough is forgiving, the toppings are flexible, and the whole thing bakes in under 15 minutes once it hits the oven. Let's make some bears!
Why You'll Love This Recipe
About the Ingredients
2 1/4 cups (280g) all-purpose flour, plus extra for dusting
Bread flour gives a chewier crust, but all-purpose is what most of us have. If you are gluten-free, use a 1-to-1 gluten-free blend and add 1 extra tablespoon of water.
1 packet (2 1/4 tsp / 7g) active dry yeast
Instant yeast works exactly the same here, no proofing needed. Always check the expiration date, dead yeast means flat bears.
1 cup (240ml) warm water, about 110F (43C)
Too hot and you kill the yeast, too cold and it never wakes up. Test it on your wrist like baby milk.
1 tbsp (13g) granulated sugar
Feeds the yeast and helps browning. Honey works as a swap, use the same amount.
1 tsp (6g) fine sea salt
Balances the sweetness and strengthens the dough. Kosher salt is fine, just use a slightly heaped teaspoon.
2 tbsp (28g) olive oil, plus more for the bowl
Keeps the dough tender and the crust golden. Any neutral oil like avocado or canola is a fine substitute.
3/4 cup (180g) pizza sauce or marinara
Use a thick sauce so the bear does not get soggy. If yours is watery, drain it in a fine mesh strainer for 5 minutes.
2 cups (225g) shredded low-moisture mozzarella
Low-moisture melts without pooling grease. Fresh mozzarella tastes great but will make the center soupy, so pat it dry if you use it.
24 slices pepperoni, plus extra for cheeks
Turkey pepperoni is a lighter swap and crisps just as nicely. Cut some into half-moons for ears and cheeks.
1/4 cup sliced black olives
These become the eyes and nose. Canned sliced olives are perfect, just drain and pat dry so they stay put.
1/2 small red bell pepper, cut into thin strips
Makes a cute mouth or bow. Green or yellow pepper works too, pick whatever color your bear deserves.
1/4 cup (30g) grated Parmesan, for sprinkling
Adds a salty finish and helps the edges crisp. Pecorino Romano is a punchier swap.
Tips & Tricks
Do Not Overload The Center
Keep sauce and cheese thin in the middle of the bear face, or the heavy toppings will sink and make a soggy belly.
Chill The Dough Before Shaping
Ten minutes in the fridge firms the dough so ears hold their round shape instead of slumping into the face.
Press Toppings In Gently
Give olives and pepperoni a tiny push into the cheese so they do not slide off when you move the pizza to the oven.
Bake On A Hot Surface
A preheated pizza stone or an upside-down sheet pan gives you a crisp bottom without any special equipment.
Pro Tips
Step-by-Step Instructions
1. Bloom The Yeast
Whisk the warm water, sugar, and yeast in a large bowl and let it sit 5 to 10 minutes until foamy. If it never foams, your yeast is dead, so start over with a fresh packet.
2. Mix And Knead
Stir in the flour, salt, and olive oil until a shaggy dough forms, then knead on a floured counter for 6 to 8 minutes until smooth and slightly tacky. The dough is ready when it springs back slowly when you poke it.
3. Let It Rise
Lightly oil a bowl, drop in the dough, cover, and let it rise in a warm spot for 60 to 90 minutes until doubled. A cold kitchen just means a longer rise, so be patient.
4. Preheat And Prep
Preheat your oven to 475F (245C) with a pizza stone or upside-down sheet pan inside for at least 20 minutes. Line a second sheet with parchment and set out all your toppings.
5. Shape The Bears
Divide the dough into 6 equal balls, then pinch off a small piece from each for the ears. Roll each large ball into a 5-inch round and each small piece into a 1-inch ball.
6. Build The Faces
Spread 2 tablespoons of sauce on each round, leaving a 1/2-inch border, then scatter 1/3 cup mozzarella over the top. Press two olive slices on for eyes, one for the nose, and add a pepper strip mouth.
7. Add Ears And Pepperoni
Dip the bottom of each ear ball in water and press it onto the top edge of the head so it sticks. Lay pepperoni slices on the cheeks and around the face, then sprinkle with Parmesan.
8. Bake Until Golden
Slide the bears onto the hot stone or pan and bake 10 to 13 minutes, until the crust is golden brown and the cheese is bubbling at the edges. The internal crust should read about 200F (93C) if you want to be exact.
9. Cool And Serve
Let the bears rest 3 minutes on the pan so the cheese sets, then transfer to plates and serve warm. Add a tiny pepper bow on top for extra charm if you like.
Delicious Variations
Veggie Garden Bears
Skip the pepperoni and use mushroom slices, cherry tomato halves, and spinach leaves for the face and belly.
BBQ Chicken Bears
Swap the marinara for barbecue sauce and top with shredded rotisserie chicken and red onion for a smoky twist.
Breakfast Bears
Use a white gravy base instead of sauce and top with scrambled egg, crumbled sausage, and cheddar for brunch.
How to Store Adorable Bear-Shaped Pizza 🍕🐻💖
Refrigerator
Store cooled bears in an airtight container in the fridge for up to 3 days. Reheat in a 350F (175C) oven for 6 to 8 minutes to bring the crust back to life.
Freezer
Freeze baked bears on a sheet pan until solid, then wrap each one tightly and freeze up to 2 months. Thaw overnight in the fridge before reheating.
Reheating
For the crispiest result, reheat on a sheet pan at 375F (190C) for 7 to 9 minutes. A microwave works in a pinch but the crust will soften.
Frequently Asked Questions
Q: Can I use store-bought pizza dough instead?
Yes, a 1-pound (450g) ball of store-bought dough makes exactly 6 bears. Let it come to room temperature for 20 minutes so it stretches without snapping back.
Grab your flour, call the kids, and build a batch of these adorable bear pizzas this week. Snap a photo of your cutest bear and tag me so I can see those little faces, and remember, Cook smart, eat happy.

Adorable Bear-Shaped Pizza 🍕🐻💖
Adorable Bear-Shaped Pizza turns pizza night into a giggly family event with fluffy homemade dough, melty mozzarella, and cute bear faces kids devour.
🧂 Ingredients
- 2 1/4 cups (280g) all-purpose flour, plus extra for dusting
- 1 packet (2 1/4 tsp / 7g) active dry yeast
- 1 cup (240ml) warm water, about 110F (43C)
- 1 tbsp (13g) granulated sugar
- 1 tsp (6g) fine sea salt
- 2 tbsp (28g) olive oil, plus more for the bowl
- 3/4 cup (180g) pizza sauce or marinara
- 2 cups (225g) shredded low-moisture mozzarella
- 24 slices pepperoni, plus extra for cheeks
- 1/4 cup sliced black olives
- 1/2 small red bell pepper, cut into thin strips
- 1/4 cup (30g) grated Parmesan, for sprinkling
📋 Instructions
- 1Bloom The Yeast — Whisk the warm water, sugar, and yeast in a large bowl and let it sit 5 to 10 minutes until foamy. If it never foams, your yeast is dead, so start over with a fresh packet.
- 2Mix And Knead — Stir in the flour, salt, and olive oil until a shaggy dough forms, then knead on a floured counter for 6 to 8 minutes until smooth and slightly tacky. The dough is ready when it springs back slowly when you poke it.
- 3Let It Rise — Lightly oil a bowl, drop in the dough, cover, and let it rise in a warm spot for 60 to 90 minutes until doubled. A cold kitchen just means a longer rise, so be patient.
- 4Preheat And Prep — Preheat your oven to 475F (245C) with a pizza stone or upside-down sheet pan inside for at least 20 minutes. Line a second sheet with parchment and set out all your toppings.
- 5Shape The Bears — Divide the dough into 6 equal balls, then pinch off a small piece from each for the ears. Roll each large ball into a 5-inch round and each small piece into a 1-inch ball.
- 6Build The Faces — Spread 2 tablespoons of sauce on each round, leaving a 1/2-inch border, then scatter 1/3 cup mozzarella over the top. Press two olive slices on for eyes, one for the nose, and add a pepper strip mouth.
- 7Add Ears And Pepperoni — Dip the bottom of each ear ball in water and press it onto the top edge of the head so it sticks. Lay pepperoni slices on the cheeks and around the face, then sprinkle with Parmesan.
- 8Bake Until Golden — Slide the bears onto the hot stone or pan and bake 10 to 13 minutes, until the crust is golden brown and the cheese is bubbling at the edges. The internal crust should read about 200F (93C) if you want to be exact.
- 9Cool And Serve — Let the bears rest 3 minutes on the pan so the cheese sets, then transfer to plates and serve warm. Add a tiny pepper bow on top for extra charm if you like.

Elena focuses on healthy cooking and meal prep for people with limited time and budget. She shares flexible recipes and shortcuts that don’t sacrifice flavor.


