

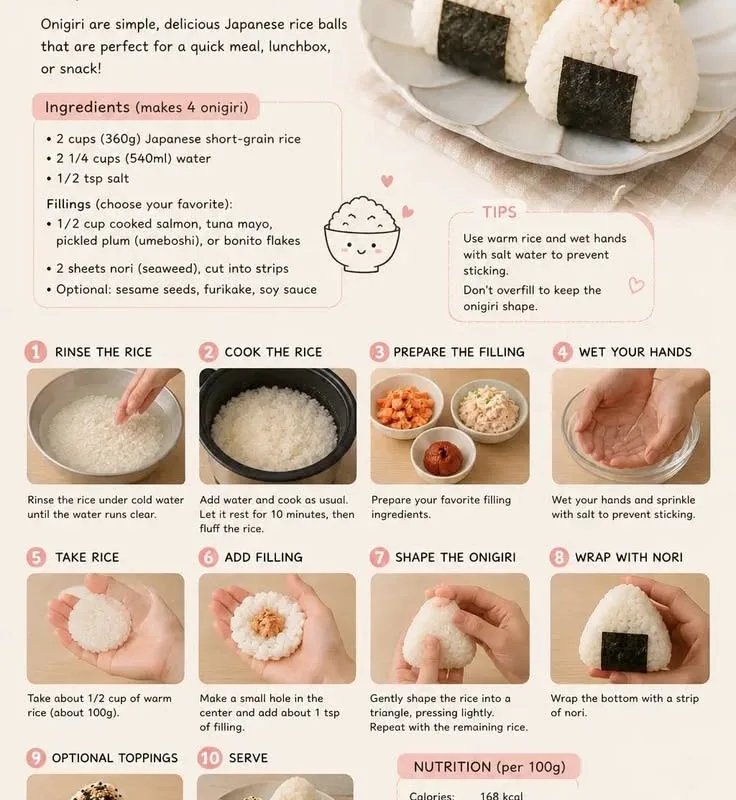
The first time I made onigiri, I stood at my kitchen counter at ten at night, palms slick with water, trying to coax warm rice into a neat triangle. It kept collapsing. I laughed, ate the evidence, and tried again. That is the beautiful thing about onigiri recipes: they forgive you. The rice is sticky enough to hold, the fillings are whatever you love, and even the lopsided ones taste wonderful.
Advertisements1
Onigiri are Japan's original portable meal, and once you learn the rhythm of wet hands, warm rice, and a little salt, you will wonder why you ever bought packaged snacks. They travel beautifully in lunch boxes, they freeze like a dream, and they cost pennies to make. Have you ever noticed how shaping rice with your hands feels almost meditative? It slows you down. That is part of the gift.
Below I share three onigiri recipes in one method: classic tuna mayo, a bright umeboshi version, and a crispy pan-seared one that gets golden on the outside. Start with one, then let your fridge guide you. Small, gradual changes are how confidence grows.
Why You'll Love This Recipe
About the Ingredients
3 cups (600g) cooked short-grain Japanese rice, still warm
Short-grain rice is essential because its stickiness holds the shape; if you only have medium-grain, add 1 tablespoon extra water when cooking. Cook it fresh and use it warm, since cold rice will not bind.
2 tablespoons (30ml) rice vinegar
A gentle splash seasons the rice and helps it stay fresh longer; substitute apple cider vinegar in a pinch, though it is slightly sweeter. Look for plain unseasoned rice vinegar, not sushi seasoning, which already contains sugar.
1 teaspoon (6g) fine sea salt, plus more for hands
Fine salt dissolves evenly into the rice; avoid coarse flakes for the hand-water bowl since they feel gritty. Kosher salt works if you crush it slightly between your fingers first.
1 can (5 oz / 142g) tuna in water, drained well
Squeeze the tuna in a paper towel until it feels dry, or the filling will weep into the rice. Canned salmon or leftover flaked cooked fish substitutes beautifully.
2 tablespoons (28g) Japanese mayonnaise
Japanese mayo (Kewpie) is richer and tangier than American mayo; if using regular mayonnaise, add a tiny squeeze of lemon juice. Do not skip draining the tuna before mixing.
1 teaspoon (5g) soy sauce
Use low-sodium soy sauce so the filling does not overpower the rice; tamari is a good gluten-free swap. Add it a few drops at a time and taste as you go.
4 umeboshi pickled plums, pitted and chopped
Umeboshi are intensely salty and sour, so a little goes far; if you cannot find them, chopped pickled cucumber or a dab of miso works as a tangy stand-in. Buy them refrigerated in vacuum packs for the best flavor.
2 sheets (5g) nori seaweed, cut into 1-inch strips
Nori adds a savory snap and keeps your fingers from sticking; toast it briefly over a flame if it feels limp. Pre-cut snack nori is a convenient shortcut.
1 teaspoon (5ml) toasted sesame oil, for the pan-seared version
Toasted sesame oil brings a nutty aroma that plain oil cannot; use a neutral oil if you dislike the intensity. A light coating is all you need, since too much makes the rice greasy.
1 tablespoon (9g) toasted sesame seeds, optional
Toast them in a dry pan for 60 seconds if they look pale, and they will smell nutty and warm. Black sesame seeds give a lovely visual contrast.
Tips & Tricks
Keep your hands wet, not dripping
Dip your palms in the salted water bowl and shake off the excess before each rice ball, because wet hands stop the rice from sticking without making it soggy.
Do not overpack the filling
A teaspoon of filling in the center is plenty; too much makes the rice ball split open when you shape it.
Shape while the rice is warm
Rice binds best between 140F and 160F (60C to 71C), so work in batches rather than letting the whole pot cool on the counter.
Salt the rice lightly, not heavily
A pinch of salt on your palms seasons each ball evenly; if you salt the whole pot, it is easy to overshoot.
Pro Tips
Step-by-Step Instructions
1. Cook and season the rice
Cook 3 cups of short-grain rice according to your rice cooker or package directions, then spread it in a wide bowl and fan it for 3 to 4 minutes until it stops steaming but is still warm. Sprinkle the rice vinegar and 1 teaspoon salt over it and fold gently with a rice paddle, cutting through the rice rather than stirring, so the grains stay whole.
2. Mix the tuna filling
Drain the tuna and squeeze it in a paper towel until it feels dry, then stir it with the Japanese mayonnaise and soy sauce in a small bowl. Taste it; it should be savory and just rich enough to feel like a treat, not heavy.
3. Set up your shaping station
Fill a small bowl with 1 cup (240ml) water and add a pinch of sea salt. Place the warm rice, the tuna filling, the chopped umeboshi, the nori strips, and the sesame seeds within arm's reach so you never have to hunt for anything with sticky hands.
4. Shape the first rice ball
Wet your palms, shake off the excess, and scoop about 1/2 cup (120g) of warm rice into one hand. Press a small well in the center with your thumb, add 1 teaspoon of tuna filling, and close the rice around it. Cup both hands and press gently into a triangle, rotating three or four times until the edges feel firm, about 30 seconds.
5. Make the umeboshi version
Repeat the same shaping method, tucking a small piece of chopped umeboshi into the center instead of tuna. Because umeboshi is so salty and sour, use only about 1/2 teaspoon per rice ball and taste the first one before making more.
6. Pan-sear for a crispy crust
For the crispy version, heat the toasted sesame oil in a nonstick skillet over medium heat, about 350F (177C), and add two plain rice balls. Cook for 3 to 4 minutes per side until the surface is golden brown and crisp, and listen for a gentle sizzle at the edges; the exterior should feel firm and lightly crusted when you tap it with a spatula.
7. Wrap with nori and finish
Wrap a strip of nori around the base of each rice ball, pressing it gently so it adheres, and sprinkle with toasted sesame seeds if you like. Serve right away while the rice is still warm and the nori is crisp.
8. Cool and store the rest
Let any rice balls you are not eating cool on a plate for 15 minutes, then wrap each one tightly in plastic wrap. This step matters because trapping steam while they are too hot makes the nori soggy and the rice gummy.
Delicious Variations
Salmon and Scallion
Flake 1/2 cup of leftover cooked salmon with a sliced scallion and a teaspoon of mayonnaise for a delicate, buttery filling.
Miso Mushroom
Saute 1 cup of chopped mushrooms with 1 teaspoon of white miso until jammy, then use a small spoonful as the center for a deeply savory vegetarian version.
Crispy Cheese Onigiri
Tuck a small cube of mozzarella in the center, then pan-sear in sesame oil until the outside is golden and the cheese pulls when you bite in.
How to Store Onigiri Recipes
Refrigerator
Wrap each rice ball tightly in plastic wrap and refrigerate for up to 2 days; let it come to room temperature or reheat before eating, since cold rice firms up and loses its tenderness.
Freezer
Wrap each rice ball individually in plastic wrap, place in a freezer bag, and freeze for up to 1 month; label the bag with the filling so you can tell them apart.
Reheating
Microwave a frozen rice ball wrapped in a damp paper towel for 90 seconds to 2 minutes on high, or until warm throughout, then add fresh nori; for pan-seared versions, reheat in a dry skillet over medium heat for 2 minutes per side.
Frequently Asked Questions
Q: What kind of rice is best for onigiri?
Short-grain Japanese rice is the best choice because its sticky texture holds the shape without falling apart. Medium-grain rice works in a pinch, but long-grain rice will not bind and is not recommended.
Q: Can I make onigiri without a mold?
Yes, you can shape onigiri entirely by hand or with plastic wrap. Wet your palms with salted water, cup the rice, and press gently into a triangle, rotating a few times until the edges firm up.
Q: How long does onigiri last?
Onigiri lasts about 2 days in the refrigerator when tightly wrapped, or up to 1 month in the freezer. Nori should be added fresh, since it softens quickly against warm rice.
Q: Why does my onigiri fall apart?
Onigiri usually falls apart because the rice is too cold or too dry, or because it was not pressed firmly enough. Use warm, freshly cooked rice and press gently but consistently, wetting your hands between each one.
Q: Is onigiri healthy?
Onigiri can be a balanced snack, since rice provides energy and fillings like tuna, salmon, or pickled plum add protein and flavor. Portion size and filling choice matter most, so keep mayonnaise-based fillings modest.
If you make these onigiri recipes, I would love to hear which filling became your favorite. Take your time with the first one, notice the warmth of the rice in your hands, and remember that a slightly lopsided rice ball still tastes like care. With kindness, Sofia

Onigiri Recipes
These onigiri recipes make tender Japanese rice balls with seasoned rice and savory fillings, a portable snack that costs pennies and keeps you full for hours.
🧂 Ingredients
- 3 cups (600g) cooked short-grain Japanese rice, still warm
- 2 tablespoons (30ml) rice vinegar
- 1 teaspoon (6g) fine sea salt, plus more for hands
- 1 can (5 oz / 142g) tuna in water, drained well
- 2 tablespoons (28g) Japanese mayonnaise
- 1 teaspoon (5g) soy sauce
- 4 umeboshi pickled plums, pitted and chopped
- 2 sheets (5g) nori seaweed, cut into 1-inch strips
- 1 teaspoon (5ml) toasted sesame oil, for the pan-seared version
- 1 tablespoon (9g) toasted sesame seeds, optional
📋 Instructions
- 1Cook and season the rice — Cook 3 cups of short-grain rice according to your rice cooker or package directions, then spread it in a wide bowl and fan it for 3 to 4 minutes until it stops steaming but is still warm. Sprinkle the rice vinegar and 1 teaspoon salt over it and fold gently with a rice paddle, cutting through the rice rather than stirring, so the grains stay whole.
- 2Mix the tuna filling — Drain the tuna and squeeze it in a paper towel until it feels dry, then stir it with the Japanese mayonnaise and soy sauce in a small bowl. Taste it; it should be savory and just rich enough to feel like a treat, not heavy.
- 3Set up your shaping station — Fill a small bowl with 1 cup (240ml) water and add a pinch of sea salt. Place the warm rice, the tuna filling, the chopped umeboshi, the nori strips, and the sesame seeds within arm's reach so you never have to hunt for anything with sticky hands.
- 4Shape the first rice ball — Wet your palms, shake off the excess, and scoop about 1/2 cup (120g) of warm rice into one hand. Press a small well in the center with your thumb, add 1 teaspoon of tuna filling, and close the rice around it. Cup both hands and press gently into a triangle, rotating three or four times until the edges feel firm, about 30 seconds.
- 5Make the umeboshi version — Repeat the same shaping method, tucking a small piece of chopped umeboshi into the center instead of tuna. Because umeboshi is so salty and sour, use only about 1/2 teaspoon per rice ball and taste the first one before making more.
- 6Pan-sear for a crispy crust — For the crispy version, heat the toasted sesame oil in a nonstick skillet over medium heat, about 350F (177C), and add two plain rice balls. Cook for 3 to 4 minutes per side until the surface is golden brown and crisp, and listen for a gentle sizzle at the edges; the exterior should feel firm and lightly crusted when you tap it with a spatula.
- 7Wrap with nori and finish — Wrap a strip of nori around the base of each rice ball, pressing it gently so it adheres, and sprinkle with toasted sesame seeds if you like. Serve right away while the rice is still warm and the nori is crisp.
- 8Cool and store the rest — Let any rice balls you are not eating cool on a plate for 15 minutes, then wrap each one tightly in plastic wrap. This step matters because trapping steam while they are too hot makes the nori soggy and the rice gummy.

Sofia writes about mindful living and personal wellness, exploring habits that nurture mental and physical health. She shares gentle, realistic suggestions for creating calm in a busy world.


