

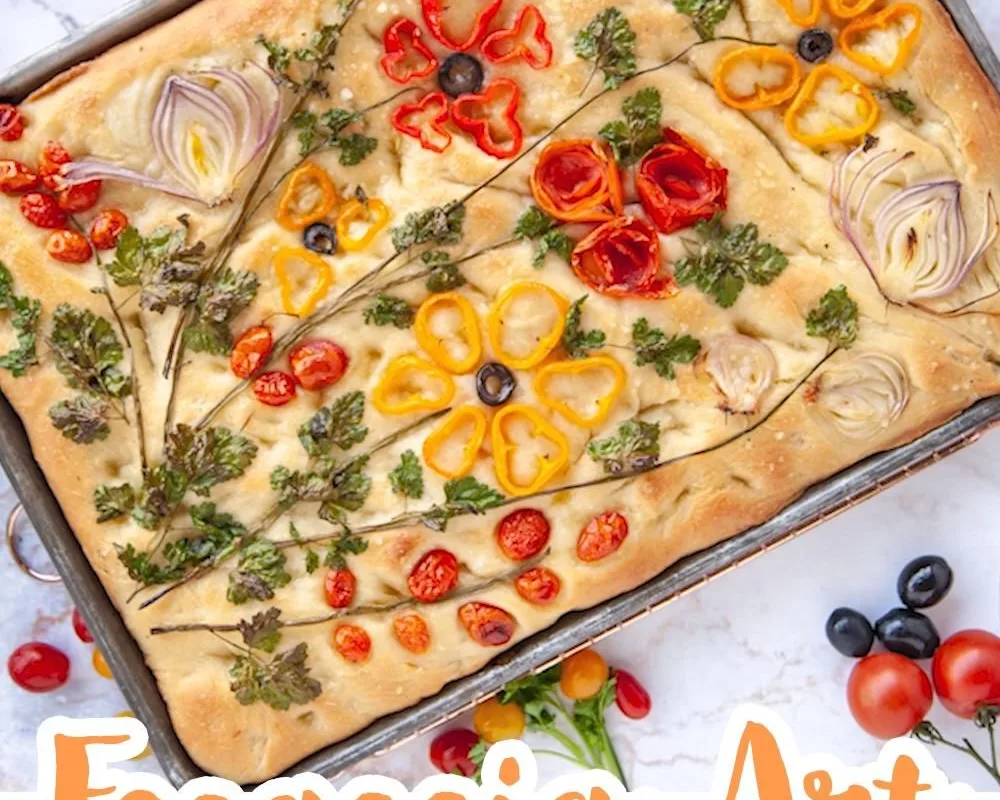
Focaccia bread art is the most fun you can have with a bowl of dough. You press peppers, cherry tomatoes, olives, and fresh herbs into dimpled, olive-oil-rich dough and bake it into an edible painting that steals the show at any table.
Advertisements1
The best part? The dough itself is practically foolproof. A simple flour, yeast, water, and olive oil mixture does all the hard work while you raid the fridge for colorful toppings. No fancy tools, no pastry skills, just a rimmed sheet pan and a little imagination.
I have made this loaf dozens of times for parties, potlucks, and lazy Sundays, and every single time someone gasps when it comes out of the oven. Let's build your masterpiece together.
Why You'll Love This Recipe
About the Ingredients
4 cups (500g) bread flour
Bread flour gives the chewiest crumb thanks to its higher protein. All-purpose flour works in a pinch, but add 2 tablespoons extra water since it absorbs less.
2 1/4 teaspoons (7g) active dry yeast
One standard packet. If yours is older than six months, proof it in the warm water first to be safe. Instant yeast can be used with no changes.
1 1/2 cups (360ml) warm water, about 110F (43C)
Think bathwater warm, not hot, or you will kill the yeast. Filtered water tastes noticeably better if your tap water is heavily chlorinated.
2 teaspoons fine sea salt
Salt flavors the dough and tightens the gluten. Do not skip it, and do not dump it directly onto the yeast before mixing.
1/4 cup (60ml) extra-virgin olive oil, plus more for the pan and drizzling
A fruity, peppery oil shines here since it is a major flavor player. Save the expensive finishing oil for drizzling after baking.
3 cloves garlic, thinly sliced
Fresh garlic is best, but 1 teaspoon garlic powder stirred into the oil works as a shortcut. Watch sliced garlic so it does not burn.
1 cup (150g) cherry tomatoes, halved
Halve them so they roast instead of bursting. Grape tomatoes or small sweet peppers are great swaps.
1/2 cup (75g) mixed bell pepper strips
Thin strips curl into pretty shapes as they bake. Jarred roasted red peppers are a delicious, time-saving substitute.
1/3 cup (50g) pitted Kalamata olives, sliced
Their briny punch balances the sweet tomatoes. Green olives, capers, or chopped sun-dried tomatoes all work beautifully.
1/4 cup fresh basil and rosemary leaves
Rosemary holds up in the oven while basil is best added after baking. Dried herbs work too: use 1 teaspoon each.
2 tablespoons flaky sea salt, for finishing
Flaky salt adds a crunchy sparkle on top. Coarse kosher salt is a fine substitute, just use a lighter hand.
Tips & Tricks
Do not rush the rise
Let the dough double in a warm spot, about 1 to 2 hours, or the crumb will be dense and tough.
Pat toppings dry
Wet vegetables steam and make the surface soggy, so blot tomatoes and peppers with a paper towel first.
Dimple with oiled fingers
Press straight down to the pan to create pools that catch olive oil and turn golden and crisp.
Pro Tips
Step-by-Step Instructions
1. Bloom the yeast
Whisk the warm water and yeast in a large bowl and let it sit 5 to 10 minutes until foamy. If nothing happens, your yeast is dead, so grab a fresh packet.
2. Mix the dough
Stir in the flour, fine sea salt, and 2 tablespoons of the olive oil until a shaggy dough forms. It will look rough and sticky, which is exactly right.
3. Knead until smooth
Knead on a floured surface 8 to 10 minutes until the dough is smooth, elastic, and springs back when poked. A stand mixer with a dough hook takes about 5 minutes.
4. Let it rise
Place the dough in an oiled bowl, cover, and let it rise in a warm spot 1 to 2 hours until doubled. It is ready when it looks puffy and holds a gentle fingerprint.
5. Stretch into the pan
Coat a 9×13-inch rimmed pan with 2 tablespoons olive oil, stretch the dough to fit, and let it relax 20 minutes if it snaps back. Dimple all over with oiled fingertips.
6. Decorate your art
Arrange tomatoes, peppers, olives, garlic, and rosemary into flowers, gardens, or abstract designs, pressing each piece gently into the dough. Sprinkle with flaky salt and drizzle with olive oil.
7. Bake until golden
Bake at 425F (220C) for 22 to 28 minutes until deeply golden, the edges are crisp, and the surface sounds hollow when tapped. An instant-read thermometer in the center should read 200F (93C).
8. Finish and serve
Slide the focaccia onto a rack, scatter with fresh basil, and drizzle with olive oil. Cool 10 minutes before slicing so the crumb sets.
Delicious Variations
Mediterranean Garden
Use artichoke hearts, sun-dried tomatoes, feta crumbles, and oregano for a Greek-inspired loaf.
Spicy Pepper Patch
Layer thin jalapeno rings, roasted red peppers, and smoked paprika oil for a bold, fiery version.
Sweet Berry Canvas
Skip the garlic and top with halved strawberries, thyme, and a honey drizzle for a dessert-style focaccia.
How to Store Focaccia Bread Art Recipe
Refrigerator
Store sliced focaccia in an airtight container at room temperature up to 2 days; refrigerate up to 5 days and refresh in the oven.
Freezer
Wrap whole or sliced focaccia tightly in foil, then freeze up to 3 months. Thaw at room temperature for 2 hours before warming.
Reheating
Warm at 350F (175C) for 8 to 10 minutes until the crust crisps back up; a skillet with a lid works great for single slices.
Frequently Asked Questions
Q: Can I make focaccia bread art ahead of time?
Yes, you can decorate the dough and refrigerate it covered for up to 12 hours before baking. Let it sit at room temperature 30 minutes while the oven preheats, then bake as directed. This is a great way to serve fresh bread at brunch without waking up at dawn.
Q: Why is my focaccia doughy in the middle?
Underbaking is almost always the culprit, so bake until the internal temperature hits 200F (93C). Too many wet toppings or a too-thick layer of dough can also cause sogginess. Pat your vegetables dry and stretch the dough evenly across the pan.
Q: What vegetables work best for bread art?
Firm, low-moisture vegetables like cherry tomatoes, bell peppers, olives, red onion, and zucchini hold their shape beautifully. Avoid watery vegetables like cucumber or raw mushrooms unless you roast them first. Fresh rosemary, thyme, and basil add color and fragrance.
Q: Can I use all-purpose flour instead of bread flour?
Absolutely, all-purpose flour makes a slightly softer focaccia that still tastes wonderful. Reduce the water by about 2 tablespoons since it absorbs less liquid. The rise may be a touch less dramatic, but the flavor will be just as good.
Q: How do I get a crispy bottom on focaccia?
Generously oil a dark metal pan and bake on the lower rack so the bottom gets direct heat. The oil essentially fries the crust as it bakes into a golden, crackly layer. Letting the baked loaf cool on a rack instead of the pan keeps it crisp too.
Grab your sheet pan, raid the vegetable drawer, and make a focaccia that is too pretty to eat (but too delicious not to). Snap a photo of your bread art and tag me so I can cheer you on. Cook smart, eat happy.

Focaccia Bread Art Recipe
This focaccia bread art recipe turns simple dough into a stunning edible garden of vegetables and herbs that tastes as good as it looks.
🧂 Ingredients
- 4 cups (500g) bread flour
- 2 1/4 teaspoons (7g) active dry yeast
- 1 1/2 cups (360ml) warm water, about 110F (43C)
- 2 teaspoons fine sea salt
- 1/4 cup (60ml) extra-virgin olive oil, plus more for the pan and drizzling
- 3 cloves garlic, thinly sliced
- 1 cup (150g) cherry tomatoes, halved
- 1/2 cup (75g) mixed bell pepper strips
- 1/3 cup (50g) pitted Kalamata olives, sliced
- 1/4 cup fresh basil and rosemary leaves
- 2 tablespoons flaky sea salt, for finishing
📋 Instructions
- 1Bloom the yeast — Whisk the warm water and yeast in a large bowl and let it sit 5 to 10 minutes until foamy. If nothing happens, your yeast is dead, so grab a fresh packet.
- 2Mix the dough — Stir in the flour, fine sea salt, and 2 tablespoons of the olive oil until a shaggy dough forms. It will look rough and sticky, which is exactly right.
- 3Knead until smooth — Knead on a floured surface 8 to 10 minutes until the dough is smooth, elastic, and springs back when poked. A stand mixer with a dough hook takes about 5 minutes.
- 4Let it rise — Place the dough in an oiled bowl, cover, and let it rise in a warm spot 1 to 2 hours until doubled. It is ready when it looks puffy and holds a gentle fingerprint.
- 5Stretch into the pan — Coat a 9×13-inch rimmed pan with 2 tablespoons olive oil, stretch the dough to fit, and let it relax 20 minutes if it snaps back. Dimple all over with oiled fingertips.
- 6Decorate your art — Arrange tomatoes, peppers, olives, garlic, and rosemary into flowers, gardens, or abstract designs, pressing each piece gently into the dough. Sprinkle with flaky salt and drizzle with olive oil.
- 7Bake until golden — Bake at 425F (220C) for 22 to 28 minutes until deeply golden, the edges are crisp, and the surface sounds hollow when tapped. An instant-read thermometer in the center should read 200F (93C).
- 8Finish and serve — Slide the focaccia onto a rack, scatter with fresh basil, and drizzle with olive oil. Cool 10 minutes before slicing so the crumb sets.

Elena focuses on healthy cooking and meal prep for people with limited time and budget. She shares flexible recipes and shortcuts that don’t sacrifice flavor.


