

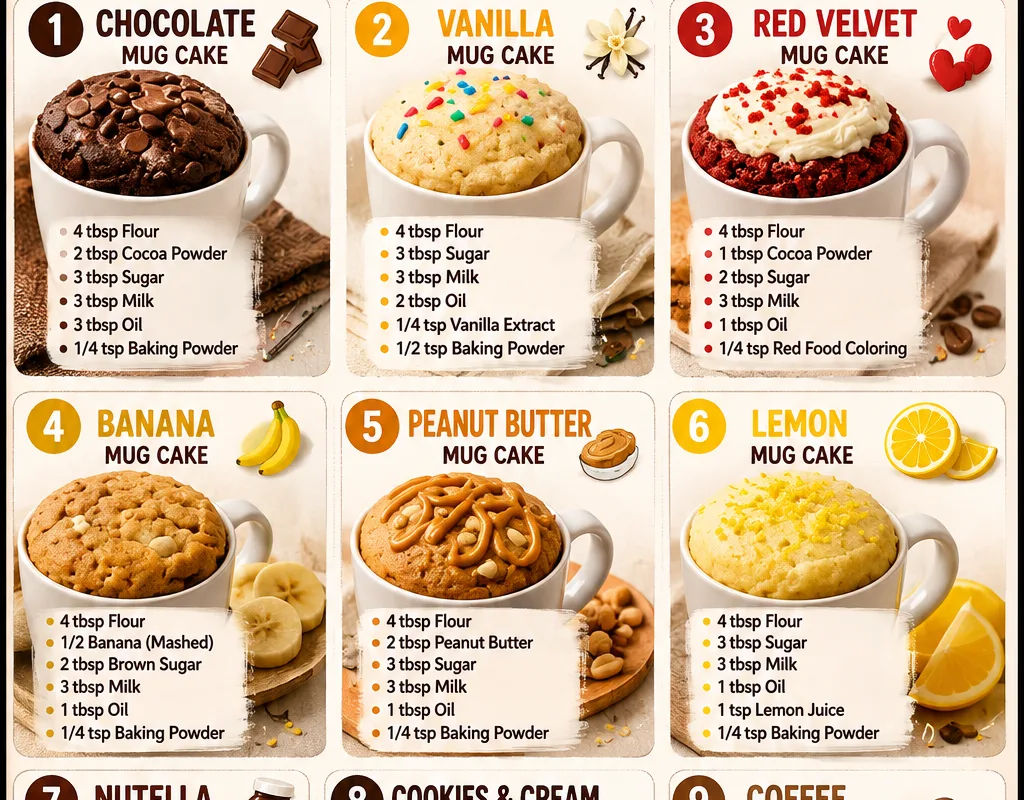
Nine mug cakes. One mug, one spoon, and a microwave that most people still treat like a reheating box instead of an oven. That is the whole pitch, and it is a good one.
Advertisements1
Here is the part the pretty videos skip: mug cake fails for exactly three reasons. Too much liquid, too much leavening, or a microwave running at a power level nobody checked. Fix those and you get a real dessert in 90 seconds. Ignore them and you get a rubber puck with a molten center of regret.
Below are nine flavors built on one master ratio, so once you learn the base you can improvise. Every single one is cooked at the same setting, and I tell you exactly what it should look like when it is done.
Why You'll Love This Recipe
About the Ingredients
1/4 cup (30g) all-purpose flour
This is the structural backbone of every mug cake here. For gluten-free, swap in a 1:1 baking blend, not almond flour, which turns gummy in the microwave.
2 tablespoons (25g) granulated sugar
Fine white sugar dissolves fastest in a 90-second cook. Brown sugar works but adds moisture, so cut the milk by 1 teaspoon if you use it.
1/4 teaspoon baking powder
Freshness matters more than brand. Test yours by dropping a pinch in hot water; if it does not fizz, it is dead and your cake will be dense.
1/8 teaspoon fine salt
Do not skip it. A tiny pinch is what keeps a sweet microwave cake from tasting flat and one-note.
3 tablespoons (45ml) whole milk
Whole milk gives the best crumb; oat and soy milk work 1:1. Cold milk straight from the fridge is fine, no need to warm it.
2 tablespoons (28g) unsalted butter, melted
Melt it and let it cool 1 minute so it does not cook the egg. Neutral oil, about 1 1/2 tablespoons, is an easy swap and keeps the cake moist longer.
1 large egg (about 50g)
One egg is the whole binder for this single serving. If you want it eggless, use 3 tablespoons of applesauce plus 1/4 teaspoon extra baking powder.
1/2 teaspoon vanilla extract
Real extract, not imitation, if you can. It is the difference between tasting like cake and tasting like a candle.
2 tablespoons (11g) unsweetened cocoa powder, for the chocolate versions
Dutch-process cocoa gives a darker, smoother flavor; natural cocoa gives a brighter, more acidic bite. Sift it or you will get dry pockets.
2 tablespoons (30g) chocolate chips or chopped chocolate, for the molten versions
Chips hold their shape and give a clean molten center; chopped bar chocolate melts into a gooey pool. Either is correct, pick your texture.
Tips & Tricks
Stop Overmixing
Stir just until the flour streaks disappear. Overmixing develops gluten and you get a chewy, rubbery sponge instead of cake.
Check Your Microwave Wattage
Most recipes assume 1000W. If yours is 700W or 1200W, the cook time shifts by 15 to 20 seconds, so watch the first one closely.
Use a Wide Mug
A tall narrow mug traps steam and the center stays raw while the top dries out. A 12-ounce mug with straight sides is the sweet spot.
Do Not Fill Past Halfway
The cake rises roughly double. Filling a small mug three-quarters full is the fastest route to a microwave cleanup job.
Pro Tips
Step-by-Step Instructions
1. Whisk the dry base
In your mug, whisk together the flour, sugar, baking powder, salt, and cocoa if using, until no lumps remain. Doing this dry first is what prevents the flour pockets you get from dumping everything in at once.
2. Add the wet ingredients
Pour in the milk, melted butter, egg, and vanilla. Stir with a fork for about 20 seconds, just until the batter is smooth and no dry flour is visible on the bottom.
3. Fold in the add-ins
Drop in chocolate chips, berries, or nut butter and give it two or three folds. For a molten center, push the chocolate into the middle of the batter rather than stirring it through.
4. Microwave on high
Cook on high power (1000W) for 70 to 90 seconds. The cake is done when the top is set, the edges pull slightly from the mug, and the surface looks matte rather than wet and shiny.
5. Check and finish in bursts
If the center still looks glossy, microwave in 10-second bursts. Stop the moment it looks set; an internal read of about 200F (93C) at the center means it is fully cooked.
6. Rest, then eat
Let the mug sit on the counter for 1 minute. The center finishes setting, the crumb tightens, and it will not burn your mouth on the first bite.
7. Top and serve
Add whipped cream, a scoop of vanilla ice cream, or a dusting of powdered sugar. Eat it straight from the mug with a spoon while it is still warm.
Delicious Variations
Molten Chocolate
Push 2 tablespoons of chocolate chips into the center and pull it at 70 seconds for a lava core.
Lemon Blueberry
Skip the cocoa, add 1 teaspoon lemon zest and 2 tablespoons fresh blueberries, and cook 85 seconds.
Peanut Butter Banana
Mash 2 tablespoons banana into the wet mix, swirl in 1 tablespoon peanut butter, and cut the sugar to 1 tablespoon.
How to Store 9 Easy Mug Cake Recipes for Every Sweet Craving 🍰☕
Refrigerator
Mug cakes are best fresh, but you can cover and refrigerate a cooled one up to 2 days. It will firm up considerably.
Freezer
Not recommended. Microwave cakes freeze into a spongy, watery texture once thawed, so make them fresh instead.
Reheating
Sprinkle with a teaspoon of water, cover loosely, and microwave 20 to 30 seconds. It will not fully return to fresh texture, but it stays edible.
Frequently Asked Questions
Q: Why is my mug cake rubbery?
Overmixing and overcooking are the two causes, almost every time. Stir only until the flour disappears and stop the microwave the second the top looks set, not dry.
Q: Can I make a mug cake without eggs?
Yes, use 3 tablespoons of applesauce or half a mashed banana in place of the egg, plus an extra 1/4 teaspoon of baking powder. Expect a slightly denser, more pudding-like crumb.
Q: How many watts should my microwave be for a mug cake?
Around 1000 watts is the standard the 70 to 90 second timing is built around. If yours is 700W, add 20 to 30 seconds; if it is 1200W, start checking at 60 seconds.
Q: Can I make a mug cake in the oven instead?
Yes, bake it in an oven-safe ramekin at 350F (175C) for 14 to 17 minutes. It comes out with a better crust, but you lose the whole 90-second appeal.
Q: Why does my mug cake taste like flour?
You likely under-mixed the dry ingredients or used too little salt and vanilla. Whisk the dry base first and never skip the salt; it is what makes the flour taste disappear.
Pick one flavor, grab your widest mug, and make it tonight. Then make the chocolate one tomorrow and tell me which won. Stay sharp, stay private.

9 Easy Mug Cake Recipes for Every Sweet Craving 🍰☕
9 Easy Mug Cake Recipes for Every Sweet Craving: one bowl, one mug, 90 seconds in the microwave, real cake texture every single time.
🧂 Ingredients
- 1/4 cup (30g) all-purpose flour
- 2 tablespoons (25g) granulated sugar
- 1/4 teaspoon baking powder
- 1/8 teaspoon fine salt
- 3 tablespoons (45ml) whole milk
- 2 tablespoons (28g) unsalted butter, melted
- 1 large egg (about 50g)
- 1/2 teaspoon vanilla extract
- 2 tablespoons (11g) unsweetened cocoa powder, for the chocolate versions
- 2 tablespoons (30g) chocolate chips or chopped chocolate, for the molten versions
📋 Instructions
- 1Whisk the dry base — In your mug, whisk together the flour, sugar, baking powder, salt, and cocoa if using, until no lumps remain. Doing this dry first is what prevents the flour pockets you get from dumping everything in at once.
- 2Add the wet ingredients — Pour in the milk, melted butter, egg, and vanilla. Stir with a fork for about 20 seconds, just until the batter is smooth and no dry flour is visible on the bottom.
- 3Fold in the add-ins — Drop in chocolate chips, berries, or nut butter and give it two or three folds. For a molten center, push the chocolate into the middle of the batter rather than stirring it through.
- 4Microwave on high — Cook on high power (1000W) for 70 to 90 seconds. The cake is done when the top is set, the edges pull slightly from the mug, and the surface looks matte rather than wet and shiny.
- 5Check and finish in bursts — If the center still looks glossy, microwave in 10-second bursts. Stop the moment it looks set; an internal read of about 200F (93C) at the center means it is fully cooked.
- 6Rest, then eat — Let the mug sit on the counter for 1 minute. The center finishes setting, the crumb tightens, and it will not burn your mouth on the first bite.
- 7Top and serve — Add whipped cream, a scoop of vanilla ice cream, or a dusting of powdered sugar. Eat it straight from the mug with a spoon while it is still warm.

Lucas covers technology and digital privacy, explaining complex topics in plain language for non-techies. He focuses on how everyday people can protect their data without being paranoid.


